- First of all, we need a SharePoint list. Below is the list, I had created. It has 8 columns.
- Now, the objective is that I wish to export any combination of columns-
- ID, Title, First Name, Last Name
- ID, First Name, Date Of Joining, Salary, Designation
- ID, Full Name (First Name + Last Name), Designation
- As we can see in above examples, the number of column as well as the columns itself are not fixed. Till now, we were creating a defined template which is having a table with columns and using it to export the data. This approach will not work here.
- Microsoft had given solution for this problem as well. Let's begin-
- Create a document library in Site Assets or the Documents library. Let say "ExcelFiles".
- Now create a blank excel file and save it with name "EmployeesData.xlsx".
- Upload this file in "ExcelFiles" folder.
- Now, open the Power Automate maker portal and create a new Instant cloud flow with flow name as "POC-ExportExcelDynamic" and trigger condition "PowerApps".
- Add a variable that will interact with PowerApps to get the column names.
- Save the flow and keep saving the flow at regular interval during the flow writing.
- Now, to create the table in excel dynamically, we should know the number of columns that are going to be created and based upon the count, the Excel cell address. As we know, that excel works upon cell address. Columns are defined as A, B, C, .... while rows are defined as 1, 2, 3, ...
- So, for the first row the first cell address is A1, second cell address is B1 and so on.
- Similarly, for the second row the first cell address is A2, second cell address is B2 and so on.
- Similarly, table is also dependent upon cells. For a 3 column table, the header address will be A1 -> C1. For a 4 column table, it will be A1 -> D1.
- However, there is no direct method to get the respective address of cell using the count. Here, we have to apply some trick. We will use an excel file to get the series of the address based upon count. Excel has provided "ADDRESS" function. Here is the excel.
- We have to create a JSON and will use the same. Here is the JSON.
[ { "ColumnNo": 1, "ColumnAddress": "A1" }, { "ColumnNo": 2, "ColumnAddress": "B1" }, { "ColumnNo": 3, "ColumnAddress": "C1" }, { "ColumnNo": 4, "ColumnAddress": "D1" }, { "ColumnNo": 5, "ColumnAddress": "E1" }, { "ColumnNo": 6, "ColumnAddress": "F1" }, { "ColumnNo": 7, "ColumnAddress": "G1" }, { "ColumnNo": 8, "ColumnAddress": "H1" }, { "ColumnNo": 9, "ColumnAddress": "I1" }, { "ColumnNo": 10, "ColumnAddress": "J1" }, { "ColumnNo": 11, "ColumnAddress": "K1" }, { "ColumnNo": 12, "ColumnAddress": "L1" }, { "ColumnNo": 13, "ColumnAddress": "M1" }, { "ColumnNo": 14, "ColumnAddress": "N1" }, { "ColumnNo": 15, "ColumnAddress": "O1" }, { "ColumnNo": 16, "ColumnAddress": "P1" }, { "ColumnNo": 17, "ColumnAddress": "Q1" }, { "ColumnNo": 18, "ColumnAddress": "R1" }, { "ColumnNo": 19, "ColumnAddress": "S1" }, { "ColumnNo": 20, "ColumnAddress": "T1" }, { "ColumnNo": 21, "ColumnAddress": "U1" }, { "ColumnNo": 22, "ColumnAddress": "V1" }, { "ColumnNo": 23, "ColumnAddress": "W1" }, { "ColumnNo": 24, "ColumnAddress": "X1" }, { "ColumnNo": 25, "ColumnAddress": "Y1" }, { "ColumnNo": 26, "ColumnAddress": "Z1" }, { "ColumnNo": 27, "ColumnAddress": "AA1" }, { "ColumnNo": 28, "ColumnAddress": "AB1" } ]
- You may create as many as column numbers you want. Ideally, keep it "Total Number of Columns in list + 10" so that in case, if one or 2 columns got added later on in the list, it will not impact your flow.
- Now, add an action called Parse JSON in flow and paste this JSON in Content as well as use this JSN to create schema "Generate from sample".
- Now, we have the columns list that were passed through PowerApps and we have the mapping structure of Column Number vs Cell Address.
- Add another action called "Filter array".
- Here we will filter the JSON to find the corresponding cell address row (Column Address property in JSON) using the count of columns passed through PowerApps.
- It will give us the item which is having ColumnNo property equals to the total number of columns received from PowerApps.
- Now, we will fetch the ColumnAddress property from this output. So, add another called "Compose".
- The first part is completed. Now, add an action called "Copy file". We will create a copy of the excel template.
- Remember to select "Copy with a new name" option in dropdown which is asking the further course of action "If another file is already there".
- Now, here the climax part of the flow. Microsoft have given a unique feature to create table on the fly. Add an action "Create table".
- Provide the input as shown below. The starting range is fixed to A1, followed by a colon ":". The table range can be "Absolute", "Partial Relative" or "Relative". Make sure, whatever you are choosing, both cell address must be in same format. Here, I had chosen, "Relative"
- You may give the table name as per your wish. I had given "SearchResults". You may define a variable for the Table Name as well in the beginning because, this table name is going to be used at two places, therefore, to avoid any misspell, you may use variable.
- This was the second part.
- The last part is adding items to table.
- Add an action called "Get Items".
- Next, we will use the "Select" to transform the data as per our requirement. For an example, if we wish to add another column "Full Name", we can do here by using "concat" function. Remember, the name of column at left side in mapping must be exactly the same as we are expecting to get receive from PowerApps.
- So, add "Select" action.
- I had used "concat" function to join First Name & Last Name. Also, I used "formatDateTime" function to apply formating upon Date Of Joining.
- Now, use "Apply to each" action to add this data to excel table.
- Add an action "Apply to each".
- Now, add "Add row into a table" action inside this "Apply to each" action.
- It's all done.
- Now, If you wish to send this excel as attachment or send the link of the file, you can add further actions that will fulfil the requirements. These all, we have already discussed in our previous posts.
- Save the flow and test it.
- Let's check for our first set of columns mentioned in the beginning of the post. Remember, column names should be separated either by comma or semicolon and should not have leading or trailing spaces.
- ID,Title,First Name,Last Name [Correct Format]
- ID;Title;First Name;Last Name [Correct Format]
- ID, Title,First Name , Last Name [In-Correct Format]
- Click on "Test" >> "Manually" >> "Test". It will show the Run window and asking for Column names.
- Give the input as "ID,Title,First Name,Last Name" and click on Run.
- Wait for the flow to complete it's execution. It got succeeded.
- Check the SharePoint library. The file got created with name as "EmployeesData1.xlsx".
- Here we go. The is there.
- Now let's try with custom column
- ID,Full Name,Designation,Date Of Joining,Salary,Experience
- Here we go. This also tested successfully.
- This is how, you can create Excel Tables dynamically with any number of columns. However, you can create the file on the runtime but for that, you need to include the OneDrive connection. Ultimately, you are creating a file then copying it. Means one more step. Therefore, we avoided that. Keeping a blank file is far better than to include one more connection and adding one more step.
Friday, September 23, 2022
Power Automate: Export To Excel With Dynamic Table & Columns Creation
Sunday, January 16, 2022
Power Automate: Useful HTTP Request Actions Part 4
Hello Friends,
Welcome back with another post on Power Automate. This post is in continuation to one of my earlier post(s) on different ways we can use HTTP request action (Send an HTTP request to SharePoint) in Power Automate to get different kind of information. I will be adding more and more options in this post from time to time. Below is the link of earlier post(s)-
- Power Automate: Useful HTTP Request Actions Part 1
- Power Automate: Useful HTTP Request Actions Part 2
- Power Automate: Useful HTTP Request Actions Part 3
- Create SharePoint List
- Create Column(s)
- Update Column(s) Display Name
- Read Excel And Insert Data
- Our process will divide into following steps-
- Create SharePoint List
- Create/Rename Columns In List
- Read Excel from Document Library
- Add Items from Excel into SharePoint list
- Create SharePoint List-
- First we will create custom SharePoint list named "SharePointListTemplateIDs" using Power Automate.
- Add an action "Send HTTP request to SharePoint".
- The Body template used is-
{ "__metadata":{ "type":"SP.List" }, "AllowContentTypes":true, "BaseTemplate":100, "Title":"SharePointListTemplateIDs", "Description":"This list contains the IDs of different types of lists/libraries we can create." }
- BaseTemplate is the Id that represents to a List type. 100 is for Custom list. Rest are as below-
- This will create list in SharePoint.
- Create/Rename Columns In List-
- We will create/rename below columns-
- Name: (We will not be creating this column. We will use Title Column and will rename it to Name)
- TemplateID: (Type: Number; Required: true)
- Description: (Type: Text (Multiline); Required: false)
- For this, we will follow below steps-
- Rename "Title" to "Name"
- Create "TemplateID"
- Rename "TemplateID" to "Template ID"
- Create "Description"
- Inputs are-
- Rename "Title" to "Name"
- Create "TemplateID"
- Rename "TemplateID" to "Template ID"
- Create "Description"
- Read Excel from Document Library-
- Now we will read the Excel file. We had uploaded the file in Documents library. This file contains the Name/TemplateID/Description columns as shown above in the post.
- Add Items from Excel into SharePoint List-
- That's all. Now save the flow and execute it.
- Here's the result-
- Please feel free to sent me your queries or any functionality that you want to achieve and currently not able to do so. I would be happy, if would be able to provide it's solution.
- Next Post Link-
- Coming soon...
Saturday, January 15, 2022
Power Automate: Useful HTTP Request Actions Part 3
Hello Friends,
Welcome back with another post on Power Automate. This post is in continuation to one of my earlier post(s) on different ways we can use HTTP request action (Send an HTTP request to SharePoint) in Power Automate to get different kind of information. I will be adding more and more options in this post from time to time. Below is the link of earlier post(s)-
- Power Automate: Useful HTTP Request Actions Part 1
- Power Automate: Useful HTTP Request Actions Part 2
- Create Column(s)
- Update Column(s) Display Name
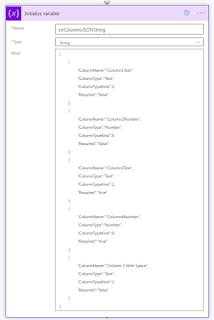
- In order to create columns, first we need an array of columns information
[ { "ColumnName":"Column1Text", "ColumnType":"Text", "ColumnTypeKind":2, "Required":"false" }, { "ColumnName":"Column2Number", "ColumnType":"Number", "ColumnTypeKind":9, "Required":"false" }, { "ColumnName":"Column3Text", "ColumnType":"Text", "ColumnTypeKind":2, "Required":"true" }, { "ColumnName":"Column4Number", "ColumnType":"Number", "ColumnTypeKind":9, "Required":"true" }, { "ColumnName":"Column 5 With Space", "ColumnType":"Text", "ColumnTypeKind":2, "Required":"false" } ]
- Here, you can see, I have taken a field ColumnDataKind. Basically, it represents the type of column. For more details, you may refer Microsoft docs site-
- For Text column it is 2 and for Number column, it is 9.
- Now, we need a SharePoint List-
- I had created a list named "DynamicColumnsList". It is be default having one column "Title".
- Now we are going to create below columns-
- Column1Text (Type: Text; Required: false)
- Column2Number (Type: Number; Required: false)
- Column3Text (Type: Text; Required: true)
- Column4Number (Type: Number; Required: true)
- Column 5 With Space (Type: Text; Required: false)
- Let's create a flow-
- I had initialized a string variable "strColumnsJSONString" and assigned the above mentioned array to this variable.
- Now, I am going to parse it. For this, I will use Parse JSON action. I will use same JSON string to create the schema.
- Lastly, I will use HTTP Action-
- We will use below schema to create columns in Body section and then will assign dynamic values from JSON.
{ "__metadata": { "type":"SP.Field" }, "FieldTypeKind":, "Title":"", "Required":"", "EnforceUniqueValues":"false", "StaticName":"" }
- Final HTTP action is-
- Save it and test it.
- As you can see, columns have been created along with the Required (Yes/No) condition. The moment, columns are created, it's Internal Name also get created with same name and gets freezes. In case, if the name has spaces, it replaces with "_x0020_".
- Now, if you want to change the Display Name, then you need to repeat the process but this time we will use MERGE.
- Below is the JSON used-
[ { "ColumnName":"Column1Text", "ColumnType":"Text", "ColumnTypeKind":2, "Required":"false", "DisplayName":"Column 1 Text" }, { "ColumnName":"Column2Number", "ColumnType":"Number", "ColumnTypeKind":9, "Required":"false", "DisplayName":"Column 2 Number" }, { "ColumnName":"Column3Text", "ColumnType":"Text", "ColumnTypeKind":2, "Required":"true", "DisplayName":"Column 3 Text" }, { "ColumnName":"Column4Number", "ColumnType":"Number", "ColumnTypeKind":9, "Required":"true", "DisplayName":"Column 4 Number" }, { "ColumnName":"Column 5 With Space", "ColumnType":"Text", "ColumnTypeKind":2, "Required":"false", "DisplayName":"Column 5 With Spaces" } ]
- Same will be used in initializing the string variable as well as in Generate Sample in Parse JSON.
- Now the HTTP action will be-
- Again Save the flow and test it.
- As we can see, the Display Name & the Internal Name are different as we wish to have. This way, we can create and rename the columns in SharePoint list using Power Automate flow.
- For adding Choice column (Drop-down menu)-
- Input-
- Output-
- Please feel free to sent me your queries or any functionality that you want to achieve and currently not able to do so. I would be happy, if would be able to provide it's solution.
- Next Post Link-
Wednesday, November 17, 2021
PowerApps: Add/Drop/Show/Rename Column
Welcome back with some new topics. Today, we will discuss about Column operations in PowerApps. PowerApps provides below options to play on columns-
- AddColumns
- ShowColumns
- DropColumns
- RenameColumns
These functions are used to re-shape the collection/table in PowerApps. Apart from that, it also provide functionality to get distinct data using Distinct function.
In this post, we will learn about:
- Add/Show/Drop/Rename Column functions
- Distinct function
- Adding Blank Record (or "Please Select") at Beginning/End of collection (beneficial when binding with Dropdown)
- Add ID using Filter function in collection having Distinct data
Let's start one by one.
- First we will create a collection. I had created a collection named "collSampleData". The data is:
-
ClearCollect( collSampleData, { ID: 1, FName: "Sachin", LName: "Jain" }, { ID: 2, FName: "Lokesh", LName: "Kumar" }, { ID: 3, FName: "Rajeev", LName: "Khanna" }, { ID: 4, FName: "Anuj", LName: "Sharma" }, { ID: 5, FName: "Rupesh", LName: "Jaiswal" }, { ID: 6, FName: "Anuj", LName: "Sharma" }, { ID: 7, FName: "Sachin", LName: "Jain" }, { ID: 8, FName: "Sanjiv", LName: "Sharma" }, { ID: 9, FName: "Rajeev", LName: "Sharma" } );
- It will create a collection with 9 records. Here I had added couple of duplicate entries which we will use for Distinct function.
- If we check the collection, it has:
- Add Column (AddColumns):
- AddColumns function is used to add column to the collection/table. You may add a calculated column, add and existing column with different datatype. I am using to add a calculated column by adding FName & LName.
-
ClearCollect( collWithFullName, AddColumns( collSampleData, "FullName", FName & " " & LName ) );
- If we check the collection, it has:
- This way, we can add columns to collection.
- Show Column (ShowColumns)
- ShowColumns is used to include only those columns in table/collection that needs to be displayed and rest needs to be dropped.
-
ClearCollect( collShowColumnData, ShowColumns( collWithFullName, "ID", "FullName" ) );
- If we check the collection, it has:
- Clearly, we can see, only 2 columns are retained and rest are removed. This is useful when we need to show a couple of columns from a large columns list.
- Drop Column (DropColumns)
- DropColumns is used to drop the columns from table/collection that needs not to be displayed. It can be say a opposite of ShowColumns.
-
ClearCollect( collWithOnlyFullName, DropColumns( collWithFullName, "ID", "FName", "LName" ) );
- If we check the collection, it has:
- Clearly, we can see, all 3 columns are dropped and rest only 1 column is retained. This is useful when we need to drop couple of columns from a large columns list and rest to be retained.
- Distinct (Distinct)
- Before moving forward to RenameColumns, we will discuss about Distinct function. After this, you will better understand the RenameColumns function. Distinct function is used to get the distinct values from a table/collection. Distinct works only on single column and return that particular column from the collection.
-
ClearCollect( collDistinctData, Distinct( collWithOnlyFullName, FullName ) );
- If we check the collection, it has:
- Rename Column (RenameColumns)
- RenameColumns is used to rename the name of existing column.
-
ClearCollect( collRenameColumnData, RenameColumns( collDistinctData, "Result", "Full Name" ) );
- If we check the collection, it has:
- As we can check the column name has been renamed from "Result" to "Full Name" while the data remains unchanged.
- Nested Use Of These Functions
- Now, once you are expertise in using functions, you may consolidate all these functions into one. I am using below function in one command to achieve the same functionality-
- AddColumns
- DropColumns
- RenameColumns
- Distinct
-
ClearCollect( collConsolidated, RenameColumns( Distinct( DropColumns( AddColumns( collSampleData, "FullName", FName & " " & LName ), "FName", "LName" ), FullName ), "Result", "Full Name" ) );
- If we check the collection, it has:
- Add Blank Record At Beginning/End of Collection
- We have consolidated data collection. We will add a blank record at the end of collection.
-
ClearCollect( collBlankAtEnd, collConsolidated, {'Full Name': Blank()} );
- For the purpose to display blank record, I had set border of labels used.
- Now, we will add a blank record at the beginning of collection.
-
ClearCollect( collBlankAtBegin, {'Full Name': Blank()}, collConsolidated );
- Add ID using Filter function in collection having Distinct data
- Now suppose a scenario, where you have a collection which is having multiple duplicate records. Your objective is to have Distinct records having ID and Name. The problem is that Distinct function returns only single column, so what the approach is?
- We will create a collection.
- Apply Distinct (to get distinct records) >> AddColumns (add ItemID column with default value as 0) >> RenameColumns (rename the column "Result" created as as result of Distinct function to ItemName).
- Create a replica of this distinct collection to apply ForAll loop.
- Apply ForAll loop. In this loop apply Patch. In Patch, use Filter with First function to get the desired ItemID of each item.
- Sequentially code is as below-
-
ClearCollect( collStationeryData, { ID: 1, ItemName: "Pencil" }, { ID: 2, ItemName: "Pen" }, { ID: 3, ItemName: "Eraser" }, { ID: 2, ItemName: "Pen" }, { ID: 4, ItemName: "Sharpner" }, { ID: 5, ItemName: "Paper A4" }, { ID: 1, ItemName: "Pencil" }, { ID: 3, ItemName: "Eraser" }, { ID: 6, ItemName: "Stapler" } );
-
ClearCollect( collDistinctStationeryData, RenameColumns( AddColumns( Distinct( collStationeryData, ItemName ), "ItemID", 0 ), "Result", "ItemName" ) );
-
ClearCollect( collDistinctStationeryDataTemp, collDistinctStationeryData );
-
ForAll( collDistinctStationeryDataTemp, Patch( collDistinctStationeryData, LookUp( collDistinctStationeryData, ItemName = collDistinctStationeryDataTemp[@ItemName] ), { ItemID: First( Filter( collStationeryData, ItemName = collDistinctStationeryDataTemp[@ItemName] ) ).ID } ) );
- If we check the collection, it has:
- collStationeryData
- collDistinctStationeryData (initial stage before Patch) / collDistinctStationeryDataTemp
- collDistinctStationeryData (After Patch)
- This way, you can utilize these power packed functions as per the required. Even you may nest these functions to avoid multiple steps.