Showing posts with label HTTP Request. Show all posts

Sunday, August 21, 2022

Access SharePoint Groups In Power Automate

Hello Friends,
Today, we will learn about working with SharePoint Groups in Power Automate. Sometimes, we have a requirement in which, we have a SharePoint group in our SharePoint site and we want to allow some activities to the members of those group in PowerApps. As we know that SharePoint Groups are not accessible in PowerApps and also not accessible directly in Power Automate, therefore, we will use some work around to access them in Power Automate flow to achieve this functionality. There are 2 ways to get the SharePoint Group members. If you know the group id, then we can directly use the HTTP request to get the group members. Otherwise, if you know the group name only, first we will get, all the groups, then we will extract the desired group from the response. From this, we will get the Group ID. Then we will use the HTTP request to get the group members using this id. 

 So, let's begin.
  1. We have created a group named "TestDesignEditGroup". I am the member of this group.
  2. Our first objective is to get the SharePoint Group Id for this group.
  3. Let's create a flow. I am talking Instant cloud flow >> Manually trigger a flow and given a name "POC-GetSharePointGroupsMembers".
  4. Now we will define 3 variables-
    1. strGroupName - This variable will hold the name of the group we are looking for
    2. intGroupID - This variable will hold the ID of the group mentioned in strGroupName
    3. strGroupMemberDisplayNames - This variable will hold the semicolon separated display names of the members of the group
  5. Save the workflow.
  6. Now, as we know that Power Automate doesn't have any direct action to connect with SharePoint Groups, we will first use HTTP action to get all the SharePoint Groups.
  7. It will ask few information-
  8. It will give us a JSON having information of all the SharePoint groups.
  9. Now, from there, we have 2 ways to extract the information-
    1. Using "Apply to each"
    2. Using "Filter"
  10. Let's try "Apply to each" first.
  11. Add an action "Apply to each".
  12. As we can see in content window, only "body" option is available. However, we need the "value" part of the output. So, we will click on "Expression" tab and use the dynamic expression.
    1. body('Send_an_HTTP_request_to_SharePoint_-_Groups')?['value']
  13. Add a "Condition" action where we will check if the "Title" of the group is equal to what we are looking for.
  14.  
  15. If, the match is found, set the "Id" of that group to the variable "intGroupID".
  16. Now, we have the ID of the group. We need to again use HTTP request action to get the group members of this group.
  17. Add another HTTP request action.
  18. It will give us the JSON of members of the group.
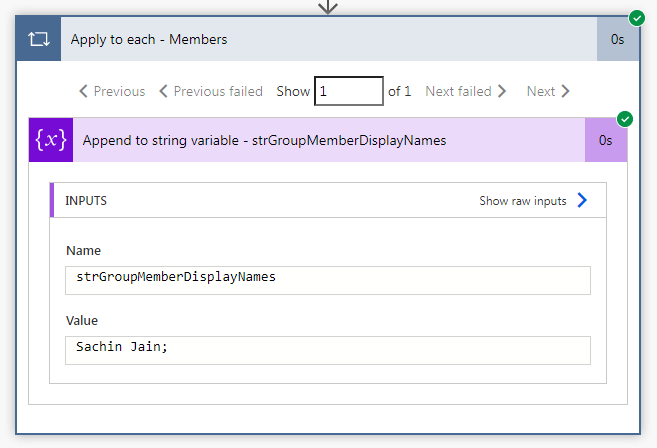
  19. We need to use another "Apply to each" action upon this JSON to fetch the "Title" (member display name) of each member. We will append this Title alongwith semicolon to the variable "strGroupMemberDisplayNames".
  20. That's all. Now, it's time to test. Save the flow and click on "Test" link provided at top right corner. 
  21. Below are the screenshots of each action (one by one), we have used here.
  22. Similar way, if you wish to extract EMail IDs, then instead of Title attribute, you have to extract the Email attribute.
  23. This way, you can get the members of SharePoint group. In case, if you already know the SharePoint group ID, then after initializing the variables, you may directly jump to the HTTP action "Send an HTTP request to SharePoint - Members".
  24. Now, try the other way using "Filter".
  25. Let's try using "Filter".
  26. In the above flow, delete the "Apply to each - Groups" action and add below 2 actions.
  27. Add Filter action.
  28. Add the filter criteria.
  29. Now add another action called "Set variable". We will not fetch the Id of the group from the output of filter action and assign it to intGroupID. If you want to check if the output of filter action is not null, then you may add a Condition action and inside that condition action, if the output is not null then you may add the set variable action there.
  30. That's all. Rest of the 2 actions (to get the members of the group and then getting their display names) will remain same.
With this, I am concluding this post.
Happy Coding !!!
Will see you again with some new topics.

Stay Safe !
Stay Healthy !

Tuesday, May 24, 2022

Power Automate: Export To Excel (SharePoint)

Hello Friends,
Welcome back with another post on Power Automate. Last year, we have learned about Export To Excel Using Power Automate where we have used OneDrive to store the excel template. Recently, someone asked me provide the same feature without using OneDrive. In short, their requirement was- whenever an item (request) is created in SharePoint list, the information is to be emailed in the form of Excel file to the user and the same excel file needs to be stored in a document library for future reference. Let's begin-
  1. Let's create a SharePoint list "TestList". It is having "Title" column by default.
  2. Below is the design of Excel template. It is having a table "Table1" with 2 columns "ID" & "Title".
  3. Below is the structure of document library "ExcelLibrary" where we will save the template and the files.
  4. The root library is "ExcelLibrary". It is having 2 nested folders -
    1. Template - It will hold the Excel template.
    2. DataFiles - It will be used to save the final excel files for each request.
  5. Upload the Excel template in "ExcelLibrary" >> "Template" folder as shown in above screenshot.
  6. Now, we will write the Power Automate Flow. Open the Power Automate Portal and click on "+ Create".
  7. Select "Automated cloud flow". Give flow a suitable name and choose the flow trigger as "When an item is created (SharePoint)".
  8. Select the Site Address and List Name. Here list name will be "TestList".
  9. Now, we will copy the excel template from Template folder to DataFiles folder. For this, we will choose "Copy file (SharePoint)" action.
  10. Select the Current Site Address, File to Copy (the excel template file), Destination Site Address (it will remain same as we are copying to same site), Destination Folder (ExcelLibrary >> DataFiles).
  11. Now the important point here is to select the course of action if another file is already there with same name. Here we will choose to Copy the file with new name. Basically, the flow will append an incremental number ahead to the file name and save. It will save us from replacing the existing file of another request.
  12. Save the flow and keep saving the flow at regular interval in order to save your precious efforts.
  13. Now, add another action to add row in excel file. For this choose the action name "Add a row into a table (Excel Online (Business))".
  14. Select the Location, Document Library.
  15. For File, select the "Id" property of "Copy file" action from dynamic expression.
  16. For Table, it will not show any table name because, you are providing the file dynamically. Therefore, choose "Enter custom value" and input "Table1". If you remember, you had added a table in Excel Template, if you check the same of this table, you will find it Table1. Otherwise, whatever be the table name, you have to put in here.
  17. Now, there will be another filed get displayed called "Row".
  18. As, all the values are dynamic in nature, therefore in design time, power automate is unable to fetch the schema of the table as well. Therefore, it allows us to provide the data to be inserted in JSON format.
  19. { 
      "ID": @{triggerOutputs()?['body/ID']},
      "Title": "@{triggerOutputs()?['body/Title']}"
    }
    
  20. The next step is to get the content of this file and send it through Email. Before that, we will add a delay of around 1 minute so that the writing of data gets completed in excel file.
  21. Now, add the Get file content (SharePoint).
  22. Select the Site Address. File Identifier will again picked from Copy file "Id" property.
  23. Now, send an email using "Send an email (V2) (Office 365 Outlook)" action.  
  24. Here, we can give the file name as per our wish. I had created a combination of "Created By Display Name" (replaced spaces by Underscore), suffixed by ItemID.
  25. concat(replace(triggerOutputs()?['body/Author/DisplayName'],' ','_'),'_',triggerOutputs()?['body/ID'],'.xlsx')
    
  26. Now, the attachment content will be mapped with the File Content property of Get file content action.
  27. Now the next step is to rename the copied file in DataFiles folder with same name we used in attachment. But that is not so easy because, the file copied and written content in it gets locked as we were editing (adding items in that file) the file. Therefore, the file will not get renamed.
  28. For this, we have to wait to get it unlocked. Here we will use "Do until" action. Let add the steps for it-
  29. Add "Initialize variable" action -
    1. Name: blnIsFileLocked
    2. Type: Boolean
    3. Value: true
  30. Add "Do until" action -
  31. Change the limits as shown below.
  32. Add "Delay" action and set count to 1 and unit to Minute.
  33. Now, we will try to rename the file. If the file is unlocked, it will get renamed otherwise, it will throw error. We have to handle the error carefully. For this, you may use the property "Configure run after".
  34. Add "Send an HTTP request to SharePoint" action.
  35. Fill up the required details. Here, we are using "ItemId" attribute to fetch the desired file.
  36. For Body section, again it will take JSON and the FileLeafRef property is set to the file name we had used earlier (without .xlsx).
  37. {'__metadata':{'type':'SP.Data.ExcelLibraryItem'},'FileLeafRef':'@{concat(replace(triggerOutputs()?['body/Author/DisplayName'],' ','_'),'_',triggerOutputs()?['body/ID'])}'}
    
  38. Add "Set variable" action and set the variable "blnIsFileLocked" to false.
  39. Now, we will set the "Configure run after" property for this action. Click on ellipses (marked in above screenshot) and choose "Configure run after".
  40. It will show the settings as above screenshot. By default, "is successful" is selected. This is what, we require. This action should only execute if the file get renamed means the HTTP request get executed successfully. Click on "Done".
  41. Now, add "Get file properties (SharePoint)" action to get the properties of the file. You may skip this step. I am adding this step to send another mail with the link of the excel file for future reference. For each step you have to set the "Configure run after" property (for "is successful")
  42. The last step is to add action "Send an email (V2)".
  43. The Item Link is set as-
  44. concat('<a href="',split(outputs('Get_file_properties')?['body/{Link}'],'?')[0],'">Item Link</a>')
    
  45. Set "Configure run after" for "is successful".
  46. At last, you may add "Terminate" action with Status as "Succeeded".
  47. Let's start testing.
  48. Add an item in TestList.
  49. As checked, file has been created in DataFiles folder with content as below.
  50. Now, we are waiting to get file renamed.
  51. Finally, the workflow got completed successfully. Let's see, if the file name has been changed. Yes, it's done.
  52. And the mails, I received are-
  53. This way, you can achieve the functionality.
With this, I am concluding this post.
Happy Coding !!!
Will see you again with some new topics.

Stay Safe !
Stay Healthy !