Hello Friends,
Welcome back with another post on Dynamics 365. Today, we are jumping into the CRUD operations in Dynamics 365 using HTML & javascript (Xrm.WebApi.online).
In this post we will look into how we can perform C.R.U.D. operations. For this, we will be-
- Creating a Solution
- Creating an Entity
- Customize the Entity Page
- Create an HTML file; add HTML UI and CRUD logic.
- Add this file on Entity Page by adding another section.
- Perform CRUD operations
The post is divided into below 6 parts-
- Basic Preparation
- Retrieve All Items
- Create Item
- Read Item
- Update Item
- Delete Item
Basic Preparation:
- Before start, let me explain you the purpose of creating a solution and entity. This is because, we are not going to alter the default entity and their forms. We would be taking our own entity to show how the CRUD operations work. The data, we will will create/update will be done in Account entity.
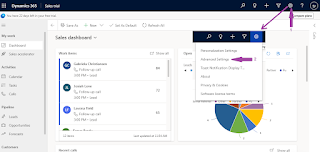
- Now, open you Dynamics 365 environment and click on gear icon (settings) and choose "Advanced Settings".
- It will open the Settings page. Here, you will find a Settings link with a down arrow. Click on it and choose Solutions.
- It will load the Solutions page where you will find all the system created solutions as well as custom solutions you had created.
- Click on New icon (shown in above screenshot) provided at top left corner to create a new solution.
- It will open a new popup window. Fill-in the Display Name, choose Publisher, Version.
- the column Name will be auto populated the moment you will fill-in the display name.
- Click on Save icon.
- It will create the solution for you. Now it's time to add Entity. For this you may either click on Entity link given in left navigation bar OR you may click on New and choose Entity.
- It will open another popup window ☺ where it will again ask the name and other information. Just input the Entity Name and it's plural version. The Field Name will be auto populated based upon the Display Name you chosen.
- Now, the most important point to remember. The next input it is asking is to define the "Areas that display this entity". Here you need to select all those module to which, this entity need to get link. If you leave it unchecked, the entity will still get created but will not be displayed anywhere. However, you may later on modify it by going to Solutions >> Entity, selecting this entity and double clicking on it. I am selecting "Sales".
- Now click on "Save and Close".
- It will start creating the entity. It may take couple of minutes to create the entity.
- Once the entity will be created, it will close the current popup window and refresh the solution popup window. The entity, recently created is now reflecting in solution window.
- This completes first part of basic preparation.
- Now we need an HTML file where we will write our CRUD code. For this first create a blank HTML file. Let name it "CRUD-Demo.html". Just open a new blank notepad file and save it with above name.
- Now we will upload this file in our solution Web Resource. Web Resource is the place, where we upload our custom code files which can be later referred in our D365 system wherever required. So, once again go back to Solution window and click on Web Resources link.
- Clicking on New icon will open another popup window where it will ask for some input. Provide a suitable name to the Web Resource you are going to upload. This unique name will be used to fetch the file for use.
- Next is display name, Content Type (choose HTML), Language (English). Then upload the file. Once file is uploaded, click on Save and after then Publish. Remember, the moment, it is saved, 3 new buttons get start appearing in navigation bar anf the Publish button gets displaced at 5th place. So carefully click the button
- The same way, once saved and published, this web resource starts reflecting in Solutions screen.
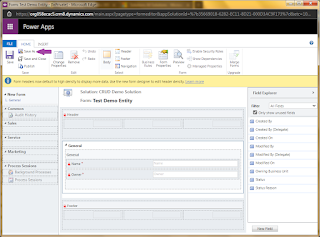
- Now, we will create a custom form where we will perform our activity. For this, go to Solutions window, click on Entities >> Test Demo Entity >> Forms. It will load all forms list in grid. Click on New >> Main Form. It will open replica of this form in another popup window. Just click on Save As
- Give this form a suitable name. I am giving it "CRUDDemoForm" and click on OK.
- The form will get saved with new name and will remain in Open mode in front of you.
- If you go back to Solutions window, you will find that now, this form starts reflecting there.
- Now, I am going to add another section in this form. For that, click on Insert >> Section >> One Column.
- It will add a new section in General tab.
- Now, double click on this section to edit its properties. Just change the Label and select the check box of "Show the label of this section on the Form".
- Click on OK.
- It will start showing the label on form.
- Now, with the currently added section as selected, we will add Web Resource file on this form. For this click on Web Resource icon (Internet globe icon in top navigation bar). This is very important point because adding an HTML file on Form is not similar to adding the JS file. ☺
- It will open a popup. Search for the Web Resource file we had added (new_CRUD-Demo-WR).
- The give a name to Field that will be bind to our HTML. Then, in Formatting, I am changing the Row Layout section. Number of Rows to 10, Automatically expand to use available spaces as Yes. Then click on OK.
- It will add our HTML web resource in the selected section.
- This is the section, where our HTML will reflect.
- Click on Save. Once saved, click on Publish.
- Now, you may close this window.
- This completes our first part of basic preparation.
- In Next post, we will fetch records from Account Entity and will try to show in this section.
- Next Post Link-


With this, I am concluding this post.
Happy Coding !!!
Will see you again with some new topics.
Stay Safe !
Stay Healthy !
No comments:
Post a Comment
Note: Only a member of this blog may post a comment.