Hello Friends,
Welcome back with another post on Power Automate. Today, we will try to export SharePoint Online list data to Excel. Let's start-
- First of all we need a SharePoint list with records that needs to be exported. I had created one list "ExportToExcelList" and added 3 records.

- Now create an excel template with same columns and convert it into table and upload it to OneDrive. The access to OneDrive is mentioned in my previous post from Access OneDrive, steps 78-81. I created folder PowerApps >> Templates.


- Now there are 3 ways to create a flow-
- When an item is created
- When an item is created or modified
- Scheduled flow
- I am creating a flow upon item create. Here, I will
- Get the template
- Check if template has rows
- If yes, delete those rows
- Write new rows
- Send it my email
- Let's do step by step-
- Create a flow on "When an item is created". You may see how to create the flow on my post Create PDF Using Power Automate, steps 10 - 24.
- Here we will use Flow name as "ExportToExcelOnItemCreate" and the list is "ExportToExcelList".

- Now before moving ahead, there are 2 things-
- You need to remove the entire content and rewrite
- You need to append the new row
- In case you need to remove the entire content, follow the steps given below from 11 -
- Click on "+ New step" and choose "List rows present in table (Excel Online (Business))"
- Set the Location, Document Library, File, Table.

- Now check if rows are present in table. For this add a Condition and check on length.

- If there are rows, delete them. For this, add and action in "If yes" condition and choose "Delete a row Excel Online (Business)".
- Set Location, Document Library, File, Table, Key Column (mention column "Name" from the Excel Table), Key Value (choose column value "Name" from the Excel Table).
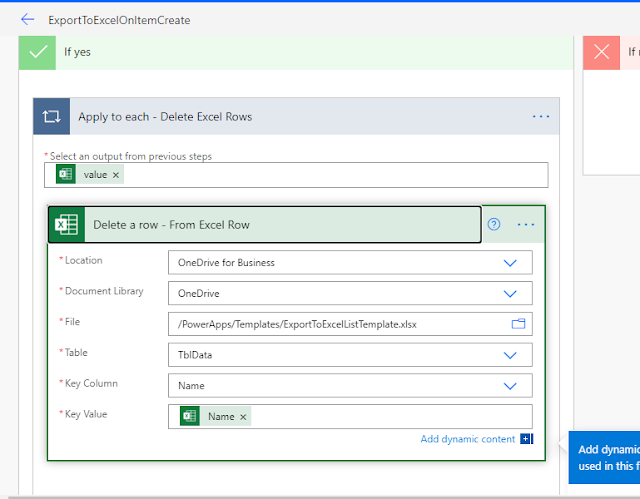
- "Apply to each" action will get auto added as soon as you will choose Key Value.
- Once all rows get deleted, move to next step. Now, the important point here is that Deletion/Insertion of rows in OneDrive Excel file is an Asynchronous process. Therefore, it is better to put a delay of sometime before moving to next step so that all async process gets completed.
- Add a Delay action. for this click on "+ New step" and choose "Delay (Schedule)".

- Now we will get items from our SharePoint list. I just added a basic filter query upon Name column that get only those items where it is not blank.

- Add a condition to check if SharePoint list has items-

- If items are available start writing into excel. For this, choose action "Add a row into a table (Excel Online (Business))" and fill in the information as below-

- If you wish to add another delay for a minute, you can add in the Apply to each section as shown below (however it's purely optional. I added a delay of 30 seconds in below example)-

- Once all items get written in excel, you can add another delay to get all async write process complete-

- Now we will get the content of this excel file and send it as an attachment over email. to get the content choose action "Get file content (OneDrive for Business)"-

- Select the Excel template file in "File"path box-

- It's almost done. Now send this file over email as below-

- It's all done. Now save the flow and put a new entry in SharePoint list.

- Let's wait for the flow to run.
- Wow! I got the mail with attachment-


- Let's try with adding one more item.

- The final list of items is-

- Got mail for this transaction also-

- As expected, the flow has replaced all the items with fresh list-

- This way, we can export our SharePoint list items to excel and can send over email.
- Additional feature that you can add is that you can save this excel in your SharePoint library also.
- Add an action "Create file (Sharepoint)". Provide details, save it and Test the flow-


- Let's wait for the result. In case, if the flow throws error of "File Content is null", just add action "Get File Content" (steps 36 - 39) just before the Create File action (step 58)and use this File content in creating file in SharePoint.
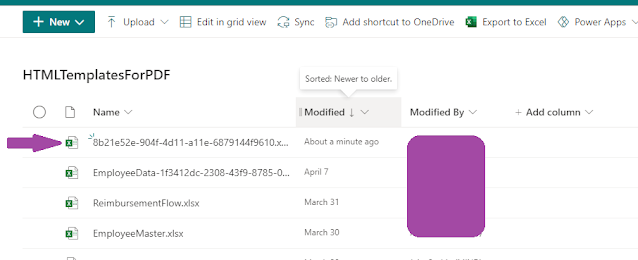
- Meanwhile, I was writing the functionality, I got the mail of file getting generated. When I checked the SharePoint library, the file got created there also. Below are the screenshots-


- So, this way, you can achieve the discussed functionality. Hope you enjoyed it.


With this, I am concluding this post.
Happy Coding !!!
Will see you again with some new topics.
Stay Safe !
Stay Healthy !
No comments:
Post a Comment
Note: Only a member of this blog may post a comment.