Showing posts with label Power Automate. Show all posts

Tuesday, February 14, 2023

PowerApps: Re-order Items In Gallery

Hello Friends,
Welcome back with another post on PowerApps. Today, we will learn about re-ordering feature in gallery. Surprised, as there is no such built-in feature in gallery. right, therefore, we will build the logic here.
We will apply re-ordering in 2 ways-
  1. Swap the position with Previous / Next item. Example: Swap 2nd position item with 3rd position item or vice-versa.
  2. Position the item at a particular number. Example: Bring the 10th position item to 2nd position.
Let's start.
  1. Open the PowerApps maker portal and create a new app and give a suitable name.
  2. Now click on App and choose the OnStart property and add logic for creating a collection.
    1. ClearCollect(collSampleData,
      {SeqNo:1,Title:"Mr",FirstName:"Aaron",LastName:"Finch"},
      {SeqNo:2,Title:"Mr",FirstName:"Sanjiv",LastName:"Verma"},
      {SeqNo:3,Title:"Mr",FirstName:"Robert",LastName:"Rosch"},
      {SeqNo:4,Title:"Ms",FirstName:"Aakriti",LastName:"Singh"},
      {SeqNo:5,Title:"Ms",FirstName:"Reshma",LastName:"Sharma"},
      {SeqNo:6,Title:"Mr",FirstName:"Kundan",LastName:"Gupta"},
      {SeqNo:7,Title:"Ms",FirstName:"Rajni",LastName:"Chugh"},
      {SeqNo:8,Title:"Ms",FirstName:"Ketty",LastName:"Woods"},
      {SeqNo:9,Title:"Mr",FirstName:"Bob",LastName:"Hamilton"},
      {SeqNo:10,Title:"Ms",FirstName:"Mary",LastName:"Christina"}
      );
  3. Now click on elipses (...) of App and select Run OnStart. It will initialize the collection.
  4. Now click on Insert and search for blank flexible height gallery.
  5. Select this control to add on screen. It will ask you the Data source. Select the collection collSampleData we have created above.
  6. Now resize the app to cover the entire screen or resize as per your application requirements. (optional).
  7. Rename the ggallery as Gallery_ReOrder.
  8. Choose the TemplateSize property and set it's value as 50. Then set the TemplatePadding to 0.
  9. It's time to add controls in this template. Click on Edit Template icon.
  10. Start adding control and set properties-
  11. Icon - Arrow up
    1. Name: IconUp
    2. X: 0
    3. Y: 0
    4. Width: 20
    5. Height: Parent.TemplateHeight
    6. Padding: Top / Bottom / Left / Right: 0
    7. Visible: ThisItem.SeqNo <> First(Sort(collSampleData,SeqNo,Ascending)).SeqNo
    8. OnSelect: 
      1. Select(Parent);
        Set(vrCurrentSeq,Value(ThisItem.SeqNo));
        Patch(collSampleData,ThisItem,{SeqNo:0});
        Patch(collSampleData,First(Filter(collSampleData,SeqNo=vrCurrentSeq-1)),{SeqNo:vrCurrentSeq});
        Patch(collSampleData,First(Filter(collSampleData,SeqNo=0)),{SeqNo:vrCurrentSeq-1});
    9. The concept used here is capture the current item sequence. The get the previous item and set it's seq equal to current one. Then set the current selected item sequence to 1 less than that of current sequence.
  12. Icon - Arrow down
    1. Name: IconDown
    2. X: IconUp.X+IconUp.Width
    3. Y: IconUp.Y
    4. Width: IconUp.Width
    5. Height: IconUp.Height
    6. Padding: Top / Bottom / Left / Right: 0
    7. Visible: ThisItem.SeqNo <> First(Sort(collSampleData,SeqNo,Descending)).SeqNo
    8. OnSelect: 
      1. Select(Parent);
        Set(vrCurrentSeq,Value(ThisItem.SeqNo));
        Patch(collSampleData,ThisItem,{SeqNo:0});
        Patch(collSampleData,First(Filter(collSampleData,SeqNo=vrCurrentSeq+1)),{SeqNo:vrCurrentSeq});
        Patch(collSampleData,First(Filter(collSampleData,SeqNo=0)),{SeqNo:vrCurrentSeq+1});
    9. The concept used here is capture the current item sequence. The get the next item and set it's seq equal to current one. Then set the current selected item sequence to 1 plus than that of current sequence.
  13. Text label
    1. Name: LblSeqNo
    2. X: IconDown.X+IconDown.Width
    3. Y: IconDown.Y
    4. Width: 50
    5. Height: IconDown.Height
    6. Text: ThisItem.SeqNo
    7. Align: Align.Right
  14. Text label
    1. Name: LblTitle
    2. X: LblSeqNo.X+LblSeqNo.Width
    3. Y: LblSeqNo.Y
    4. Width: 70
    5. Height: LblSeqNo.Height
    6. Text: ThisItem.Title
  15. Text label
    1. Name: LblFirstName
    2. X: LblTitle.X+LblTitle.Width
    3. Y: LblTitle.Y
    4. Width: 150
    5. Height: LblTitle.Height
    6. Text: ThisItem.FirstName
  16. Text label
    1. Name: LblLastName
    2. X: LblFirstName.X+LblFirstName.Width
    3. Y: LblFirstName.Y
    4. Width: 150
    5. Height: ILblFirstName.Height
    6. Text: ThisItem.LastName
  17. Drop down
    1. Name: ddSortOrder
    2. X: LblLastName.X+LblLastName.Width
    3. Y: LblLastName.Y
    4. Width: 150
    5. Height: LblLastName.Height
    6. Default: ThisItem.SeqNo
  18. For Items property, first we will add below code in App >> OnStart (after the collSampleData collection creation)
    1. Set(vrCurrentSeq,First(Sort(collSampleData,SeqNo,Ascending)).SeqNo);
      ClearCollect(collSequence,Sequence(CountRows(collSampleData),vrCurrentSeq));
    2. Now click on elipses (...) of App and select Run OnStart. It will initialize the collection collSequence. 
  19. Now set the Items property of ddSortOrder as collSequence.
  20. Save the app.
  21. The remaining part is to write the login for OnChange property of ddSortOrder. It iis little bit complex. Here we need to check if the new position of item is greater than the current position or less. Based upon that, we need to reposition the items. For example, see the below screenshot.
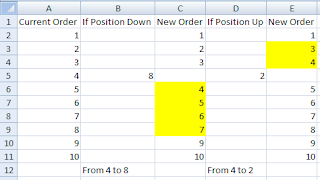
  22. If we are changing order from 4 to 8 then Yellow highlighted items order also need to be updated. Similarly, if we are changing order from 4 to 2, then Yellow highlighted items order also need to be updated.
  23. Let's write the logic for ddSortOrder >> OnChange property.
    1. Select(Parent);
      Set(vrCurrentSeq,Value(ThisItem.SeqNo));
      Set(vrDesiredSeq,Value(ddSortOrder.Selected.Value));
      Patch(collSampleData,ThisItem,{SeqNo:0});
      If(vrDesiredSeq>vrCurrentSeq,
          ClearCollect(collNewSequence,Sequence(vrDesiredSeq-vrCurrentSeq,vrCurrentSeq+1));
          ForAll(collNewSequence,Patch(collSampleData,First(Filter(collSampleData,SeqNo=Value)),{SeqNo:Value-1}));,
          ClearCollect(collNewSequence,Sequence(vrCurrentSeq-vrDesiredSeq,vrDesiredSeq));
          ForAll(collNewSequence,Patch(collSampleData,First(Filter(collSampleData,SeqNo=Value)),{SeqNo:Value+1})););
      Patch(collSampleData,First(Filter(collSampleData,SeqNo=0)),{SeqNo:vrDesiredSeq});
  24. Last, to give a beautiful appearance to the grid, we will fill a background color to the alternate rows. For this, update the TemplateFill property of GalleryReOrder as below.
    1. If(Mod(ThisItem.SeqNo,2)=0,RGBA(222,222,222,1),RGBA(0,0,0,0))
  25. Save the app, publish and Run/Play.
  26. If you play this app and try to change the order, you will find that the order gets changed but the grid is not showing data properly. The reason is that, we had not applied the Sorting on grid datasource.. Edit the app and choose the gallery GalleryReOrder >> Items property. Here you will find that the datasource collSampleData is directly associated. Change it to -
    1. Sort(collSampleData,Value(SeqNo),Ascending)
  27. Now, save/publish and Run/Play.
  28. I swapped order 3 to 2 by clicking Up icon and the results are-
    1. Before
    2. After
  29. Now, I am swapping order 9 to 10 by clicking Down icon and the results are-
    1. Before
    2. After
  30. Now, I will reorder the item of position 7 to position 3 using drop down and the results are-
    1. Before
    2. After

With this, I am concluding this post.
Happy Coding !!!
Will see you again with some new topics.

Stay Safe !
Stay Healthy !

Thursday, December 29, 2022

Power Automate Flow vs Dynamics 365 Flow

Hello Friends,

Welcome back with another post. Today, we will discuss a very important comparison which is usually asked during interviews. It's a comparison between-

  1. Microsoft Power Automate Flow
  2. Microsoft Dynamics 365 Workflow
Let's see the advantages & disadvantages-

Advantages of Power Automate Flow-
  1. Power Automate Flows can work with various web-based applications / services. For example - SharePoint, Dataverse, Twitter, Gmail, SQL.
  2. Power Automate provide 600+ built-in connectors and custom connectors to connect with various apps / services. For example-
    1. You can create a record in CRM based upon a tweet posted in Twitter.
    2. You can create a case in CRM based upon an email received on Gmail.
    3. You can send notification in Microsoft Teams to notify users when an opportunity is created, or a case is created.
  3. Power Automate Flows facilitates to perform CRUD operations upon data.
  4. Power Automate provides pre-built templates to create the flow.

Advantages of Dynamics 365 Workflow-
  1. Dynamics 365 Workflows can be synchronous as well as asynchronous.
  2. Dynamics 365 Workflows are faster than Power Automate Flows.

Additional Comparision:

Feature (Capability) Power Automate Flow Dynamics 365 Flow
Conditional Branching (Modeling) Yes Yes
Dynamics Content (Composition) Yes Yes
Trigger on Field Changes (Execution) Yes Yes
Trigger Conditionally on Field Values (Execution)
(e.g., On a Certain Date in a Date Field)
No No
Run On-Demand (Execution) Yes Yes
Run-as Scopes (Execution)
(e.g., Organization, Business Unit, User)
Yes Yes
Auditing (History) Yes Yes
Solution Support (Authoring & Portability) Yes Yes


Feature (Capability) Power Automate Flow Dynamics 365 Flow
Looping (Modeling) Yes No
Wait Conditions on Fields (Modeling) No Yes
Parallel Branch (Modeling) Yes No
OOB Connectors to External Systems (Modeling) Yes No
Access To Pre-Image of Event Data (Composition) No Yes
Run Child Workflows (Composition) No Yes
Run CDS Actions Including Custom (Composition) No Yes
Run Custom Workflow Activities (Composition) No Yes
Group Steps to Run in a Transaction (Composition) Yes No
Approval Workflows (Composition) Yes No
Trigger on Multiple CDS Entity Events (Execution) No Yes
Run on a Schedule (Execution) Yes No
Run Synchronously (Execution) No Yes
Run Analytics (History) Yes No
Modern Designer (Authoring & Portability) Yes No
AI Assisted Authoring (Authoring & Portability) Yes No

Related Articles:
Disclaimer: This post is for personal use only.

Friday, September 23, 2022

Power Automate: Export To Excel With Dynamic Table & Columns Creation

Hello Friends,
Welcome back with another post on Power Automate. Today, we will learn how create a table in excel dynamically along with the columns where number of columns are not predefined. The export data to excel. The outcome of this post will be-
Let's start-
  1. First of all, we need a SharePoint list. Below is the list, I had created. It has 8 columns.
  2. Now, the objective is that I wish to export any combination of columns-
    1. ID, Title, First Name, Last Name 
    2. ID, First Name, Date Of Joining, Salary, Designation
    3. ID, Full Name (First Name + Last Name), Designation
  3. As we can see in above examples, the number of column as well as the columns itself are not fixed. Till now, we were creating a defined template which is having a table with columns and using it to export the data. This approach will not work here.
  4. Microsoft had given solution for this problem as well. Let's begin-
  5. Create a document library in Site Assets or the Documents library. Let say "ExcelFiles".
  6. Now create a blank excel file and save it with name "EmployeesData.xlsx".
  7. Upload this file in "ExcelFiles" folder.
  8. Now, open the Power Automate maker portal and create a new Instant cloud flow with flow name as "POC-ExportExcelDynamic" and trigger condition "PowerApps".
  9. Add a variable that will interact with PowerApps to get the column names.
  10. Save the flow and keep saving the flow at regular interval during the flow writing.
  11.  Now, to create the table in excel dynamically, we should know the number of columns that are going to be created and based upon the count, the Excel cell address. As we know, that excel works upon cell address. Columns are defined as A, B, C, .... while rows are defined as 1, 2, 3, ...
  12. So, for the first row the first cell address is A1, second cell address is B1 and so on.
  13. Similarly, for the second row the first cell address is A2, second cell address is B2 and so on.
  14. Similarly, table is also dependent upon cells. For a 3 column table, the header address will be A1 -> C1. For a 4 column table, it will be A1 -> D1.
  15. However, there is no direct method to get the respective address of cell using the count. Here, we have to apply some trick. We will use an excel file to get the series of the address based upon count. Excel has provided "ADDRESS" function. Here is the excel.
  16. We have to create a JSON and will use the same. Here is the JSON.
    1. [
        {
          "ColumnNo": 1,
          "ColumnAddress": "A1"
        },
        {
          "ColumnNo": 2,
          "ColumnAddress": "B1"
        },
        {
          "ColumnNo": 3,
          "ColumnAddress": "C1"
        },
        {
          "ColumnNo": 4,
          "ColumnAddress": "D1"
        },
        {
          "ColumnNo": 5,
          "ColumnAddress": "E1"
        },
        {
          "ColumnNo": 6,
          "ColumnAddress": "F1"
        },
        {
          "ColumnNo": 7,
          "ColumnAddress": "G1"
        },
        {
          "ColumnNo": 8,
          "ColumnAddress": "H1"
        },
        {
          "ColumnNo": 9,
          "ColumnAddress": "I1"
        },
        {
          "ColumnNo": 10,
          "ColumnAddress": "J1"
        },
        {
          "ColumnNo": 11,
          "ColumnAddress": "K1"
        },
        {
          "ColumnNo": 12,
          "ColumnAddress": "L1"
        },
        {
          "ColumnNo": 13,
          "ColumnAddress": "M1"
        },
        {
          "ColumnNo": 14,
          "ColumnAddress": "N1"
        },
        {
          "ColumnNo": 15,
          "ColumnAddress": "O1"
        },
        {
          "ColumnNo": 16,
          "ColumnAddress": "P1"
        },
        {
          "ColumnNo": 17,
          "ColumnAddress": "Q1"
        },
        {
          "ColumnNo": 18,
          "ColumnAddress": "R1"
        },
        {
          "ColumnNo": 19,
          "ColumnAddress": "S1"
        },
        {
          "ColumnNo": 20,
          "ColumnAddress": "T1"
        },
        {
          "ColumnNo": 21,
          "ColumnAddress": "U1"
        },
        {
          "ColumnNo": 22,
          "ColumnAddress": "V1"
        },
        {
          "ColumnNo": 23,
          "ColumnAddress": "W1"
        },
        {
          "ColumnNo": 24,
          "ColumnAddress": "X1"
        },
        {
          "ColumnNo": 25,
          "ColumnAddress": "Y1"
        },
        {
          "ColumnNo": 26,
          "ColumnAddress": "Z1"
        },
        {
          "ColumnNo": 27,
          "ColumnAddress": "AA1"
        },
        {
          "ColumnNo": 28,
          "ColumnAddress": "AB1"
        }
      ]
      
  17. You may create as many as column numbers you want. Ideally, keep it "Total Number of Columns in list + 10" so that in case, if one or 2 columns got added later on in the list, it will not impact your flow.
  18. Now, add an action called Parse JSON in flow and paste this JSON in Content as well as use this JSN to create schema "Generate from sample".
  19. Now, we have the columns list that were passed through PowerApps and we have the mapping structure of Column Number vs Cell Address.
  20. Add another action called "Filter array".
  21. Here we will filter the JSON to find the corresponding cell address row (Column Address property in JSON) using the count of columns passed through PowerApps.
  22. It will give us the item which is having ColumnNo property equals to the total number of columns received from PowerApps.
  23. Now, we will fetch the ColumnAddress property from this output. So, add another called "Compose".
  24. The first part is completed. Now, add an action called "Copy file". We will create a copy of the excel template.
  25. Remember to select "Copy with a new name" option in dropdown which is asking the further course of action "If another file is already there".
  26. Now, here the climax part of the flow. Microsoft have given a unique feature to create table on the fly. Add an action "Create table".
  27. Provide the input as shown below. The starting range is fixed to A1, followed by a colon ":". The table range can be "Absolute", "Partial Relative" or "Relative". Make sure, whatever you are choosing, both cell address must be in same format. Here, I had chosen, "Relative"
  28. You may give the table name as per your wish. I had given "SearchResults". You may define a variable for the Table Name as well in the beginning because, this table name is going to be used at two places, therefore, to avoid any misspell, you may use variable.
  29. This was the second part.
  30. The last part is adding items to table.
  31. Add an action called "Get Items".
  32. Next, we will use the "Select" to transform the data as per our requirement. For an example, if we wish to add another column "Full Name", we can do here by using "concat" function. Remember, the name of column at left side in mapping must be exactly the same as we are expecting to get receive from PowerApps.
  33. So, add "Select" action.
  34. I had used "concat" function to join First Name & Last Name. Also, I used "formatDateTime" function to apply formating upon Date Of Joining. 
  35. Now, use "Apply to each" action to add this data to excel table.
  36. Add an action "Apply to each".
  37. Now, add "Add row into a table" action inside this "Apply to each" action.
  38. It's all done.
  39. Now, If you wish to send this excel as attachment or send the link of the file, you can add further actions that will fulfil the requirements. These all, we have already discussed in our previous posts.
  40. Save the flow and test it.
  41. Let's check for our first set of columns mentioned in the beginning of the post. Remember, column names should be separated either by comma or semicolon and should not have leading or trailing spaces.
    1. ID,Title,First Name,Last Name [Correct Format]
    2. ID;Title;First Name;Last Name [Correct Format]
    3. ID, Title,First Name , Last Name [In-Correct Format]
  42. Click on "Test" >> "Manually" >> "Test". It will show the Run window and asking for Column names.
  43. Give the input as "ID,Title,First Name,Last Name" and click on Run.
  44. Wait for the flow to complete it's execution. It got succeeded.
  45. Check the SharePoint library. The file got created with name as "EmployeesData1.xlsx".
  46. Here we go. The is there.
  47. Now let's try with custom column 
    1. ID,Full Name,Designation,Date Of Joining,Salary,Experience
  48. Here we go. This also tested successfully.
  49. This is how, you can create Excel Tables dynamically with any number of columns. However, you can create the file on the runtime but for that, you need to include the OneDrive connection. Ultimately, you are creating a file then copying it. Means one more step. Therefore, we avoided that. Keeping a blank file is far better than to include one more connection and adding one more step.
With this, I am concluding this post.
Happy Coding !!!
Will see you again with some new topics.

Stay Safe !
Stay Healthy !