Hello Friends,
Welcome back with another post on Power Automate. This post is in continuation to one of my earlier post(s) on different ways we can use HTTP request action (Send an HTTP request to SharePoint) in Power Automate to get different kind of information. I will be adding more and more options in this post from time to time. Below is the link of earlier post(s)-
- Power Automate: Useful HTTP Request Actions Part 1
- Power Automate: Useful HTTP Request Actions Part 2
Today, we will learn about below ones-
- Create Column(s)
- Update Column(s) Display Name
Sometimes, there is a requirement to create lots of columns in SharePoint list. They may be "Single line of text" or "Number" column. So, either you need to create manually one by one OR you can use Power Automate to achieve the same. We are discussing Power Automate option here.
- In order to create columns, first we need an array of columns information
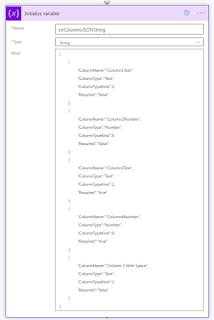
[
	{
		"ColumnName":"Column1Text",
		"ColumnType":"Text",
		"ColumnTypeKind":2,
		"Required":"false"
	},
	{
		"ColumnName":"Column2Number",
		"ColumnType":"Number",
		"ColumnTypeKind":9,
		"Required":"false"
	},
	{
		"ColumnName":"Column3Text",
		"ColumnType":"Text",
		"ColumnTypeKind":2,
		"Required":"true"
	},
	{
		"ColumnName":"Column4Number",
		"ColumnType":"Number",
		"ColumnTypeKind":9,
		"Required":"true"
	},
	{
		"ColumnName":"Column 5 With Space",
		"ColumnType":"Text",
		"ColumnTypeKind":2,
		"Required":"false"
	}
]
- Here, you can see, I have taken a field ColumnDataKind. Basically, it represents the type of column. For more details, you may refer Microsoft docs site-
- For Text column it is 2 and for Number column, it is 9.
- Now, we need a SharePoint List-
- I had created a list named "DynamicColumnsList". It is be default having one column "Title".
- Now we are going to create below columns-
- Column1Text (Type: Text; Required: false)
- Column2Number (Type: Number; Required: false)
- Column3Text (Type: Text; Required: true)
- Column4Number (Type: Number; Required: true)
- Column 5 With Space (Type: Text; Required: false)
- Let's create a flow-
- I had initialized a string variable "strColumnsJSONString" and assigned the above mentioned array to this variable.
- Now, I am going to parse it. For this, I will use Parse JSON action. I will use same JSON string to create the schema.
- Lastly, I will use HTTP Action-
- We will use below schema to create columns in Body section and then will assign dynamic values from JSON.
{
	"__metadata":
		{
			"type":"SP.Field"
		},
	"FieldTypeKind":,
	"Title":"",
	"Required":"",
	"EnforceUniqueValues":"false",
	"StaticName":""
}
- Final HTTP action is-
- Save it and test it.
- As you can see, columns have been created along with the Required (Yes/No) condition. The moment, columns are created, it's Internal Name also get created with same name and gets freezes. In case, if the name has spaces, it replaces with "_x0020_".
- Now, if you want to change the Display Name, then you need to repeat the process but this time we will use MERGE.
- Below is the JSON used-
[
	{
		"ColumnName":"Column1Text",
		"ColumnType":"Text",
		"ColumnTypeKind":2,
		"Required":"false",
		"DisplayName":"Column 1 Text"
	},
	{
		"ColumnName":"Column2Number",
		"ColumnType":"Number",
		"ColumnTypeKind":9,
		"Required":"false",
		"DisplayName":"Column 2 Number"
	},
	{
		"ColumnName":"Column3Text",
		"ColumnType":"Text",
		"ColumnTypeKind":2,
		"Required":"true",
		"DisplayName":"Column 3  Text"
	},
	{
		"ColumnName":"Column4Number",
		"ColumnType":"Number",
		"ColumnTypeKind":9,
		"Required":"true",
		"DisplayName":"Column 4 Number"
	},
	{
		"ColumnName":"Column 5 With Space",
		"ColumnType":"Text",
		"ColumnTypeKind":2,
		"Required":"false",
		"DisplayName":"Column 5 With Spaces"
	}
]
- Same will be used in initializing the string variable as well as in Generate Sample in Parse JSON.
- Now the HTTP action will be-
- Again Save the flow and test it.
- As we can see, the Display Name & the Internal Name are different as we wish to have. This way, we can create and rename the columns in SharePoint list using Power Automate flow.
- For adding Choice column (Drop-down menu)-
- Input-
- Output-
- Please feel free to sent me your queries or any functionality that you want to achieve and currently not able to do so. I would be happy, if would be able to provide it's solution.
- Next Post Link-


With this, I am concluding this post.
Happy Coding !!!
Will see you again with some new topics.
Stay Safe !
Stay Healthy !
No comments:
Post a Comment
Note: Only a member of this blog may post a comment.