Hello Friends,
Welcome back with a new and different topic. If you are working with Power Platform (PowerApps, Power Automate); whether developing a PowerApps app or customizing the SharePoint list form using PowerApps; then it is obvious that you had to move the flow or the app from one environment to other. Now the issue is that, when you move these packages from one environment to other, then you need to change the Connections, URLs, everywhere in these packages. If the flow is quite complex then it is really a tough job to change the URLs at every place.
Secondly, If you are customizing the SharePoint list form using PowerApps then another issue is that, it always take you to the default environment of PowerApps. Even, it does not give the option to change the environment. In such scenario, if any client has Default, DEV, QA, PROD environment, then how, would you create the custom form in Dev environment and how will you move it to QA environment?
There is no direct solution for this problem. But, we have a work around for this problem. So, here we will try to resolve this problem. For this, let's take a scenario.
We have a list in DEV environment named "SampleList". We want to customize it form using PowerApps in DEV environment. It will be using a Flow as well from the Form. Another flow is running when an item is created. After getting the functionality tested, we need to move it to QA environment or to other tenant. Before movement, we need to update the URLs, Environment ID, List ID, Flow IDs in Custom Form package and flows. So, let's start-
- We had created a list named "SampleList" having 2 columns-
- Title (Single line of text)
- GuidFromFlow (Single line of text)
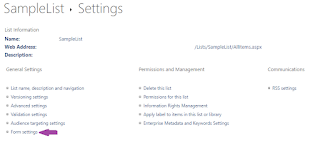
- Below is the screenshot-
- Now, go to list settings. Here you will find an option "Form Settings" under "General Settings" section.
- Click on this link. It will take you to Form Settings screen. Here, you will get 3 options-
- Use the default SharePoint form
- Use a custom form created in PowerApps
- Use a custom form created in InfoPath
- We have to use 2nd option. It has a link provided there "Customize in PowerApps".
- Before using this option, we need to back to List Settings. Here click on Advance Settings options and scroll down to bottom. Here in an option "List experience". Choose "Default experience for the site" (if you are already using New experience) Or "New experience".
- Now go back to Form settings. Now take a break because here we need to understand some key points.
- The moment, you click on "Customize in PowerApps", it will navigate you to PowerApps maker portal and will create an app in Default Environment. Then it will save it automatically and reopen in Edit mode.
- So, you need to be cautious and active and ready to copy the URL from URL bar, the moment, it will navigate you to PowerApps maker portal.
- After copying the URL, you need to close that Tab so that it should not create the app in Default environment.
- Don't worry, if you were unable to close the tab, then it's OK. we will manage. But try to copy the URL quickly.
- So, let's begin. In Form Settings, click on "Customize in PowerApps" using the CTRL key. Using CTRL key, it will be opened in new tab.
- Now go to that tab and copy the URL and close the tab.
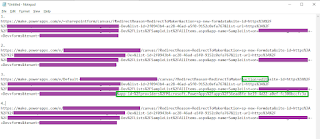
- Paste this URL in notepad. It looks like below. It is having all the information.
- As you can see from the first URL, the purple area is the URL of your site and tenantid. The green areas is the action which informs the PowerApps to create a new powerapps app for the list whose id is given in list-id parameter. But you can see in this URL, that there is information about environment. This is because we had captured the URL a little bit early.
- Another information to capture from here is the "app-name". This is the last part of URL. If you see the URL, it is written as "app-name=SampleList+on+Dev+Site+Name+-+Dev-forms". Copy this parameter value and replace "+" by " " (blank space). It will be also be replaced by QA name.
- Now, see the second URL. Along with all other information captured in first URL, it is also having the Environment ID. See the blue highlighted piece of url "Default - XXXX-XXX...". This is the environment ID, where the PowerApps will create the custom app. So, we need to wait till the URL gets changed to this mode. The moment, environment id gets reflected in URL, copy it and close the tab.
- So, once again we will go to Form Settings
- So, again go to Form settings and refresh the page. If you are still getting the same option "Customize in PowerApps", then click on it with CTRL key and wait for the URL to show the environment ID. The moment, environment ID is reflected, we will copy the URL and close the tab.
- The purpose to capture this URL is that we will change the environment ID in this URL and then we will use it to create the custom powerapp form.
- Now, open the powerapps maker portal and choose the desired environment.
- The purple area is the environment ID of Dev environment. Now, we will replace the Default environment ID in second URL with this ID.
- Now, we are good to go to create customized form. Copy this URL and paste in browser and press enter.
- It will take a couple of minutes to create the customized form.
- I am customizing it by adding background color and removing the attachment control.
- Now, I will add a button and on that button, I will add a Power Automate. This power Automate will take a GUID as input and will convert into CAPITAL LETTERS and return back to PowerApps. This output will be saved in Title column.
- Now click on File >> Save to save the changes. After saving, it will give button "Publish to SharePoint".
- Once published, click on the URL displaying on the screen under title "SharePoint list".
- It will open the SharePoint list. Click on "+ New" button. New customized form will appear. In case, if it not displayed, just refresh the browser and again click on "+ New" button.
- Now click on "Generate New GUID" button. It will create a new GUID and pass it to Flow. The flow converted in case to UPPER and returned back. The output is now shown in Title column.
- Our Customized form is working fine. Now we will create another flow which will trigger upon item create. For this, login to Power Automate >> Dev Environment. Create another flow "When an item is created" and using that flow update the item column "GuidFromFlow" with another GUID.
- Save the workflow and then try to insert a new item in SampleList.
- As we can see, our workflows are working fine.
- Now, it begins the actual case. As these are on DEV environment. Now, we want to move it to QA environment. For this, we need to replace below values in PowerApps app and Flows-
- Site URL
- Environment ID
- List ID
- Flow ID (Flow calling from PowerApps)
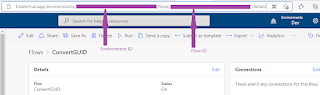
- For this, we will first capture this information from DEV environment-
- Site URL:
- Environment ID:
- List ID:
- Flow ID (ConvertGUID):
- Similarly, we need the same details from QA environment.
- Site URL
- Environment ID
- List ID
- Flow ID (Flow calling from PowerApps)
- If you are deploying, the package for the first time to QA, then you will be having Site URL & Environment ID for QA but List ID & Flow ID will not be there as the list and flow are not there in QA environment. So, first create the list in QA environment and then get it's List ID.
- Now, we are ready to change these 3 values in flows. After replacing in flows, we will import these flows in QA environment and then get flow id of ConvertGUID. To replace the values, we will use, below JSON. Copy the below JSON in a notepad file and save it as "ForFlows.json".
[ { "__comments":"Below is for Generic Site URL", "source": "https://tenant.sharepoint.com/sites/DevSiteName-Dev", "destination": "https://tenant.sharepoint.com/sites/QASiteName-QA" }, { "__comments":"Below is for Relative Site URL", "source": "/sites/QASiteName-Dev", "destination": "/sites/QASiteName-QA" }, { "__comments":"Below is for Form Name", "source": "SampleList on Dev Site Name - Dev forms", "destination": "SampleList on QA Site Name - QA forms" }, { "__comments":"Below is for Environment ID", "source": "Write the DEV EnvironmentID here", "destination": "Write the QA EnvironmentID here" }, { "__comments":"Below is for SampleList List ID", "source": "Write the List ID of SampleList on DEV here", "destination": "Write the List ID of SampleList on QA here" } ]- After replacing the values, our JSON is ready to use.
- Now, we need a PowerShell script which will use this JSON, pick the flow and then change the values in them. Copy the below powershell script and save it as "PowerShellReplacement.ps1"
- PowerShell is-
# Color Options: Black, DarkBlue, DarkGreen, DarkCyan, DarkRed, DarkMagenta, DarkYellow, Gray, DarkGray, Blue, Green, Cyan, Red, Magenta, Yellow, White

Param (
   [string] $jsonPath,
   [string] $solutionPath
)

# Need to encode in proper UTF8
$locationPath = (Get-Location).Path
$Utf8NoBomEncoding = New-Object System.Text.UTF8Encoding $False
[System.Environment]::CurrentDirectory = $locationPath

# Global Var
$solutionName = [System.IO.Path]::GetFileNameWithoutExtension($solutionPath)
$strNow = Get-Date -Format "yyyyMMdd_HHmm"
$newSolutionFolder = "$($solutionName)_$($strNow)"

# Get JSON
$json = Get-Content -Raw -Path $jsonPath | ConvertFrom-Json

# Functions
# =====> Replace content for a specific file
function ReplaceValue {
    param([string]$path)
    $content = Get-Content -path "$path" -Raw -Encoding UTF8
    $strContent = $content
    foreach($value in $json){
        $strContent = $strContent.ireplace($value.source, $value.destination)
    }
    return $strContent
}

# ====> Edit file, replace value and export it as encoded utf8
function EditFileTemplate {
    param( [string]$path )
    $valuereplaced = ReplaceValue -path $path

    [System.IO.File]::WriteAllLines($path, $valuereplaced, $Utf8NoBomEncoding)
}

# ====> Parsing file and folder
function ParseFilesNFolders{
    param([string]$thisFolder)
    Write-Host "Parsing FOLDER $thisFolder ..."
    $folderContent = Get-ChildItem -Path $thisFolder
    foreach($content in $folderContent){
        if($content.GetType() -eq [System.IO.DirectoryInfo]){
            ParseFilesNFolders -thisFolder "$thisFolder\$content"
        }
        else{
            $ext = [System.IO.Path]::GetExtension($content)
            Switch($ext){
                ".json"{
                    Write-Host "Replacing value(s) in $thisFolder\$content"
                    EditFileTemplate "$thisFolder\$content"
                    Write-Host "$thisFolder\$content DONE" -ForegroundColor Green
                }
                ".msapp"{
                    Write-Host "Temporary extract msapp file"
                    $msappFileName = [System.IO.Path]::GetFileNameWithoutExtension("$thisFolder\$content")
                    New-Item -Path ".\Temp\$newSolutionFolder" -Name $msappFileName -ItemType "directory" | Out-Null

                    Copy-Item "$thisFolder\$content" -Destination ".\Temp\$newSolutionFolder\$content"
                    Rename-Item ".\Temp\$newSolutionFolder\$content" "$msappFileName.zip"

                    Expand-Archive ".\Temp\$newSolutionFolder\$msappFileName.zip" -DestinationPath ".\Temp\$newSolutionFolder\$msappFileName"
                    Write-Host "Extracted into .\Temp\$newSolutionFolder\$msappFileName"
                    Remove-Item -Path ".\Temp\$newSolutionFolder\$msappFileName.zip" -Force
                    Remove-Item -Path "$thisFolder\$content" -Force

                    ParseFilesNFolders -thisFolder ".\Temp\$newSolutionFolder\$msappFileName"

                    Write-Host "Compress .\Temp\$newSolutionFolder\$msappFileName folder and save it into $thisFolder"
                    Compress-Archive -Path ".\Temp\$newSolutionFolder\$msappFileName\*" -DestinationPath "$thisFolder\$msappFileName.zip"
                    Write-Host "Rename $msappFileName.zip into $content"
                    Rename-Item "$thisFolder\$msappFileName.zip" "$content"
                    Write-Host "$content regenerated" -ForegroundColor Green

                }
                Default{
                    Write-Host "Skipped (File/Folder) : $content" -ForegroundColor DarkGray
                }
            }
        }
    }
}

################
#### SCRIPT ####
################

try{
    #Check if Output and Temp folder exist
    Write-Host "Check if Output folder exist"
    If(Test-Path ".\Output"){
        Write-Host "Output folder exist" -ForegroundColor Green
    }
    else{
        Write-Host "Output folder doesn't exist, creation in progress" -ForegroundColor Yellow
        New-Item -Path ".\" -Name "Output" -ItemType "directory" | Out-Null
        Write-Host "Output file created" -ForegroundColor Green
    }

    Write-Host "Check if Temp folder exist"
    If(Test-Path ".\Temp"){
        Write-Host "Temp folder exist" -ForegroundColor Green
    }
    else{
        Write-Host "Temp folder doesn't exist, creation in progress" -ForegroundColor Yellow
        New-Item -Path ".\" -Name "Temp" -ItemType "directory" | Out-Null
        Write-Host "Temp file created" -ForegroundColor Green
    }

    Write-Host ""

    #Get zip file name and create folder in Output Temp file
    Write-Host "Creating folder $newSolutionFolder in Output"
    New-Item -Path ".\Output" -Name $newSolutionFolder -ItemType "directory" | Out-Null
    Write-Host "$newSolutionFolder created in $locationPath\Output" -ForegroundColor Green
    Write-Host "Creating folder $newSolutionFolder in Temp"
    New-Item -Path ".\Temp" -Name $newSolutionFolder -ItemType "directory" | Out-Null
    Write-Host "$newSolutionFolder created in $locationPath\Temp" -ForegroundColor Green
    Write-Host ""

    #Unzip solution
    Write-Host "Get and unzip solution..."
    Expand-Archive $solutionPath -DestinationPath ".\Output\$newSolutionFolder"
    Write-Host "Unzipped in $locationPath\Output\$newSolutionFolder" -ForegroundColor Green
    Write-Host ""

    #Parse folder solution
    Write-Host "Parse file and folder in .\Output\$newSolutionFolder"

    ParseFilesNFolders -thisFolder ".\Output\$newSolutionFolder"

    Write-Host ""

    #Rebuild solution
    Write-Host "REBUILD SOLUTION"
    Compress-Archive -Path ".\Output\$newSolutionFolder\*" -DestinationPath ".\Output\$newSolutionFolder.zip"

    Write-Host "NEW SOLUTION:" -ForegroundColor Green
    Write-Host "$locationPath\Output\$newSolutionFolder.zip"-BackgroundColor DarkGreen

}
catch{
    Write-Host "ERROR:" -ForegroundColor Red
    Write-Host $_.Exception.Message -ForegroundColor Red
}

$t = Read-Host "Press enter to exit..."
- What this PowerShell do?
- It will take 2 input-
- JSON File path
- Solution File Path
- Now, it will create 2 folders Temp & Output. Then it will extract the files from zip folder, replace the values in each file one by one and then compress back to the same structure in Output Folder.
- For this, copy all the below 3 items in a folder in local system.
- ForFlows.json
- PowerShellReplacement.ps1
- All downloaded flows
- Open PowerShell window from Start menu.
- Traverse to the folder where all files are kept.
- Now, write below command-
- Press Enter.
- It will start doing the process and change all the values in folder. Once done it will ask you to press Enter to exit.
- The final solution is now ready in Output folder in zipped format.
- Once done, import the flow in QA environment. Now, copy ID of this flow (ConvertGUID) and update the below JSON.
[ { "__comments":"Below is for Generic Site URL", "source": "https://tenant.sharepoint.com/sites/DevSiteName-Dev", "destination": "https://tenant.sharepoint.com/sites/QASiteName-QA" }, { "__comments":"Below is for Relative Site URL", "source": "/sites/QASiteName-Dev", "destination": "/sites/QASiteName-QA" }, { "__comments":"Below is for Form Name", "source": "SampleList on Dev Site Name - Dev forms", "destination": "SampleList on QA Site Name - QA forms" }, { "__comments":"Below is for Environment ID", "source": "Write the DEV EnvironmentID here", "destination": "Write the QA EnvironmentID here" }, { "__comments":"Below is for SampleList List ID", "source": "Write the List ID of SampleList on DEV here", "destination": "Write the List ID of SampleList on QA here" }, { "__comments":"Below is for ConvertGUID Flow ID", "source": "Write the ID of ConvertGUID flow on DEV here", "destination": "Write the ID of ConvertGUID flow on QA here" } ]- Save this JSON as "ForPowerApps.JSON".
- We are ready with JSON, but we haven't downloaded the PowerApps package yet. For this go to SampleList >> List Settings >> Form Settings. Now, you will see that the options have been changed little bit. Instead of "Customize in PowerApps" option, now, you will be getting 2 other options "Modify form in PowerApps" and "See versions and usage". Former can be use to modify the form again. Latter can be used to Export the package. So click on latter one "See version and usage".
- It will open the PowerApps site-
- Click on Export Package. It will open the Export wizard. Give package a suitable name
- Change the Import Setup for Package Form as Create.
- For Flow "ConvertGUID" the import setup will always remain as "Update" as the flow already been imported in QA environment.
- Click on Export button.
- Now copy this package, "ForPowerApps.json" in same folder.
- Now, again use PowerShell to change the values in package.
- Final Output-
- Your package is ready to get imported in QA.
- Import the package as usual you import the PowerApps app. While importing, Import Status for form will be "Create New". For flow, it will "Update".
- Once imported, it is still not linked to SharePoint list in QA. For this, after import, open the app. just make a little bit of change (like adding a space in any text and revert back) so that PowerApps should ask you to Save it. Now click on File. It will ask you to Save. Save the package. After Save, it will ask you to "Publish to SharePoint". Publish it.
- All done. just refresh the SharePoint list in QA and click on "+ New" button. You new customized form start appearing.
- Now, what if you want to update the form later in future. You need to first delete the existing package from QA and re-import it.
- For this go to SampleList >> List Settings >. Form Settings.
- Click on "Use the default SharePoint form". The moment you will click on it, a new option "Delete custom form" will start appearing in second option.
- Click on "Delete custom form". It will prompt to confirm. confirm it. The form will get deleted. Now you can import the updated package again.
- This way we learned 2 topics here-
- How to Customize the SharePoint form in an environment other than Default environment.
- How to change the settings (IDs / URLs...) in packages from source to destination when moving packages from
- One Environment to Other
- One Tenant to Other
- You can use this approach for standard PowerApps applications or Power Automate Flows or both as well.
- If you are using multiple lists / flows in same form, then update the JSON by adding source/destination for all those ones.
- Now, What if, you haven't closed the tab when creating the custom form for the first time in dev site. It will create the custom form in default environment and then open in edit mode. No problem, we still can update the URL as per our requirement; delete the already created custom form and then use the newly created URL to create the custom form in DEV environment.
- Below, we have captured the 3rd url as well which we discussed above.
- Below is the URLs.
- First URL is that one we had captured in very initial stage. We are not using this URL.
- Second URL is the actual URL, we used in the process. It was captured when the URL start showing Default environment ID. We had captured this URL, changed the environment id from default one to dev one and then used the url.
- Third URL is the URL, when we had forgotten to close the tab after capturing the second url. At this stage a custom form app has been created in Default environment. If you see this url, there are only two changes.
- The value of action has been changed from "sp-new-formdata" to "edit".
- At the end of URL, a new parameter is being added with parameter name as "app-id".
- So, what we need to do is that, in this URL, we will-
- Change environment ID from Default one to Dev one.
- Change the action parameter value from "edit" to "sp-new-formdata".
- Remove the "app-id" parameter.
- Now it will become the URL mentioned at 4th number.
- If you see, now, URL at 2nd number and URL at 4th number at same.
- The only task now remaining is that go back to SampleList >> List Settings >> Form Settings. Here, you will find that now it is showing "Mofiy form in PowerApps".
- Choose the option "Use the default SharePoint form".
- Then click on "Delete custom form".
- Open the browser and paste the 4th URL (or the 2nd URL) and press Enter. It will open the PowerApps maker portal and create the custom form in DEV environment.


No comments:
Post a Comment
Note: Only a member of this blog may post a comment.