In our last post we have discussed on "CRUD Operations Using SPFx (SharePoint Online)". Let us discuss now on "CRUD Operation Using SPFx And React JS (SharePoint Online)".
Now, let us see, how we can create SPFx webpart. Before creating SPFx webpart, there are some pre-requisites that need to fulfill. Please refer SPFx Prerequisites page.
Let's begin-
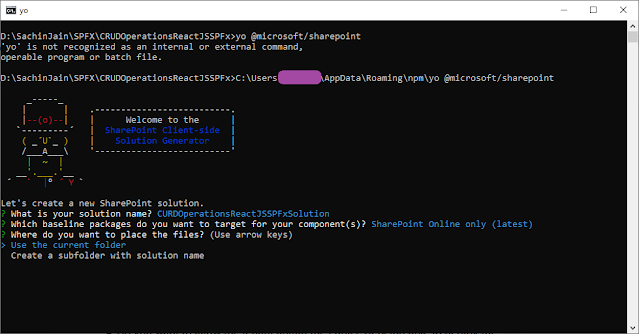
- Open command prompt and move to the folder where you need to create SPFx solution. I am creating SPFx solution in D drive.

- Now create a folder where SPFx solution files will be created using command "md CRUDOperationsReactJSSPFx". You make choose any name as per your wish. "md" is the DOS command to create directory/folder.
- Change the directory path using command "cd CRUDOperationsReactJSSPFx". "cd" is the DOS command to change the directory/folder.

- Execute the command "yo @microsoft/sharepoint". It runs Yeoman SharePoint Generator to create a new SPFx web part. Sometimes, it happens that when we had installed all the pre requisites, it doesn't gets installed globally. In that case, it fails to recognize the command.

- In such case, find out the path where all the installations took place. Copy the complete path and paste it before "yo". Press Enter

- Now, it will ask a series of questions ( name can be of your choice 😊 ) -
- What is your solution name? : CRUDOperationsReactJSSPFxSolution


- Which baseline packages do you want to target for your component(s)? : SharePoint Online only (latest)

- Where do you want to place the files? : Use the current folder
- Do you want to allow the tenant admin the choice of being able to deploy the solution to all sites immediately without running any feature deployment or adding apps in sites? : N


- Will the components in the solution require permissions to access web APIs that are unique and not shared with other components in the tenant? : N


- Which type of client-side component to create? : WebPart

- Apart form it, now it will ask the next set of questions that are specific about your web part ( name/description can be of your choice 😊 ) -
- What is your Web part name? : CRUDOperationsReactJSSPFxWP

- What is your Web part description? : Manage CRUD Operations Using SPFx And React JS

- Which framework would you like to use? : React

- Once you press Enter, it will start creating the SPFx webpart. It may take from 2-3 minutes to 20-25 minutes.


- Once completed, a Congratulations! message will be displayed on screen.

- Finally, WebPart has been created successfully. Now you may view it on local workbench, how it is looking. But we are stopping here as we have to modify it as per our need. Hence we will open the code in Visual Studio Code Editor. For this we will use "code ." command.

- Press Enter. It will open the SPFx webpart code is VSC editor.

- Coming back to command prompt window, we will use another command to see how the default WebPart looks like. For this we will use "gulp serve" command. In case of path issue, use the complete path

- This command executes a series of gulp tasks to create and start a local webserver hosting the endpoints localhost:4321 and localhost:5432. It will then open your default browser and load the workbench preview web parts from your local dev environment.

- 😟 Where is my webpart?
- Relax! Click on the + sign showing at the middle. It will populate the available webpart.

- Here is our webpart. Click on it. It will be added to the local workbench.

- Now, open your Sharepoint online site. change the root URL by removing the SitePages/<YourDefaultPage>.aspx by "_layouts/15/workbench.aspx" (https://yoursitename.sharepoint.com/sites/yoursubsitename/_layouts/15/workbench.aspx) and press Enter. (Remember WorkBench is available only in Online Site. It is not available in SharePoint 2016/2013...).

- This is your SharePoint site workbench. Now click on + sign at the middle. Surprisingly, It will show your webpart along with others.
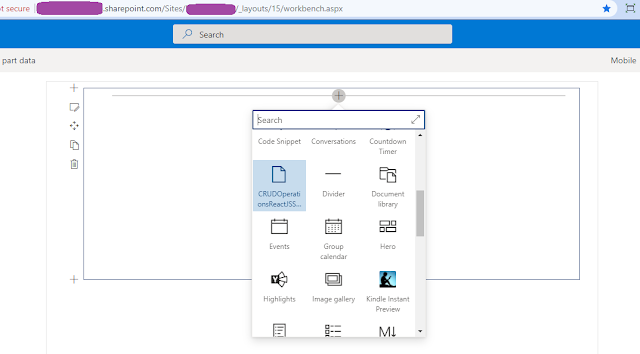
- Click on it. It will be added to the SharePoint site workbench.

- Till now, we were creating our default SPFx webpart. Now we have to modify it so that we can try CRUD operations using it. For this, first we need a SharePoint list. I am using a simple list (name:- Registration Details) with 4 columns-
- Title : (or Full Name) of type Single Line of Text
- Address : of type Single Line of Text
- Mobile : of type Single Line of Text
- EmailID : of type Single Line of Text

- Fine. Till now you have done good job. Now, come to the code part. Remember, we had opened our SPFx webpart code in code editor using "code ." command.

- All the files which we need to create/edit can be accessed through Explorer window-

- Now the next process is split into 4 parts-
- Configure Property for List Name
- Model for List Item
- Add Controls to WebPart
- Implement CRUD Operations
- CREATE
- READ
- UPDATE
- DELETE
- Configure Property for List Name
- Here we will update below files-
- src\webparts\crudOperationsReactJsspFxWp\loc\mystrings.d.ts
- src\webparts\crudOperationsReactJsspFxWp\loc\en-us.js
- src\webparts\crudOperationsReactJsspFxWp\components\ICrudOperationsReactJsspFxWpProps.ts
- src\webparts\crudOperationsReactJsspFxWp\CrudOperationsReactJsspFxWpWebPart.ts
- src\webparts\crudOperationsReactJsspFxWp\components\CrudOperationsReactJsspFxWp.tsx
- Let's do step by step. Open the file "src\webparts\crudOperationsReactJsspFxWp\loc\mystrings.d.ts" and rename
- DescriptionFieldLabel to ListNameFieldLabel
- BEFORE-
- declare interface ICrudOperationsReactJsspFxWpWebPartStrings {PropertyPaneDescription: string;BasicGroupName: string;DescriptionFieldLabel: string;}
- AFTER-
- declare interface ICrudOperationsReactJsspFxWpWebPartStrings {PropertyPaneDescription: string;BasicGroupName: string;ListNameFieldLabel: string;}
- Next Open the file "src\webparts\crudOperationsReactJsspFxWp\loc\en-us.js" and rename
- DescriptionFieldLabel to ListNameFieldLabel
- "Description Field" to "List Name"
- BEFORE-
- define([], function() {return {"PropertyPaneDescription": "Description","BasicGroupName": "Group Name","DescriptionFieldLabel": "Description Field"}});
- AFTER-
- define([], function() {return {"PropertyPaneDescription": "Description","BasicGroupName": "Group Name","ListNameFieldLabel": "List Name"}});
- Next Open the file "src\webparts\crudOperationsReactJsspFxWp\components\ICrudOperationsReactJsspFxWpProps.ts" and rename
- description to listName
- BEFORE-
- export interface ICrudOperationsReactJsspFxWpProps {description: string;}
- AFTER-
- export interface ICrudOperationsReactJsspFxWpProps {listName: string;}
- Next Open the file "src\webparts\crudOperationsReactJsspFxWp\CrudOperationsReactJsspFxWpWebPart.ts" and rename
- description to listName
- DescriptionFieldLabel to ListNameFieldLabel
- BEFORE-
- export interface ICrudOperationsReactJsspFxWpWebPartProps {description: string;}
- AFTER-
- export interface ICrudOperationsReactJsspFxWpWebPartProps {listName: string;}
- BEFORE-
- public render(): void {const element: React.ReactElement<ICrudOperationsReactJsspFxWpProps> = React.createElement(CrudOperationsReactJsspFxWp,{description: this.properties.description});ReactDom.render(element, this.domElement);}
- AFTER-
- public render(): void {const element: React.ReactElement<ICrudOperationsReactJsspFxWpProps> = React.createElement(CrudOperationsReactJsspFxWp,{listName: this.properties.listName});ReactDom.render(element, this.domElement);}
- BEFORE-
- groups: [{groupName: strings.BasicGroupName,groupFields: [PropertyPaneTextField('description', {label: strings.DescriptionFieldLabel})]}]
- AFTER-
- groups: [{groupName: strings.BasicGroupName,groupFields: [PropertyPaneTextField('listName', {label: strings.ListNameFieldLabel})]}]
- Now Open last file of this section "src\webparts\crudOperationsReactJsspFxWp\components\CrudOperationsReactJsspFxWp.tsx" and rename
- description to listName
- BEFORE-
- <p className={ styles.description }>{escape(this.props.description)}</p>
- AFTER-
- <p className={ styles.description }>{escape(this.props.listName)}</p>
- Now, if your workbench is still running, refresh the page. You will get the webpart as below-

- Now click on webpart. Webpart edit controls will appear on left side. click on pencil icon-

- A new property window will appear on right side. Type the list name in the box provided. You will see that as you change the name, the same appears on webpart-

- The first part completes. Now we will create some models to pass list item data and the state of process execution.
- Model for List Item
- Here we will create below files-
- src\webparts\crudOperationsReactJsspFxWp\components\IListItem.ts
- src\webparts\crudOperationsReactJsspFxWp\components\CrudOperationsReactJsspFxWpState.ts
- Then we will update below file-
- src\webparts\crudOperationsReactJsspFxWp\components\CrudOperationsReactJsspFxWp.tsx
- Let's create the IListItem.ts file at path "src\webparts\crudOperationsReactJsspFxWp\components\". For this click on components in Explorer window and type in the file name with extension "IListItem.ts"-


- Add code to this file-
- export interface IListItem {Title:string;Address:string;Mobile:string;EmailID:string;ID:Int32Array;}
- The file will appear like below-

- As ReactJS acts on change of state. Hence let's add a state to our solution. For this, create the CrudOperationsReactJsspFxWpState.ts file at path "src\webparts\crudOperationsReactJsspFxWp\components\". For this click on components in Explorer window and type in the file name with extension "CrudOperationsReactJsspFxWpState.ts", the same way we did for "IListItem.ts"-

- Import "IListItem" in this file then add an interface as below-
- import {IListItem} from './IListItem'export interface ICrudOperationsReactJsspFxWpState{status:string;items:IListItem[];}
- The file will appear as below-

- Now we will update the "src\webparts\crudOperationsReactJsspFxWp\components\CrudOperationsReactJsspFxWp.tsx" file.
- Look for the code-
- import { ICrudOperationsReactJsspFxWpProps } from './ICrudOperationsReactJsspFxWpProps';
- Now import "CrudOperationsReactJsspFxWpState.ts" file after it-
- import {ICrudOperationsReactJsspFxWpState} from './CrudOperationsReactJsspFxWpState'
- Then look for below code line-
- export default class CrudOperationsReactJsspFxWp extends React.Component<ICrudOperationsReactJsspFxWpProps, {}> {
- Replace with below-
- export default class CrudOperationsReactJsspFxWp extends React.Component<ICrudOperationsReactJsspFxWpProps, ICrudOperationsReactJsspFxWpState> {
- Now add a constructor after the above line-
- constructor (props:ICrudOperationsReactJsspFxWpProps, state:ICrudOperationsReactJsspFxWpState){super(props);this.state = {status:'Ready',items:[]};}
- Now the file looks like below-

- This completes the Model Part. Now we will add controls to the webpart so that we can perform CRUD operations-
- Add Controls To WebPart
- Here we will update below files-
- src\webparts\crudOperationsReactJsspFxWp\components\ICrudOperationsReactJsspFxWpProps.ts
- src\webparts\crudOperationsReactJsspFxWp\components\CrudOperationsReactJsspFxWp.tsx
- src\webparts\crudOperationsReactJsspFxWp\CrudOperationsReactJsspFxWpWebPart.ts
- src\webparts\crudOperationsReactJsspFxWp\components\CrudOperationsReactJsspFxWp.module.scss
- Let's start.
- Open "ICrudOperationsReactJsspFxWpProps.ts" file at location "src\webparts\crudOperationsReactJsspFxWp\components\".
- Add two more properties-
- spHttpClient: SPHttpClient;siteUrl: string;
- Also add reference of SPHttpClient-
- import {SPHttpClient} from '@microsoft/sp-http';
- BEFORE-

- AFTER-

- Now open "CrudOperationsReactJsspFxWp.tsx" file at location "src\webparts\crudOperationsReactJsspFxWp\components\"
- Look for the below code-
- import { escape } from '@microsoft/sp-lodash-subset';
- Import "IListItem" interface after it-
- import {IListItem} from './IListItem';
- BEFORE-

- AFTER-

- Now import "SPHttpClient" and "SPHttpClientResponse" after above-
- import {SPHttpClient} from '@microsoft/sp-http';import {SPHttpClientResponse} from '@microsoft/sp-http';
- Then add Props interface-
- import { ICrudOperationsReactJsspFxWpWebPartProps } from '../CrudOperationsReactJsspFxWpWebPart';
- It will look like-

- Now update the render() method-
- Look for the code-
- public render(): React.ReactElement<ICrudOperationsReactJsspFxWpProps> {return (<div className={ styles.crudOperationsReactJsspFxWp }><div className={ styles.container }><div className={ styles.row }><div className={ styles.column }><span className={ styles.title }>Welcome to SharePoint!</span><p className={ styles.subTitle }>Customize SharePoint experiences using Web Parts.</p><p className={ styles.description }>{escape(this.props.listName)}</p><a href="https://aka.ms/spfx" className={ styles.button }><span className={ styles.label }>Learn more</span></a></div></div></div></div>);}
- Replace it with below-
- public render(): React.ReactElement<ICrudOperationsReactJsspFxWpProps> {const tblPrefix = `<table className={styles.table}><th className={styles.th}>Full Name</th><th className={styles.th}>Address</th><th className={styles.th}>Email ID</th><th className={styles.th}>Phone Number</th><th className={styles.th}>Edit</th><th className={styles.th}>Delete</th>`;const tblSuffix = `</table>`;const itemsCount = this.state.items.length;const items: JSX.Element[] = this.state.items.map((item: IListItem, i: number): JSX.Element => {return (<tr className={styles.tr}><td className={styles.td}>{item.ID}</td><td className={styles.td}>{item.Title}</td><td className={styles.td}>{item.Address}</td><td className={styles.td}>{item.EmailID}</td><td className={styles.td}>{item.Mobile}</td><td className={styles.td}><button id="btnGetRecordData" className={styles['getRecord-Button']} data-val={`${item.ID}`} onClick={() => this.UpdateWithGridEditButton(item.ID)}>Edit</button></td><td className={styles.td}><button id="btnDelRecordData" className={styles['delRecord-Button']} data-val={`${item.ID}`} onClick={() => this.DeleteWthGridDeleteButton(item.ID)}>Delete</button></td></tr>);});return (<div className={ styles.crudOperationsReactJsspFxWp }><div className={ styles.container }><div className={ styles.row }><div className={ styles.column }><span className={ styles.title }>Welcome to SharePoint!</span><p className={ styles.subTitle }>Customize SharePoint experiences using Web Parts.</p><p className={ styles.description }>{escape(this.props.listName)}</p><div><table><tr><td>Full Name</td><td><input type="text" id="idFullName" name="fullName" placeholder="Full Name.."/></td></tr><tr><td>Address</td><td><input type="text" id="idAddress" name="address" placeholder="Address.."/></td></tr><tr><td>Mobile Number</td><td><input type="text" id="idPhoneNumber" name="mobile" placeholder="Mobile Number.."/></td></tr><tr><td>Email ID</td><td><input type="text" id="idEmailId" name="emailid" placeholder="Email ID.."/></td></tr></table><div id="tblRegistrationDetails"></div></div><div className={`ms-Grid-row ms-bgColor-themeDark ms-fontColor-white ${styles.row}`}><div className='ms-Grid-col ms-u-lg10 ms-u-xl8 ms-u-xlPush2 ms-u-lgPush1'><a href="#" className={`${styles.button}`} onClick={() => this.createItem()}><span className={styles.label}>Create</span></a><a href="#" className={`${styles.button}`} onClick={() => this.updateItem()}><span className={styles.label}>Update</span></a><a href="#" className={`${styles.button}`} onClick={() => this.deleteItem()}><span className={styles.label}>Delete</span></a>{/* <a href="#" className={`${styles.button}`} onClick={() => this.readItem()}><span className={styles.label}>Read</span></a> */}<a href="#" className={`${styles.button}`} onClick={() => this.getListData()}><span className={styles.label}>All Data</span></a></div></div><div className={`ms-Grid-row ms-bgColor-themeDark ms-fontColor-white ${styles.row}`}><div className='ms-Grid-col ms-u-lg10 ms-u-xl8 ms-u-xlPush2 ms-u-lgPush1'>{this.state.status}{this.state.items.length ?<table className={styles.table}><th className={styles.th}>ID</th><th className={styles.th}>Full Name</th><th className={styles.th}>Address</th><th className={styles.th}>Email ID</th><th className={styles.th}>Phone Number</th><th className={styles.th}>Edit</th><th className={styles.th}>Delete</th>{items}</table>:''}</div></div></div></div></div></div>);}
- This piece of code contains-
- Input Boxes to capture data to perform CRUD Operations
- CRUD operations button
- Table structure to show all records on page load
- Now add CRUD functions after the above piece of code (means at the end of file just before the last closing bracket "}"-
- CREATE
- UDPATE
- DELETE
- READ
- UPDATE (With Grid Edit Button)
- DELETE (WIth Grid Delete Button)
- CLEAR (To Reset The Input Fields)
- CREATE-
- private createItem(): void {this.setState({status: 'Creating item...',items: []});const body: string = JSON.stringify({'Title': document.getElementById('idFullName')["value"],'Address': document.getElementById('idAddress')["value"],'Mobile': document.getElementById('idPhoneNumber')["value"],'EmailID': document.getElementById('idEmailId')["value"]});this.props.spHttpClient.post(`${this.props.siteUrl}/_api/web/lists/getbytitle('${this.props.listName}')/items`,SPHttpClient.configurations.v1,{headers: {'Accept': 'application/json;odata=nometadata','Content-type': 'application/json;odata=nometadata','odata-version': ''},body: body}).then((response: SPHttpClientResponse): Promise<IListItem> => {return response.json();}).then((item: IListItem): void => {this.setState({status: `Item '${item.Title}' (ID: ${item.ID}) successfully created`,items: [item]});this.getListData();this.clear();}, (error: any): void => {this.setState({status: 'Error while creating the item: ' + error,items: []});this.getListData();this.clear();});this.getListData();this.clear();}
- UPDATE-
- private updateItem(): void {this.setState({status: 'Updating Item ...',items: []});const body: string = JSON.stringify({'Title': document.getElementById('idFullName')["value"],'Address': document.getElementById('idAddress')["value"],'Mobile': document.getElementById('idPhoneNumber')["value"],'EmailID': document.getElementById('idEmailId')["value"]});this.props.spHttpClient.post(`${this.props.siteUrl}/_api/web/lists/getbytitle('${this.props.listName}')/items(${this.listItemId})`,SPHttpClient.configurations.v1,{headers: {'Accept': 'application/json;odata=nometadata','Content-type': 'application/json;odata=nometadata','odata-version': '','IF-MATCH': '*','X-HTTP-Method': 'MERGE'},body: body}).then((response: SPHttpClientResponse): void => {this.setState({status: `Item successfully updated`,items: []});this.getListData();this.clear();}, (error: any): void => {this.setState({status: `Error updating item: ${error}`,items: []});this.getListData();this.clear();});this.getListData();this.clear();}
- DELETE-
- private deleteItem() {if (!window.confirm('Are you sure you want to delete this item?')) {return;}this.setState({status: 'Deleting Item ...',items: []});return this.props.spHttpClient.post(`${this.props.siteUrl}/_api/web/lists/getbytitle('${this.props.listName}')/items(${this.listItemId})`,SPHttpClient.configurations.v1,{headers: {'Accept': 'application/json;odata=nometadata','Content-type': 'application/json;odata=verbose','odata-version': '','IF-MATCH': '*','X-HTTP-Method': 'DELETE'}}).then((response: SPHttpClientResponse): void => {this.setState({status: `Item successfully deleted`,items: []});this.getListData();this.clear();}, (error: any): void => {alert(`${error}`);});this.getListData();this.clear();}
- READ-
- private getListData() {this.props.spHttpClient.get(`${this.props.siteUrl}/_api/web/lists/getbytitle('${this.props.listName}')/items`, SPHttpClient.configurations.v1).then(response => {return response.json().then((items: any): void => {let listItems: IListItem[] = items.value;this.setState({status: `Items Count:- ${items.value.length}`,items: listItems});})})}
- UPDATE (With Grid Edit Button)-
- private UpdateWithGridEditButton(Id){this.props.spHttpClient.get(`${this.props.siteUrl}/_api/web/lists/getbytitle('${this.props.listName}')/items?$select=*&$filter=Id eq '${Id}'`, SPHttpClient.configurations.v1).then(response => {return response.json().then((item: any): void => {document.getElementById('idFullName')["value"] = item.value[0].Title;document.getElementById('idAddress')["value"] = item.value[0].Address;document.getElementById('idEmailId')["value"] = item.value[0].EmailID;document.getElementById('idPhoneNumber')["value"] = item.value[0].Mobile;this.listItemId = item.value[0].Id;});});}
- DELETE (WIth Grid Delete Button)-
- private DeleteWthGridDeleteButton(Id){if (!window.confirm('Are you sure you want to delete this item?')) {return;}this.props.spHttpClient.post(`${this.props.siteUrl}/_api/web/lists/getbytitle('${this.props.listName}')/items(${Id})`,SPHttpClient.configurations.v1,{headers: {'Accept': 'application/json;odata=nometadata','Content-type': 'application/json;odata=verbose','odata-version': '','IF-MATCH': '*','X-HTTP-Method': 'DELETE'}}).then((response: SPHttpClientResponse): void => {this.setState({status: `Item successfully deleted`,items: []});this.getListData();this.clear();}, (error: any): void => {alert(`${error}`);});}
- CLEAR (To Reset The Input Fields)-
- private clear(): void {document.getElementById('idFullName')["value"] = "";document.getElementById('idAddress')["value"] = "";document.getElementById('idEmailId')["value"] = "";document.getElementById('idPhoneNumber')["value"] = "";}
- Now add one variable which will hold item id upon which action is getting performed. For this find beolw code-
- constructor (props:ICrudOperationsReactJsspFxWpProps, state:ICrudOperationsReactJsspFxWpState)
- Add below code just before it-
- private listItemId: number = 0;
- BEFORE-

- AFTER-

- Next is file "CrudOperationsReactJsspFxWpWebPart.ts" at location "src\webparts\crudOperationsReactJsspFxWp\".
- Here we will add code to initiate site url and spHttpClient. For this find below code-
- listName: this.properties.listName
- Add code for siteURL and spHttpClient after it-
- ,spHttpClient: this.context.spHttpClient,siteUrl: this.context.pageContext.web.absoluteUrl
- BEFORE-
- const element: React.ReactElement<ICrudOperationsReactJsspFxWpProps> = React.createElement(CrudOperationsReactJsspFxWp,{listName: this.properties.listName});
- AFTER-
- const element: React.ReactElement<ICrudOperationsReactJsspFxWpProps> = React.createElement(CrudOperationsReactJsspFxWp,{listName: this.properties.listName,spHttpClient: this.context.spHttpClient,siteUrl: this.context.pageContext.web.absoluteUrl});
- Finally add some CSS to css file. For this open file "CrudOperationsReactJsspFxWp.module.scss" at location "src\webparts\crudOperationsReactJsspFxWp\components\".
- Add below css at the end of file just before the last closing bracket "}"-
- .table, .th, .tr, .td{border: 1px;border-style: solid;border-color: #DA2128;border-spacing: 0px;}.getRecord-Button, .delRecord-Button{color: #DA2128;}
- The code will look like-
- BEFORE-

- AFTER-

- Next look for below css-
- // Basic Buttonoutline: transparent;position: relative;font-family: "Segoe UI WestEuropean","Segoe UI",-apple-system,BlinkMacSystemFont,Roboto,"Helvetica Neue",sans-serif;-webkit-font-smoothing: antialiased;font-size: $ms-font-size-m;font-weight: $ms-font-weight-regular;border-width: 0;text-align: center;cursor: pointer;display: inline-block;padding: 0 16px;
- Add below css just after it-
- border-radius: .25em;margin: 2px;
- Final look-
- BEFORE-

- AFTER-

- Finally Done. Now refresh the workbench. It will appear as below-

- Let's play with it. First add a record-
- Input some data-

- Click on Create Button-

- Wow! record inserted in table. Hey, what is this 1st record? 😕
- Don't worry, it is the record, I had created a week ago. As I am refreshing the table, hence all records are getting populated.
- Let's edit this record now. For this click on Edit button provided ahead of it. It will load this record in input boxes-

- I am updating last digit of mobile number from 0 to 5 and clicking on Update button-

- Hurray! My record has been updated successfully.
- Now I will try to delete the first record with ID 16. For this I am clicking on Delete button provided ahead to it. It will ask me to whether delete or not-

- The moment, I say Yes by clicking on OK, it deletes the record and refresh the table.

- Now to test the All Data button, I had added one record directly in list-

- Now clicked on "All Data" button to load the table. Wow, it loaded all records-

- To delete the record using Delete button provided separately, you need to first click on Edit button in grid ahead or that record. It will populate the record in input boxes. Now click on Delete button. It will ask for confirmation. Once you OK it, it will delete and reload the grid.


This way, we can make CRUD operations using SPFx webpart and React JS.
- Refer more details upon SPFx WebPart, please visit Microsoft Website.
Update (Date: 14 June 2021):-
- In case, if you wish to get the ID of the record created using Save command, it might be possible you won't get here. for this, you need to update "odata=nometadata" with "odata.metadata=minimal".
- Or you may update the existing code with below one-
this.context.spHttpClient.post(`${this.context.pageContext.web.absoluteUrl}/_api/web/lists/getbytitle('${this.properties.listName}')/items`,
      SPHttpClient.configurations.v1,
      {
        headers: {
          'Accept': 'application/json;odata.metadata=minimal',
          'Content-type': 'application/json;odata.metadata=minimal',
          'X-HTTP-Method': 'POST'
        },
        body: body
      }).then((response: SPHttpClientResponse): Promise<IListItem> => {
        return response.json();
      })
      .then((item:IListItem):void=>{
        alert(`Item '${item.Name}' (ID: ${item.ID}) successfully created`)
      }, (error: any): void => {
        alert(`${error}`);
      });
No comments:
Post a Comment
Note: Only a member of this blog may post a comment.