Hello Friends,
Welcome back with another post on Dynamics 365. This post is the 2nd part of CRUD operations.
In last post, we have done basic preparations like Creating solution, entity, adding web resource in solution, creating new form, adding section, adding web resource file in form.
Dynamics 365: CRUD Operations-1 (Basic Preparations)
Today, we will learn about getting all items using javascript (Xrm.WebApi).
Let's start-
- First of all, we will update the HTML file. First, we will add some CSS & JS File references. Then added a basic HTML layout on how the data will be displayed.
<html>
    <head></head>
    <body onfocusout="parent.setEmailRange();" style="overflow-wrap: break-word;">
        <meta charset="UTF-8">
        <link rel="stylesheet" href="https://static2.sharepointonline.com/files/fabric/office-ui-fabric-js/1.4.0/css/fabric.min.css">
        <link rel="stylesheet" href="https://static2.sharepointonline.com/files/fabric/office-ui-fabric-js/1.4.0/css/fabric.components.min.css">
        <link rel="stylesheet" href="https://stackpath.bootstrapcdn.com/bootstrap/4.3.1/css/bootstrap.min.css" integrity="sha384-ggOyR0iXCbMQv3Xipma34MD+dH/1fQ784/j6cY/iJTQUOhcWr7x9JvoRxT2MZw1T" crossorigin="anonymous">
        <link href="https://unpkg.com/bootstrap-table@1.18.1/dist/bootstrap-table.min.css" rel="stylesheet">

        <script src="https://static2.sharepointonline.com/files/fabric/office-ui-fabric-js/1.4.0/js/fabric.min.js"></script>
        <script src="https://ajax.googleapis.com/ajax/libs/jquery/3.2.1/jquery.min.js"></script>
        <script src="https://code.jquery.com/jquery-3.3.1.slim.min.js" integrity="sha384-q8i/X+965DzO0rT7abK41JStQIAqVgRVzpbzo5smXKp4YfRvH+8abtTE1Pi6jizo" crossorigin="anonymous"></script>
        <script src="https://cdnjs.cloudflare.com/ajax/libs/popper.js/1.14.7/umd/popper.min.js" integrity="sha384-UO2eT0CpHqdSJQ6hJty5KVphtPhzWj9WO1clHTMGa3JDZwrnQq4sF86dIHNDz0W1" crossorigin="anonymous"></script>
        <script src="https://stackpath.bootstrapcdn.com/bootstrap/4.3.1/js/bootstrap.min.js" integrity="sha384-JjSmVgyd0p3pXB1rRibZUAYoIIy6OrQ6VrjIEaFf/nJGzIxFDsf4x0xIM+B07jRM" crossorigin="anonymous"></script>
        <script src="https://code.jquery.com/jquery-3.3.1.slim.min.js" integrity="sha384-q8i/X+965DzO0rT7abK41JStQIAqVgRVzpbzo5smXKp4YfRvH+8abtTE1Pi6jizo" crossorigin="anonymous"></script>
        <script src="https://cdnjs.cloudflare.com/ajax/libs/popper.js/1.14.7/umd/popper.min.js" integrity="sha384-UO2eT0CpHqdSJQ6hJty5KVphtPhzWj9WO1clHTMGa3JDZwrnQq4sF86dIHNDz0W1" crossorigin="anonymous"></script>
        <script src="https://stackpath.bootstrapcdn.com/bootstrap/4.3.1/js/bootstrap.min.js" integrity="sha384-JjSmVgyd0p3pXB1rRibZUAYoIIy6OrQ6VrjIEaFf/nJGzIxFDsf4x0xIM+B07jRM" crossorigin="anonymous"></script>
        <script src="https://unpkg.com/bootstrap-table@1.16.0/dist/bootstrap-table.min.js"></script>
        <script src="https://unpkg.com/tableexport.jquery.plugin/tableExport.min.js"></script>
        <style type="text/css">
            .footer {
                position: fixed;
                bottom: 0;
                right: 0;
                padding-bottom: 10px;
                padding-right: 10px;
            }

            .footerButton {
                width: 150px;
            }
        </style>
        <div>
            <table id="table" data-search="true" data-header-style="headerStyle" data-page-size="25">
                <thead>
                    <tr>
                        <th data-field="id" data-visible="false" data-checkbox="true">Id</th>
                        <th data-field="name" data-sortable="true">Full Name</th>
                        <th data-field="mainphone" data-sortable="true">Main Phone</th>
                        <th data-field="primaryemail" data-sortable="true">EMail (Primary)</th>
                        <th data-field="primarycontact" data-sortable="true">Primary Contact</th>
                        <th data-field="updateitem" data-sortable="false">Update</th>
                    </tr>
                </thead>
            </table>
        </div>
    </body>
</html>
- Now, update this file in D365 Web Resources. If you still have Solutions window open, then go to that window, otherwise, go to Settings >> Solutions >> CRUD Demo Solution.
- Now, there are 2 ways to update the Web Resource file.
- Upload the updated file
- Choose the text editor to update the content.
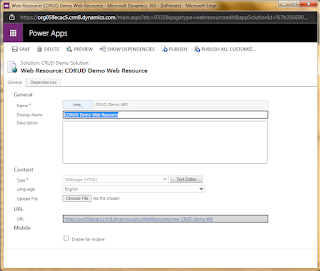
- I am using 2nd one (Text Editor). For this, click on Text Editor button. It will show you a popup window with 2 tabs - Rich Text, Source. Click on Source tab.
- You will be surprised that you had uploaded blank HTML file, then from where this code comes from. It is added by D365. Well, no problem, we have included this piece of code in our HTML as well. Just copy the entire HTML shown above and paste it in this window.
- Click on OK. It will be saved and the popup gets closed. Now save the Web Resource and publish it.
- Remember, every time you are making any change in file, you need to Save it and then Publish it.
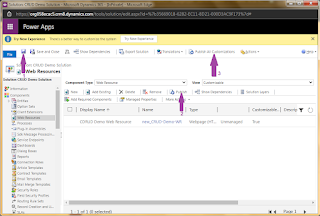
- Close this popup and go back to Solutions popup. Click on Save / Publish / Publish All Customizations.
- At this point Save and Publish below ones-
- Web Resources (in Solution)
- Entity Form (in Solution >> Entity)
- Entity (in Solution)
- Now, go back to D365 dashboard. Click on Settings >> Advanced Settings.
- It will open a new window. Here again click on arrow just next to Settings and click on Apps.
- It will navigate the screen to the page where it will show all the Apps published in D365. Here click on first app - "Dynamics 365 - custom".
- Actually, the entity you have created would not be reflecting on D365 dashboard. So, this is the app, designed by Microsoft, where your custom entities will reflect.
- Here it is. Click on this entity. Sometimes, it may take time due to Sync issues.
- Click on "+ New".
- Here is our HTML. Wow!
- Now, we will add our script to get the records from Account entity.
- Before, going deep into that, you should know the internal field names of Account Entity. You may go to Settings >> Advanced Settings >> Settings >> Customizations >> Customize the system >> Entities >> Account >> Fields.
- Here we need to fetch below fields:-
- accountid (Id)
- name (Name)
- telephone1 (Main Phone)
- emailaddress1 (Email Primary)
- primarycontactid (Primary Contact)
- Now, go back to HTML file (on your local system) and replace the entire HTML content with below one.
<html>
    <head></head>
    <body onfocusout="parent.setEmailRange();" style="overflow-wrap: break-word;">
        <meta charset="UTF-8">
        <link rel="stylesheet" href="https://static2.sharepointonline.com/files/fabric/office-ui-fabric-js/1.4.0/css/fabric.min.css">
        <link rel="stylesheet" href="https://static2.sharepointonline.com/files/fabric/office-ui-fabric-js/1.4.0/css/fabric.components.min.css">
        <link rel="stylesheet" href="https://stackpath.bootstrapcdn.com/bootstrap/4.3.1/css/bootstrap.min.css" integrity="sha384-ggOyR0iXCbMQv3Xipma34MD+dH/1fQ784/j6cY/iJTQUOhcWr7x9JvoRxT2MZw1T" crossorigin="anonymous">
        <link href="https://unpkg.com/bootstrap-table@1.18.1/dist/bootstrap-table.min.css" rel="stylesheet">

        <script src="https://static2.sharepointonline.com/files/fabric/office-ui-fabric-js/1.4.0/js/fabric.min.js"></script>
        <script src="https://ajax.googleapis.com/ajax/libs/jquery/3.2.1/jquery.min.js"></script>
        <script src="https://code.jquery.com/jquery-3.3.1.slim.min.js" integrity="sha384-q8i/X+965DzO0rT7abK41JStQIAqVgRVzpbzo5smXKp4YfRvH+8abtTE1Pi6jizo" crossorigin="anonymous"></script>
        <script src="https://cdnjs.cloudflare.com/ajax/libs/popper.js/1.14.7/umd/popper.min.js" integrity="sha384-UO2eT0CpHqdSJQ6hJty5KVphtPhzWj9WO1clHTMGa3JDZwrnQq4sF86dIHNDz0W1" crossorigin="anonymous"></script>
        <script src="https://stackpath.bootstrapcdn.com/bootstrap/4.3.1/js/bootstrap.min.js" integrity="sha384-JjSmVgyd0p3pXB1rRibZUAYoIIy6OrQ6VrjIEaFf/nJGzIxFDsf4x0xIM+B07jRM" crossorigin="anonymous"></script>
        <script src="https://code.jquery.com/jquery-3.3.1.slim.min.js" integrity="sha384-q8i/X+965DzO0rT7abK41JStQIAqVgRVzpbzo5smXKp4YfRvH+8abtTE1Pi6jizo" crossorigin="anonymous"></script>
        <script src="https://cdnjs.cloudflare.com/ajax/libs/popper.js/1.14.7/umd/popper.min.js" integrity="sha384-UO2eT0CpHqdSJQ6hJty5KVphtPhzWj9WO1clHTMGa3JDZwrnQq4sF86dIHNDz0W1" crossorigin="anonymous"></script>
        <script src="https://stackpath.bootstrapcdn.com/bootstrap/4.3.1/js/bootstrap.min.js" integrity="sha384-JjSmVgyd0p3pXB1rRibZUAYoIIy6OrQ6VrjIEaFf/nJGzIxFDsf4x0xIM+B07jRM" crossorigin="anonymous"></script>
        <script src="https://unpkg.com/bootstrap-table@1.16.0/dist/bootstrap-table.min.js"></script>
        <script src="https://unpkg.com/tableexport.jquery.plugin/tableExport.min.js"></script>
        <style type="text/css">
            .footer {
                position: fixed;
                bottom: 0;
                right: 0;
                padding-bottom: 10px;
                padding-right: 10px;
            }

            .footerButton {
                width: 150px;
            }
        </style>
        <div>
            <table id="table" data-search="true" data-header-style="headerStyle" data-page-size="25">
                <thead>
                    <tr>
                        <th data-field="id" data-visible="false" data-checkbox="true">Id</th>
                        <th data-field="name" data-sortable="true">Full Name</th>
                        <th data-field="mainphone" data-sortable="true">Main Phone</th>
                        <th data-field="primaryemail" data-sortable="true">EMail (Primary)</th>
                        <th data-field="primarycontact" data-sortable="true">Primary Contact</th>
                        <th data-field="primarycontactname" data-sortable="true">Primary Contact Name</th>
                        <th data-field="updateitem" data-sortable="false">Update</th>
                    </tr>
                </thead>
            </table>
        </div>
    </body>
    <script type="text/javascript">
        $(document).ready(function(){
            fnGetAllAccounts();
        });
        function fnGetAllAccounts()
        {
            //var query = '?$select=accountcategorycode,address1_addressid,address1_longitude,donotphone,name,_primarycontactid_value,revenue';
            var query = '?$select=accountid,name,telephone1,emailaddress1,_primarycontactid_value';
            window.parent.Xrm.WebApi.online.retrieveMultipleRecords("account", query).then(
            function success(accounts)
            {
                var results = accounts.entities;
                    var accountRecords = [];
                results.forEach(function (result, index, array)
                {
                    var accountid = result["accountid"];
                    var name = result["name"];
                    var telephone = result["telephone1"];
                    var emailaddress = result["emailaddress1"];
                    var primarycontactid = result["_primarycontactid_value"];
                    var primarycontactname = result["_primarycontactid_value@OData.Community.Display.V1.FormattedValue"];

                    var accountRecord = {};
                    accountRecord =
                    {
                        'id': accountid,
                        'name': name,
                        'account': accountid,
                        'mainphone': telephone,
                        'primaryemail':emailaddress,
                        'primarycontact':primarycontactid,
                        'primarycontactname':primarycontactname,
                        'updateitem':'<a href="javascript:void(0);" onclick="fnUpdateAccount(\'' + accountid + '\');return false;">Update</a>'
                    }
                    accountRecords.push(accountRecord);
                });
                $('table').bootstrapTable({ data: accountRecords });
            },
            function (error) {
                console.log(error.message);
                reject(Error(error.message));
            });
        }
    </script>
</html>
- Actually, I had added one more column to display. That's why, I am asking to replace the entire HTML. Save the file.
- Now, in order to update this HTML in Dynamics 365, as I am using 2nd method (replacing the content directly in D365), open the Web Resources, click on your web resource file, it will show the file in editor window. Click on Source. Paste the entire HTML in content box and click on OK.
- Every time, when we update the HTML, we need to follow above steps. Now refresh (Ctrl + F5) the D365 Page.
- Here we go! HTML got updated as well as data is appearing. Now, what's the magic behind the scenes? It is noting but Xrm.WebApi.online api. It has following methods-
- retrieveMultipleRecords
- createRecord
- updateRecord
- deleteRecord
- retrieveRecord
- When using this api in HTML, it will not work directly. We need to add "window.parent." as prefix to the api-
- window.parent.Xrm.WebApi.online.retrieveMultipleRecords
- This covers our 2nd part.
- In Next post, we will try to create a records in Account Entity.
- Next Post Link-
With this, I am concluding this post.
Happy Coding !!!
Will see you again with some new topics.
Stay Safe !
Stay Healthy !


No comments:
Post a Comment
Note: Only a member of this blog may post a comment.