Showing posts with label SharePoint. Show all posts

Wednesday, August 24, 2022

Power Automate: Working With OBJECT Variable

Hello Friends,

Welcome back with another post on Power Automate. As we know, while creating a flow, we all use variables of Integer type, String type, Boolean type and sometimes Array type. Apart from that, did we observe one more type of variable "Object" type. I guess, we would haven't observed it. This is an amazing type of variable. If you are using lots of variables in your flow, then surely it will help you in replacing all those variables with a single one. As the type of this variable is object, we can store any object in this type of variable. The simplest way is to store a JSON in this variable. As we know, JSON contains the Key-Value pairs, thus it is the simplest and strongest part of JSON. The combination of JSON with Object type variable is an amazing combination. Let's see.

  1. Open the Power Automate Portal. Click on "+ Create", select "Instant cloud flow".
  2. Give your flow a suitable name. and select the appropriate trigger condition. For demo purpose, I am selecting "Manually trigger a flow".
  3. Click on "Create" to create the flow. Now, we will add 2 variables
    1. arrRandomNumbers (variable type - Array)
    2. objCounts (variable type - Object)
  4. The objective is that we will generate a series of random numbers between 0 & 9 and count how many 0s, 1s --- 9s are generated. For each number, we will add a key-value pair (or a property in object variable).
    1. {
      	"CountFor0" : 0,
      	"CountFor1" : 0,
      	"CountFor2" : 0,
      	"CountFor3" : 0,
      	"CountFor4" : 0,
      	"CountFor5" : 0,
      	"CountFor6" : 0,
      	"CountFor7" : 0,
      	"CountFor8" : 0,
      	"CountFor9" : 0
      }
      
  5. Save the flow and keep saving at regular interval.
  6. Add another variable that will be treated as counter for the how many Random Numbers, we will generate.
  7. Now, add another action called Do-Until and set the validation criteria. Here, we are generating 10 random numbers.
  8. Now inside the Do-until action, add a Compose action and add the expression-
    1. rand(0,9)
  9. Now, add a Switch action and for each number from 0 to 9, add Case. The output of Compose action will be the "On" criteria for the Switch action.

  10. Now for each case, we will add the increment action. However, it will be little bit different. First add another compose action and add the logic mentioned below.
  11. setProperty(variables('objCounts'),'CountFor0',add(int(variables('objCounts')['CountFor0']),1))
    
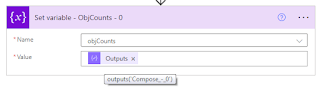
  12. Then add another action named "Set variable" and assign the output of above Compose action to the variable "ObjCounts". this will update the variable data.
  13.  
  14. The complete code setup for Case 0 will be-
  15. The same steps we need to repeat for rest of the cases. First add a Compose action then add Set Variable action.
  16. Now, we will add action to increment the counter so that the loop gets terminated once the counter reaches to 10.
  17. Now, if you wish to check if the logic we written over here worked, let's assign the ObjCounts variable to a Compose action. This action will be added outside the Do-Until loop.
  18. Save the workflow and run it to verify.
  19. If you wish to know, what all random numbers were generated, then you may add an action called "Append to array variable" as below to add all those numbers in an array-
  20. Lastly, add another compose action to see what all numbers got generated.
  21. Run the flow again and verify the result.
  22. This time the outcome is-
  23. This is how, you can leverage the beauty of Object variables.

With this, I am concluding this post.
Happy Coding !!!
Will see you again with some new topics.

Stay Safe !
Stay Healthy !

Sunday, August 21, 2022

Access SharePoint Groups In Power Automate

Hello Friends,
Today, we will learn about working with SharePoint Groups in Power Automate. Sometimes, we have a requirement in which, we have a SharePoint group in our SharePoint site and we want to allow some activities to the members of those group in PowerApps. As we know that SharePoint Groups are not accessible in PowerApps and also not accessible directly in Power Automate, therefore, we will use some work around to access them in Power Automate flow to achieve this functionality. There are 2 ways to get the SharePoint Group members. If you know the group id, then we can directly use the HTTP request to get the group members. Otherwise, if you know the group name only, first we will get, all the groups, then we will extract the desired group from the response. From this, we will get the Group ID. Then we will use the HTTP request to get the group members using this id. 

 So, let's begin.
  1. We have created a group named "TestDesignEditGroup". I am the member of this group.
  2. Our first objective is to get the SharePoint Group Id for this group.
  3. Let's create a flow. I am talking Instant cloud flow >> Manually trigger a flow and given a name "POC-GetSharePointGroupsMembers".
  4. Now we will define 3 variables-
    1. strGroupName - This variable will hold the name of the group we are looking for
    2. intGroupID - This variable will hold the ID of the group mentioned in strGroupName
    3. strGroupMemberDisplayNames - This variable will hold the semicolon separated display names of the members of the group
  5. Save the workflow.
  6. Now, as we know that Power Automate doesn't have any direct action to connect with SharePoint Groups, we will first use HTTP action to get all the SharePoint Groups.
  7. It will ask few information-
  8. It will give us a JSON having information of all the SharePoint groups.
  9. Now, from there, we have 2 ways to extract the information-
    1. Using "Apply to each"
    2. Using "Filter"
  10. Let's try "Apply to each" first.
  11. Add an action "Apply to each".
  12. As we can see in content window, only "body" option is available. However, we need the "value" part of the output. So, we will click on "Expression" tab and use the dynamic expression.
    1. body('Send_an_HTTP_request_to_SharePoint_-_Groups')?['value']
  13. Add a "Condition" action where we will check if the "Title" of the group is equal to what we are looking for.
  14.  
  15. If, the match is found, set the "Id" of that group to the variable "intGroupID".
  16. Now, we have the ID of the group. We need to again use HTTP request action to get the group members of this group.
  17. Add another HTTP request action.
  18. It will give us the JSON of members of the group.
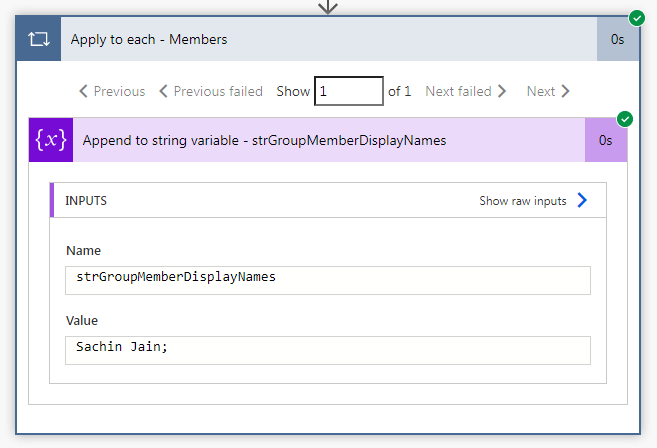
  19. We need to use another "Apply to each" action upon this JSON to fetch the "Title" (member display name) of each member. We will append this Title alongwith semicolon to the variable "strGroupMemberDisplayNames".
  20. That's all. Now, it's time to test. Save the flow and click on "Test" link provided at top right corner. 
  21. Below are the screenshots of each action (one by one), we have used here.
  22. Similar way, if you wish to extract EMail IDs, then instead of Title attribute, you have to extract the Email attribute.
  23. This way, you can get the members of SharePoint group. In case, if you already know the SharePoint group ID, then after initializing the variables, you may directly jump to the HTTP action "Send an HTTP request to SharePoint - Members".
  24. Now, try the other way using "Filter".
  25. Let's try using "Filter".
  26. In the above flow, delete the "Apply to each - Groups" action and add below 2 actions.
  27. Add Filter action.
  28. Add the filter criteria.
  29. Now add another action called "Set variable". We will not fetch the Id of the group from the output of filter action and assign it to intGroupID. If you want to check if the output of filter action is not null, then you may add a Condition action and inside that condition action, if the output is not null then you may add the set variable action there.
  30. That's all. Rest of the 2 actions (to get the members of the group and then getting their display names) will remain same.
With this, I am concluding this post.
Happy Coding !!!
Will see you again with some new topics.

Stay Safe !
Stay Healthy !

Thursday, February 10, 2022

Migration Steps

Hello Friends,

Welcome back with another post. Today, we will discuss about the steps that needs to be followed during any migration. Let's see-

  1. Evaluate
    1. This is the primary step or a Pre Migration Step.Here, we evaluate the intent of migration and define a scope for the data that needs to be migrated. It includes-
      1. Data Source
      2. Data Types
      3. Quantify Packages
  2. Plan
    1. This the stage where we define the strategy for data migration. It includes-
      1. Plan migration strategy
      2. Plan downtime
      3. Master data source identification
      4. Plan the data cleaning
      5. Destination data source identification
      6. Plan the data verification
  3. Extract
    1. This is the stage where we define and perform the data extraction from data source(s). Normally, we use Intermediate database (Staging Database) here. It includes-
      1. Creating packages to extract
      2. Simplify data at source or at intermediate database
  4. Clean
    1. This is the stage where we cleanup the data before loading to the actual data base. Cleaning is a continuous process. We can perform this process in parallel to other steps as well and at stage. It includes-
      1. Identify & Remove duplicate data
      2. Remove Garbage data
  5. Load
    1. This is the stage where actual process of loading the data into production database is performed. This stage is very crucial and needs extensive planning. We need to ensure that the stage should have a minimal impact upon users as well as upon business continuity. It includes-
      1. Loading small set of data
      2. Ensure everything is OK
      3. Push rest of the data
      4. Process can be done in using iterative approach
  6. Verify
    1. This is the final stage of migration or a Post Migration Step. Verification of migrated data is also crucial and a continuous process. It is better to include a Business Application Data Expert to validate the data at different stages. Validation is required-
      1. When data is extracted to ensure all the requisite data is accounted for
      2. When cleanup is done to ensure relevant data is not removed
      3. When data is loaded to ensure all data is loaded in correct and accurate manner


With this, I am concluding this post.
Happy Coding !!!
Will see you again with some new topics.

Stay Safe !
Stay Healthy !

Saturday, January 15, 2022

Power Automate: Useful HTTP Request Actions Part 3

Hello Friends,

Welcome back with another post on Power Automate. This post is in continuation to one of my earlier post(s) on different ways we can use HTTP request action (Send an HTTP request to SharePoint) in Power Automate to get different kind of information. I will be adding more and more options in this post from time to time. Below is the link of earlier post(s)-
  1. Power Automate: Useful HTTP Request Actions Part 1
  2. Power Automate: Useful HTTP Request Actions Part 2
Today, we will learn about below ones-
  1. Create Column(s)
  2. Update Column(s) Display Name
Sometimes, there is a requirement to create lots of columns in SharePoint list. They may be "Single line of text" or "Number" column. So, either you need to create manually one by one OR you can use Power Automate to achieve the same. We are discussing Power Automate option here.
  1. In order to create columns, first we need an array of columns information
    1. [
      	{
      		"ColumnName":"Column1Text",
      		"ColumnType":"Text",
      		"ColumnTypeKind":2,
      		"Required":"false"
      	},
      	{
      		"ColumnName":"Column2Number",
      		"ColumnType":"Number",
      		"ColumnTypeKind":9,
      		"Required":"false"
      	},
      	{
      		"ColumnName":"Column3Text",
      		"ColumnType":"Text",
      		"ColumnTypeKind":2,
      		"Required":"true"
      	},
      	{
      		"ColumnName":"Column4Number",
      		"ColumnType":"Number",
      		"ColumnTypeKind":9,
      		"Required":"true"
      	},
      	{
      		"ColumnName":"Column 5 With Space",
      		"ColumnType":"Text",
      		"ColumnTypeKind":2,
      		"Required":"false"
      	}
      ]
      
  2. Here, you can see, I have taken a field ColumnDataKind. Basically, it represents the type of column. For more details, you may refer Microsoft docs site-
    1. FieldType enumeration
  3. For Text column it is 2 and for Number column, it is 9.
  4. Now, we need a SharePoint List-
  5. I had created a list named "DynamicColumnsList". It is be default having one column "Title".
  6. Now we are going to create below columns-
    1. Column1Text (Type: Text; Required: false) 
    2. Column2Number (Type: Number; Required: false)
    3. Column3Text (Type: Text; Required: true)
    4. Column4Number (Type: Number; Required: true)
    5. Column 5 With Space (Type: Text; Required: false)
  7. Let's create a flow-
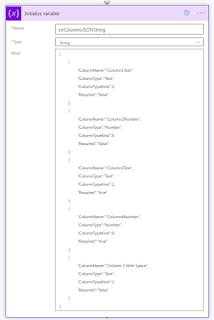
    1. I had initialized a string variable "strColumnsJSONString" and assigned the above mentioned array to this variable.
    2. Now, I am going to parse it. For this, I will use Parse JSON action. I will use same JSON string to create the schema.
    3. Lastly, I will use HTTP Action-
      1. We will use below schema to create columns in Body section and then will assign dynamic values from JSON.
      2. {
        	"__metadata":
        		{
        			"type":"SP.Field"
        		},
        	"FieldTypeKind":,
        	"Title":"",
        	"Required":"",
        	"EnforceUniqueValues":"false",
        	"StaticName":""
        }
      3. Final HTTP action is-
  8. Save it and test it.
  9. As you can see, columns have been created along with the Required (Yes/No) condition. The moment, columns are created, it's Internal Name also get created with same name and gets freezes. In case, if the name has spaces, it replaces with "_x0020_".
  10. Now, if you want to change the Display Name, then you need to repeat the process but this time we will use MERGE.
  11. Below is the JSON used-
    1. [
      	{
      		"ColumnName":"Column1Text",
      		"ColumnType":"Text",
      		"ColumnTypeKind":2,
      		"Required":"false",
      		"DisplayName":"Column 1 Text"
      	},
      	{
      		"ColumnName":"Column2Number",
      		"ColumnType":"Number",
      		"ColumnTypeKind":9,
      		"Required":"false",
      		"DisplayName":"Column 2 Number"
      	},
      	{
      		"ColumnName":"Column3Text",
      		"ColumnType":"Text",
      		"ColumnTypeKind":2,
      		"Required":"true",
      		"DisplayName":"Column 3  Text"
      	},
      	{
      		"ColumnName":"Column4Number",
      		"ColumnType":"Number",
      		"ColumnTypeKind":9,
      		"Required":"true",
      		"DisplayName":"Column 4 Number"
      	},
      	{
      		"ColumnName":"Column 5 With Space",
      		"ColumnType":"Text",
      		"ColumnTypeKind":2,
      		"Required":"false",
      		"DisplayName":"Column 5 With Spaces"
      	}
      ]
      
  12. Same will be used in initializing the string variable as well as in Generate Sample in Parse JSON.
  13. Now the HTTP action will be-
  14. Again Save the flow and test it.
  15. As we can see, the Display Name & the Internal Name are different as we wish to have. This way, we can create and rename the columns in SharePoint list using Power Automate flow.
  16. For adding Choice column (Drop-down menu)-
    1. Input-
    2. Output-
  17. Please feel free to sent me your queries or any functionality that you want to achieve and currently not able to do so. I would be happy, if would be able to provide it's solution.
  18. Next Post Link-
    1. Power Automate: Useful HTTP Request Actions Part 4
With this, I am concluding this post.
Happy Coding !!!
Will see you again with some new topics.

Stay Safe !
Stay Healthy !