Hello Friends,
Welcome back with another post on SharePoint Online functionality. Today, we will try to create a PDF with image as a logo and send it over email. Actually, it's not a rocket science to create a PDF in MS Flow and send it over email. We need an HTML template (a html replica of the letter with placeholders defined to replace the values dynamically) and an image to be place in the template, then we will convert it into PDF and send it over email as attachment. For this, let's take a scenario of Company Interviews process. We will send an interview schedule letter as a PDF to the candidate over email. Let's start-
- First we need a SharePoint list where we can save candidate's interview schedule details. I had created one as below-


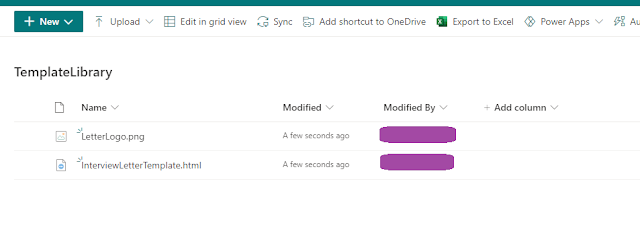
- We need a document library also where we can place our HTML template of letter as well as the company logo image.
- The HTML is (InterviewLetterTemplate.html):-
<!DOCTYPE html PUBLIC "-//W3C//DTD XHTML 1.0 Strict//EN" "http://www.w3.org/TR/xhtml1/DTD/xhtml1-strict.dtd">
<html xmlns="http://www.w3.org/1999/xhtml">
<!-- saved from url=(0014)about:internet -->
<head>
<meta charset="utf-8"/>
<meta http-equiv="X-UA-Compatible" content="IE=edge"/>
<meta name="SKYPE_TOOLBAR" content="SKYPE_TOOLBAR_PARSER_COMPATIBLE"/>
<meta name="apple-mobile-web-app-capable" content="yes"/>
<meta name="apple-mobile-web-app-status-bar-style" content="black-translucent"/>
<title>Appointment Schedule</title>
</head>
<body>
<!--Wrapper -->

<table width="100%">
	<tr>
		<td width="30%" style="float:left;">
			<img src="{logosrc}" style="width:100px;"/>
		</td>
		<td width="35%" style="text-align:center;">
			Appointment Schedule
		</td>
		<td width="35%" style="float:right;">
			{todaydate}
		</td>
	</tr>
</table>
<div style=width:100%;height:3px;background-color:#66CCFF;">
</div>
<div>
	<p>
		Dear <strong>{candidatename}</strong>,
	</p>
	<p>
		We are pleased to inform you that your appointment for interview for the post of <strong>{postappliedfor}</strong> has been scheduled.
	</p>
	<p>
		 The scheduled datetime are: <strong>{appointmentdate}</strong> at <strong>{appointmenttime}</strong>.
	</p>
	<p>
		The interview location will be {interviewlocation}.
	</p>
	<p>
		Please reach the venue at least 30 minutes before the scheduled time to complete the pre interview formalities.
	</p>
	<p>
		<br/>
		<br/>
	</p>
	<p>
		Regards,
	</p>
	<p>
		Admin
	</p>

</div>
<!--Ends Wrapper -->
</body>
</html>
- The image is (LetterLogo.png)-

- Now, we have to create a Flow to perform the activity. For this, click on "Automate" >> "Power Automate" >> "See your flows" menu of InterviewSchedule list.

- You can click on "Create a flow" also but here you need to drill down more in order to get the desired flow type. So , I feel the easy way to create a new one using "See your flows". 😉
- So, when you click on "See your flows", it will take you to MS Flow Portal. Here click on "+ Create" link from left menu.

- It will load the available option of type of flows, you can create. Choose "Automated cloud flow".

- It will open a popup where it will ask you to choose the type of trigger upon which you want to execute your flow. It will also ask you to give your flow a lovely name.

- Now click on Create button.
- It will create a basic flow and show the below screen-

- Click on "Site Address" drop down. It will show all the site you are having on your tenant. Select the site where you had created the list "InterviewSchedule".
- Once you select the site, it loads all the lists in "List Name" drop down. Select the list "InterviewSchedule"-

- Now click on "+ New step" button. With this, you can add next step to be taken. It could be anything, like - Initialize Variable, Get Items, ...
- The moment you click on "+ New step", it shows a popup to choose the action-

- Just start typing in the search box provided to choose the action. Here we will with getting the file content of image logo, so we will search for "get file content"-

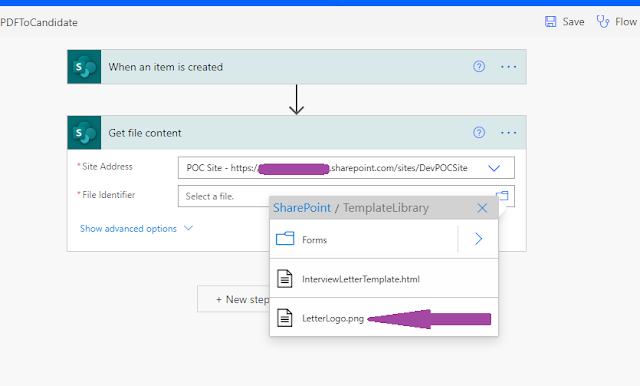
- It will add the action to your flow and ask to provide the "Site Address" and the "File Identifier" so that it can get the content of that file -

- Select the "Site Address" and the logo image file location-

- Now we will initialize couple of variables to store some information and make calculations-
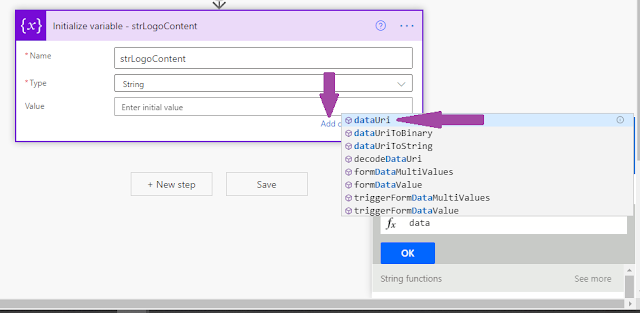
- Create a string variable "strLogoContent" to store logo image. For this again click on "+ New step" button. A popup will open, type "initiali" in search box. It will show the "Initialize variable" action in list.

- Choose the "Ïnitialize variable". Type the name as "strLogoContent". Choose Type as "String". One more interesting fact that you should know is that you can rename the action titles. Just click on elipses (...) as shown and rename the title. Remember, these action titles plays a very important role in MS Flows. Whenever you use any dynamic content value, you will find that the popup showing these dynamic content variables, categorize them using these action titles. It will be more clear in next steps.

- Now click on Value box. It will show another popup as shown in right side of above image. The same can be populated by clicking on "Add dynamic content" link provided at just below the Value box.
- Click on Expression tab. Type dataUri. It will show the matching list. Click on "dataUri" and add bracket to it "()". Now click in the middle of this bracket and then click on Dynamic content tab.
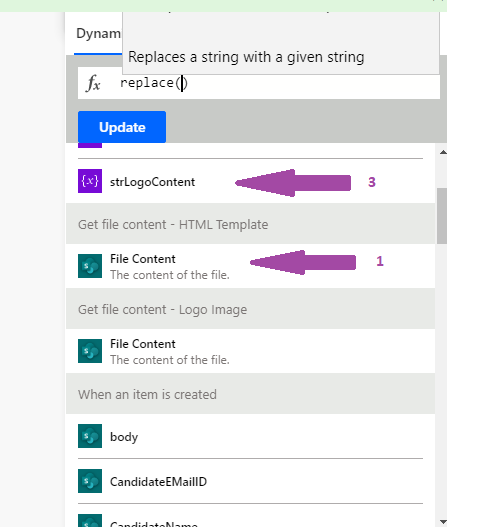
- Before using the dynamic content, I had updated the action title of "Get file content" to "Get file content - Logo Image".

- It will show the content variables that can be added in expression. Click on "File content".

- Now click on Ok button shown just below the fx. It will add this function to the Value box.

- Here, you will see that the dynamic variable "File content" is displaying under heading "Get file content - Logo Image". This way, it segregates the dynamic content so that you can choose wisely.
- Next we will create 2 more variables-
- strInterviewStartDateTime of type String and will assign the InterviewDate value of list item.

- strInterviewEndDateTime of type String and will assign the 1 hour added to strInterviewStartDateTime value of list item.

- The main point to remember here is that in SharePoint Online & Power Automate, there is a big role of Time Zone. Currently the portal I am using is on different time zone as compared to Power Automate Portal. Therefore, you may get a time difference in my blog. However, we have to focus on the process to achieve the functionality.
- Now, click on "+ New step" and search for "get file content". As our template is in SharePoint library hence we will choose the "Get file content (SharePoint)" option.

- Now change the title. (optional)
- Select the Site Address where your Template library is created.
- Select the file (HTML template) from the template folder.

- Now we have all the content to replace in this template.
- Start and replace one by one. For this, we have to use Compose action. We will do repeated steps as below-
- Click on "+ New step".
- Search for "Compose" action.

- Compose action will be added to your workflow.
- Now click on "Inputs" box. Dynamic query window will be shown
- Now click on "Expression" tab.
- Search for "replace" function. It takes 3 inputs-
- Text in which replacement is to made (HTML template content in our case)
- Old text to be replaced (html variable defined in template i.e. {logosrc})
- New text that will replace the old one (content we had got from list / logo)

- Elaborated mode:-
- The above step will replace the logo variable with logo image.
- Now in order to replace rest of the information, remember that the first value in "replace" function is to be taken as the output of last action. As the above action was the first action, hence we had taken the HTML template.
- Now, the HTML template has been updated with logo. So in next Compose action, we will take the output of above Compose action and so on.
- So, now, we will replace rest of the information. I am giving the screenshots of the same.
- Replace Letter Date

- Replace Candidate Name

- Replace Post Applied For

- Replace Appointment Date

- Replace Appointment Time

- Replace Interview Location

- Thanks for your patience to replace all these values. 👍 😉
- Now we have to save this updated content as HTML file at any OneDrive location. Create a folder on OneDrive. For this, you may click on grid icon (9 dots) at top left side of your SharePoint Online site.

- Click on One Drive link-

- It will show you below screen. Click on "+ New" link and create a new folder (I had create PowerApps)
- Let's save out updated HTML template file here.
- Click on "+ New step" and search for "create file". Choose "Create file (OneDrive for Business)".
- Set the Folder Path.
- Set File Name.
- Set File Content (output of last compose action)

- Now convert this html file to PDF. For this again click on "+ Next step" and search for "convert file" and select the "Convert file (preview) (OneDrive for Business)" action.
- It will ask for file and the Target type.
- Target type is by default shown as PDF so nothing to do with it.
- For File, click on it's input box and choose the Id of Temporary HTML file created in previous action.

- It will create the PDF file on OneDrive with a new guid name.
- Now, if you wish to delete the Temporary HTML file then you can use below action-

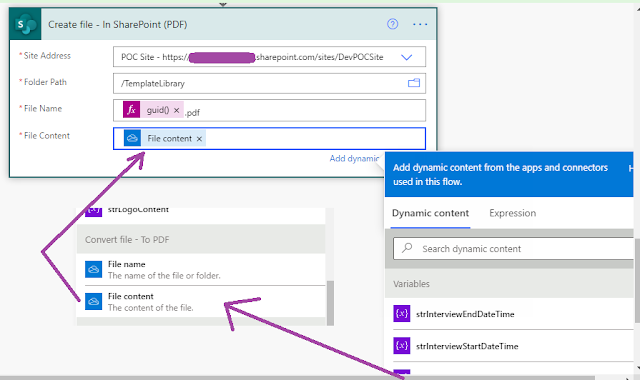
- Now, the PDF file can also be saved in SharePoint. For this, you need to use "Create File (SharePoint)" action.
- Last 2 steps remaining. To send this PDF file as attachment, first we need to get its content and then send it via email.
- To get the content of PDF file, use "Get file content (SharePoint)" action.

- Now use "Send an email (V2)" action.

- This way you had completed the process.
- If you don't wish to save the PDF in SharePoint, you may skip the steps 96-100. So, now, you will be thinking that to send the PDF by email, from where, you will get the FileContent? So, you may use the output "File content" of step 92 (Convert file - To PDF (Preview)) in Attachment Content section. 😉
- What are you waiting for? Try it !
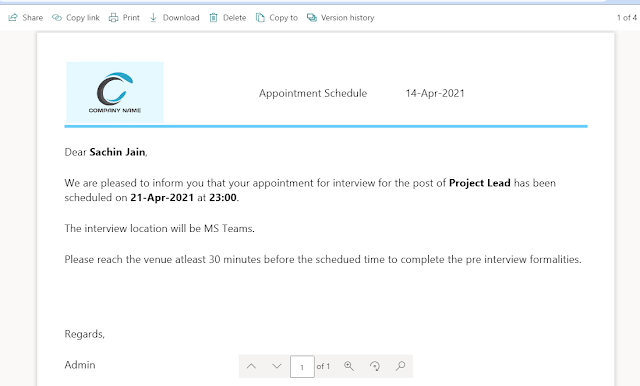
- I executed and got below mail and attachment-


- And the PDF file received is-

- Would you please give me 5 more minutes. I will give you one more surprising functionality. Send MS Teams meeting schedule through MS Flow.
- Let's start quickly-
- Click on "+ New step" and search for "create a teams", you will find below action. Select it-

- Fill/select details as mentioned below-

- It's done.


- Thanks for you patience.
- This way you can create PDF using MS Flow, add image to it, send it through Email and also can schedule MS Teams meeting.
- Sorry, forgot to attach screenshots of SharePoint library yesterday, where we were saving the PDF file. Please find the same below-

- Screenshot of PDF in zoom mode-


With this, I am concluding this post.
Happy Coding !!!
Will see you again with some new topics.
Stay Safe !
Stay Healthy !
No comments:
Post a Comment
Note: Only a member of this blog may post a comment.