Showing posts with label DataTable. Show all posts

Monday, February 20, 2023

PowerApps: Scroll Bar In Gallery

Hello Friends,
Welcome back with another post on PowerApps. Sometimes, we came across with a situation where we have to display a large number of columns in gallery (usually - vertical gallery or flexible height gallery) and doing so, the gallery width goes beyond the screen width. Unfortunately, the gallery doesn't have any horizontal scroll. So, how to overcome this situation?
Today, we are going to create something which will resolve this issue.


Let's start.
  1. Before starting, we need a collection to be used as datasource. If you have a datasource then it's fine. For demo purpose, I am creating a collection as per below schema.
    1. ClearCollect(
          collSampleData,
          {
              ID: "1",
              EmployeeID: "ES-1001",
              FirstName: "Tonya ",
              LastName: " Guzma",
              Father: "Anthony Shea",
              Mother: "Rhonda Schultz",
              Child1: "Jimmy Moore",
              Child2: "Jessica Cruz",
              Key1: "CED6E09DF06F4C1CB269662F2BE2954D",
              Key2: "CEB2CC72451C454F96077DD931308910",
              Key3: "8F03AA3F37694C978F3719B3E36C2EB9"
          } )
  2. Added around 160 records thereafter in this collection.
  3. Login to PowerApps Maker Portal and create a Canvas App.
  4. Rename the sceen as "ScreenHome".
  5. Choose the App >> OnStart property and create a collection as stated above.
  6. Then click on ellipses of App and choose "Run OnStart".
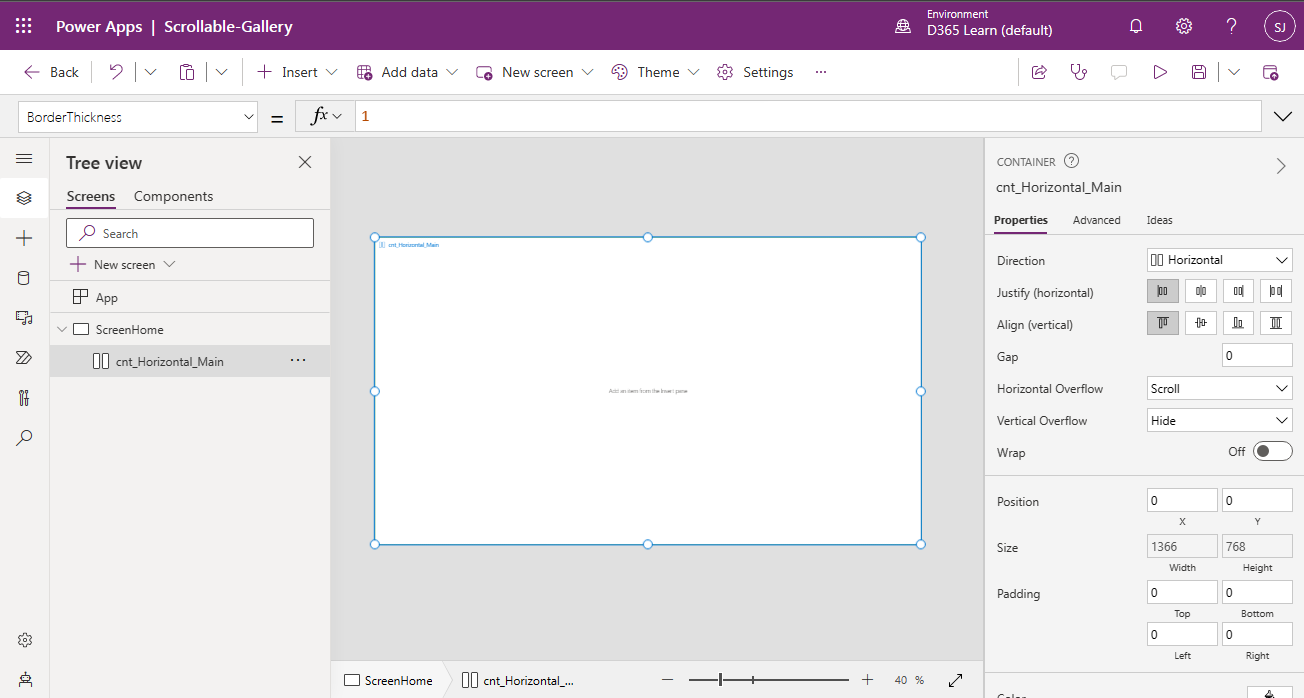
  7. Now add "Horizontal container" on screen. Wherever in doubt, match the control icon and set the properties as-
    1. Name: cnt_Horizontal_Main
    2. LayoutOverflowX (Horizontal Overflow): LayoutOverflow.Scroll
    3. X: 0
    4. Y: 0
    5. Width: ScreenHome.Width
    6. Height: ScreenHome.Height
    7. BorderColor: ColorValue("#007F00")
    8. BorderStyle: BorderStyle.Solid
    9. BorderThickness: 1
  8. Inside this container, add plain "Container" and set it's properties as-
    1. Name: cnt_Plain_Inner
    2. AlignInContainer: AlignInContainer.SetByContainer
    3. FillPortions (Flexible Width): 0
    4. Width: (Set Later Using Gallery Width)
    5. Height: Parent.Height-20 (20 is subtracted to view the horizontal scroll of parent container)
  9. Now add label controls to create headers of gallery.
  10. Add "Text label" and set properties as below-
    1. Name: lbl_Header_ID
    2. Text: ID
    3. Size: 15
    4. FontWeight: FontWeight.Semibold
    5. Align: Align.Center
    6. X: 0
    7. Y: 0
    8. Width: 150
    9. Height: 40
    10. Color: RGBA(255, 255, 255, 1)
    11. Fill: RGBA(0, 18, 107, 1)
  11. Add another "Text label" and set properties as below-
    1. Name: lbl_Header_EmployeeID
    2. Text: Employee ID
    3. Size: 15
    4. FontWeight: FontWeight.Semibold
    5. Align: Align.Center
    6. X: lbl_Header_ID.X+lbl_Header_ID.Width
    7. Y: lbl_Header_ID.Y
    8. Width: 150
    9. Height: 40
    10. Color: RGBA(255, 255, 255, 1)
    11. Fill: RGBA(0, 18, 107, 1)
  12. The layout comes out to be-
  13. Now, add "Text label" for rest of the headers and set properties as mentioned above (similar to lbl_Header_EmployeeID). Remember to change the X property value based upon previous control each time. The naming convention, I am using here for rest of the headers as-
    1. Name: lbl_Header_FirstName
      1. Text: First Name
    2. Name: lbl_Header_LastName
      1. Text: Last Name
    3. Name: lbl_Header_Father
      1. Text: Father Name
    4. Name: lbl_Header_Mother
      1. Text: Mother Name
    5. Name: lbl_Header_Child1
      1. Text: Child 1
    6. Name: lbl_Header_Child2
      1. Text: Child 2
    7. Name: lbl_Header_Key1
      1. Text: Key 1
    8. Name: lbl_Header_Key2
      1. Text: Key 2
    9. Name: lbl_Header_Key3
      1. Text: Key 3
  14. The outcome will be-
  15. Now, the next step is to add a Gallery. Therefore, click on Insert and choose Blank flexible height gallery.
  16. Set the properties of gallery as-
    1. Name: gal_BFHG_UserDetails
    2. Items (Data source): collSampleData
    3. X: lbl_Header_ID.X
    4. Y: lbl_Header_ID.Y+lbl_Header_ID.Height
    5. Width: lbl_Header_Key3.X+lbl_Header_Key3.Width
    6. Height: Parent.Height-Self.Y
    7. TemplateSize: 40
    8. TemplatePadding: 5
  17. Now edit the template and add labels to display the data (items). The process will be same as we did for Headers.
  18. Click on edit template icon (pen with circle) in gallery and the click on Insert and choose Text label. Set properties as below
    1. Name: lbl_Item_ID
    2. Text: ThisItem.ID
    3. LineHeight: 1
    4. X: lbl_Header_ID.X
    5. Y: 0
    6. Width: lbl_Header_ID.Width
    7. Height: Parent.TemplateHeight
  19. Add another Text label and set properties as below-
    1. Name: lbl_Item_EmployeeID
    2. Text: ThisItem.EmployeeID
    3. LineHeight: 1
    4. X: lbl_Header_EmployeeID.X
    5. Y: lbl_Item_ID.Y
    6. Width: lbl_Header_EmployeeID.Width
    7. Height: Parent.TemplateHeight
  20. Similarly add rest of the labels.
    1. Name: lbl_Item_FirstName
      1. Text: ThisItem.FirstName
      2. X: lbl_Header_FirstName.X
      3. Width: lbl_Header_FirstName.Width
    2. Name: lbl_Item_LastName
      1. Text: ThisItem.LastName
      2. X: lbl_Header_LastName.X
      3. Width: lbl_Header_LastName.Width
    3. Name: lbl_Item_Father
      1. Text: ThisItem.Father
      2. X: lbl_Header_Father.X
      3. Width: lbl_Header_Father.Width
    4. Name: lbl_Item_Mother
      1. Text: ThisItem.Mother
      2. X: lbl_Header_Mother.X
      3. Width: lbl_Header_Mother.Width
    5. Name: lbl_Item_Child1
      1. Text: ThisItem.Child1
      2. X: lbl_Header_Child1.X
      3. Width: lbl_Header_Child1.Width
    6. Name: lbl_Item_Child2
      1. Text: ThisItem.Child2
      2. X: lbl_Header_Child2.X
      3. Width: lbl_Header_Child2.Width
    7. Name: lbl_Item_Key1
      1. Text: ThisItem.Key1
      2. X: lbl_Header_Key1.X
      3. Width: lbl_Header_Key1.Width
    8. Name: lbl_Item_Key2
      1. Text: ThisItem.Key2
      2. X: lbl_Header_Key2.X
      3. Width: lbl_Header_Key2.Width
    9. Name: lbl_Item_Key3
      1. Text: ThisItem.Key3
      2. X: lbl_Header_Key3.X
      3. Width: lbl_Header_Key3.Width
  21. Now, we will set the width of parent container of gallery; i.e. cnt_Plain_Inner. This will be set to the width of gallery. This is the main point of this post. This setting will provide you the horizontal scroll feature. For this, click on "cnt_Plain_Inner" and then click on Width property and set the width as-
    1. Width: gal_BFHG_UserDetails.Width
  22. All set now. Save the app and play. If you wish to increase the width of any gallery item, you can set it accordingly. For example, I found that Key1, Key2, Key3 columns need to have more width. So, I am increasing width for these 3 columns. To increase the width of column, you have to increase the width of header labels as the gallery columns are referring the width of their respective headers.
  23. Save the app and play.
  24. As you can see, we can scroll the gallery horizontally. The gallery itself is having it's vertical scroll. So, this is how, we can apply Horizontal scroll as well as Vertical scroll.
With this, I am concluding this post.
Happy Coding !!!
Will see you again with some new topics.

Stay Safe !
Stay Healthy !

Wednesday, September 21, 2022

Power Automate: Export To Excel For Dynamic View/Filter Selection In PowerApps

Hello Friends,

Welcome back with another post on Power Automate. We had already discussed about "Export To Excel" in our earlier posts. However, we are again going to discuss the same. This time, we are getting the data based upon the selection of View as well as filters applied in PowerApps. This post is also related to my previous two posts-
Let's start-
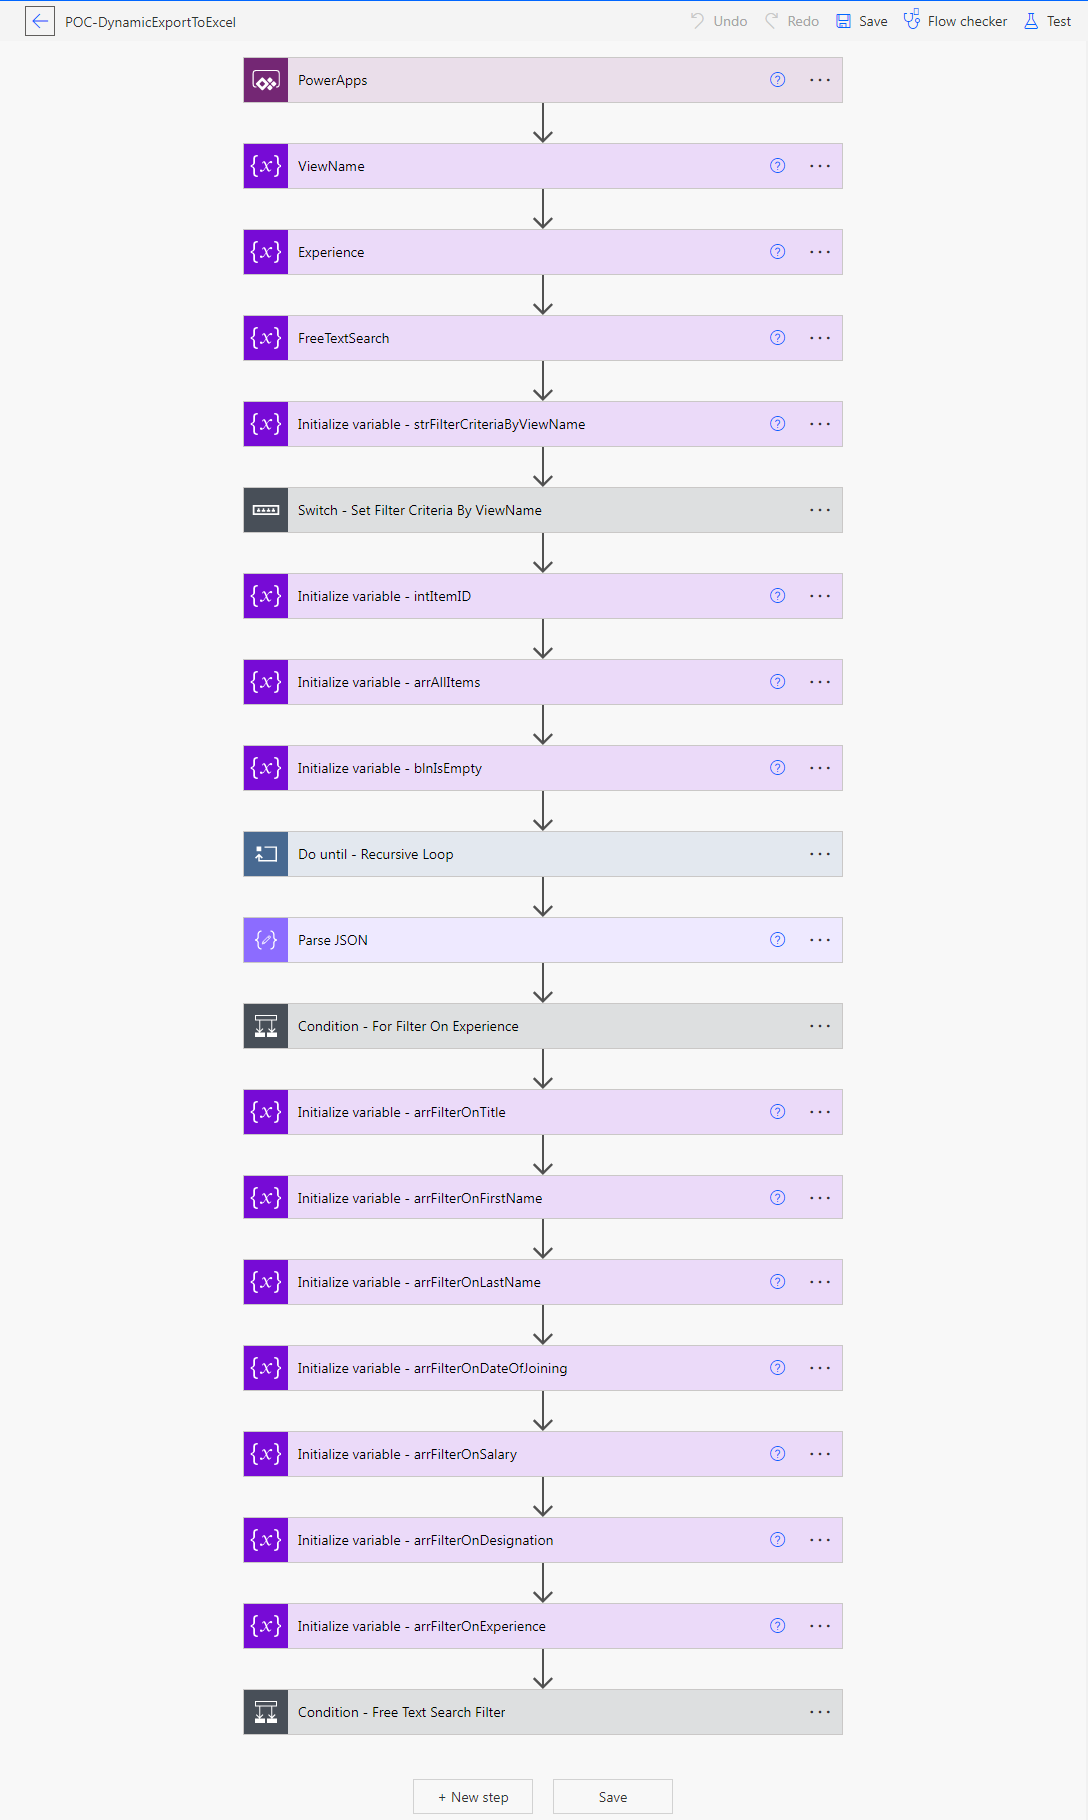
  1. Open the Power Automate maker portal and create a Instant cloud flow with trigger type as "PowerApps" and flow name as- "POC-DynamicExportToExcel".
  2. Now, we have 3 parameters to apply filter upon data-
    1. View Name
    2. Experience
    3. Free Text Search
  3. We will initialize 3 variables (using Initialize variable and value as Ask in PowerApps) that will communicate with PowerApps to provide these values to the flow-
  4. Variable1: ViewName
  5. Variable2: Experience
  6. Variable3: FreeTextSearch
  7. Now, we will define another variable named "strFilterCriteriaByViewName". This will be the first filter criteria.
  8. Keep saving your flow frequently.
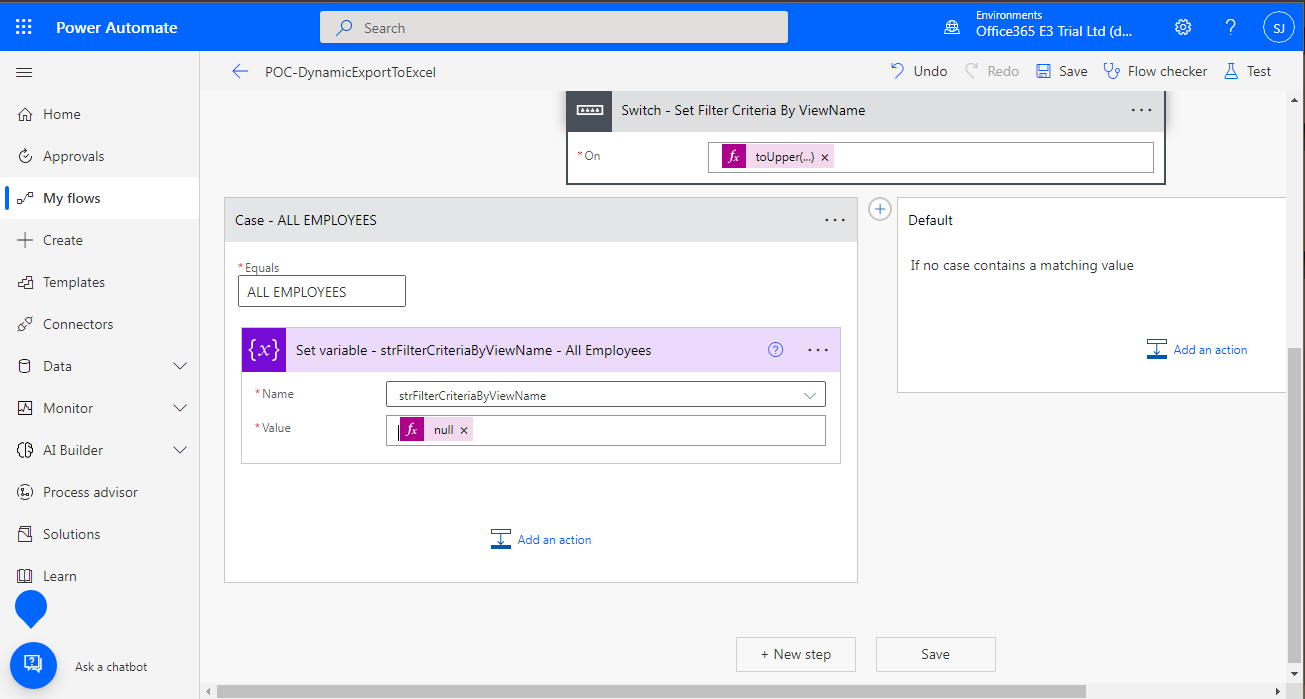
  9. Here, we will use the same filter conditions as we applied in PowerApps. For that, we will apply a Switch-Case.
  10. Now, refer back to the previous post, where, we have defined the Views. Check the "Items" property of DataTable / Gallery.
  11. Please find below the function from PowerApps for ready reference.
    1. Switch(
          Dropdown_SelectView.SelectedText.ViewName,
          "All Employees",
          Filter(
              EmployeeInfo,
              Experience.Value in If(
                  Radio_SelectExperience.SelectedText.Experience = "All",
                  Experience.Value,
                  Radio_SelectExperience.SelectedText.Experience
              ) && (Trim(TextInput_Search.Text) in 'First Name' || Trim(TextInput_Search.Text) in 'Last Name' || 
      Trim(TextInput_Search.Text) in Designation.Value || Trim(TextInput_Search.Text) in Experience.Value || 
      Upper(Title) = Upper(Trim(TextInput_Search.Text))) || Text(
                  'Date Of Joining',
                  "m/d/yyyy",
                  "en-US"
              ) = Text(
                  Trim(TextInput_Search.Text),
                  "m/d/yyyy",
                  "en-US"
              ) || Text(Trim(Salary)) = Trim(TextInput_Search.Text)
          ),
          "Software Engineer",
          Filter(
              EmployeeInfo,
              "Software Engineer" in Designation.Value,
              Experience.Value in If(
                  Radio_SelectExperience.SelectedText.Experience = "All",
                  Experience.Value,
                  Radio_SelectExperience.SelectedText.Experience
              ) && (Trim(TextInput_Search.Text) in 'First Name' || Trim(TextInput_Search.Text) in 'Last Name' || 
      Trim(TextInput_Search.Text) in Designation.Value || Trim(TextInput_Search.Text) in Experience.Value || 
      Upper(Title) = Upper(Trim(TextInput_Search.Text))) || Text(
                  'Date Of Joining',
                  "m/d/yyyy",
                  "en-US"
              ) = Text(
                  Trim(TextInput_Search.Text),
                  "m/d/yyyy",
                  "en-US"
              ) || Text(Trim(Salary)) = Trim(TextInput_Search.Text)
          ),
          "Module Lead",
          Filter(
              EmployeeInfo,
              "Module Lead" in Designation.Value,
              Experience.Value in If(
                  Radio_SelectExperience.SelectedText.Experience = "All",
                  Experience.Value,
                  Radio_SelectExperience.SelectedText.Experience
              ) && (Trim(TextInput_Search.Text) in 'First Name' || Trim(TextInput_Search.Text) in 'Last Name' || 
      Trim(TextInput_Search.Text) in Designation.Value || Trim(TextInput_Search.Text) in Experience.Value || 
      Upper(Title) = Upper(Trim(TextInput_Search.Text))) || Text(
                  'Date Of Joining',
                  "m/d/yyyy",
                  "en-US"
              ) = Text(
                  Trim(TextInput_Search.Text),
                  "m/d/yyyy",
                  "en-US"
              ) || Text(Trim(Salary)) = Trim(TextInput_Search.Text)
          ),
          "Project Manager",
          Filter(
              EmployeeInfo,
              "Project Manager" in Designation.Value,
              Experience.Value in If(
                  Radio_SelectExperience.SelectedText.Experience = "All",
                  Experience.Value,
                  Radio_SelectExperience.SelectedText.Experience
              ) && (Trim(TextInput_Search.Text) in 'First Name' || Trim(TextInput_Search.Text) in 'Last Name' || 
      Trim(TextInput_Search.Text) in Designation.Value || Trim(TextInput_Search.Text) in Experience.Value || 
      Upper(Title) = Upper(Trim(TextInput_Search.Text))) || Text(
                  'Date Of Joining',
                  "m/d/yyyy",
                  "en-US"
              ) = Text(
                  Trim(TextInput_Search.Text),
                  "m/d/yyyy",
                  "en-US"
              ) || Text(Trim(Salary)) = Trim(TextInput_Search.Text)
          ),
          "Program Manager",
          Filter(
              EmployeeInfo,
              "Program Manager" in Designation.Value,
              Experience.Value in If(
                  Radio_SelectExperience.SelectedText.Experience = "All",
                  Experience.Value,
                  Radio_SelectExperience.SelectedText.Experience
              ) && (Trim(TextInput_Search.Text) in 'First Name' || Trim(TextInput_Search.Text) in 'Last Name' || 
      Trim(TextInput_Search.Text) in Designation.Value || Trim(TextInput_Search.Text) in Experience.Value || 
      Upper(Title) = Upper(Trim(TextInput_Search.Text))) || Text(
                  'Date Of Joining',
                  "m/d/yyyy",
                  "en-US"
              ) = Text(
                  Trim(TextInput_Search.Text),
                  "m/d/yyyy",
                  "en-US"
              ) || Text(Trim(Salary)) = Trim(TextInput_Search.Text)
          )
      )
  12. The same we are going to implement in flow. The primary filter is upon Designation-
    1. All Employees - No Filter Criteria
    2. Software Engineer - Filter Designation by "Software Engineer"
    3. Module Lead - Filter Designation by "Module Lead"
    4. Project Manager - Filter Designation by "Project Manager"
    5. Program Manager - Filter Designation by "Program Manager"
  13. We had completed first part.
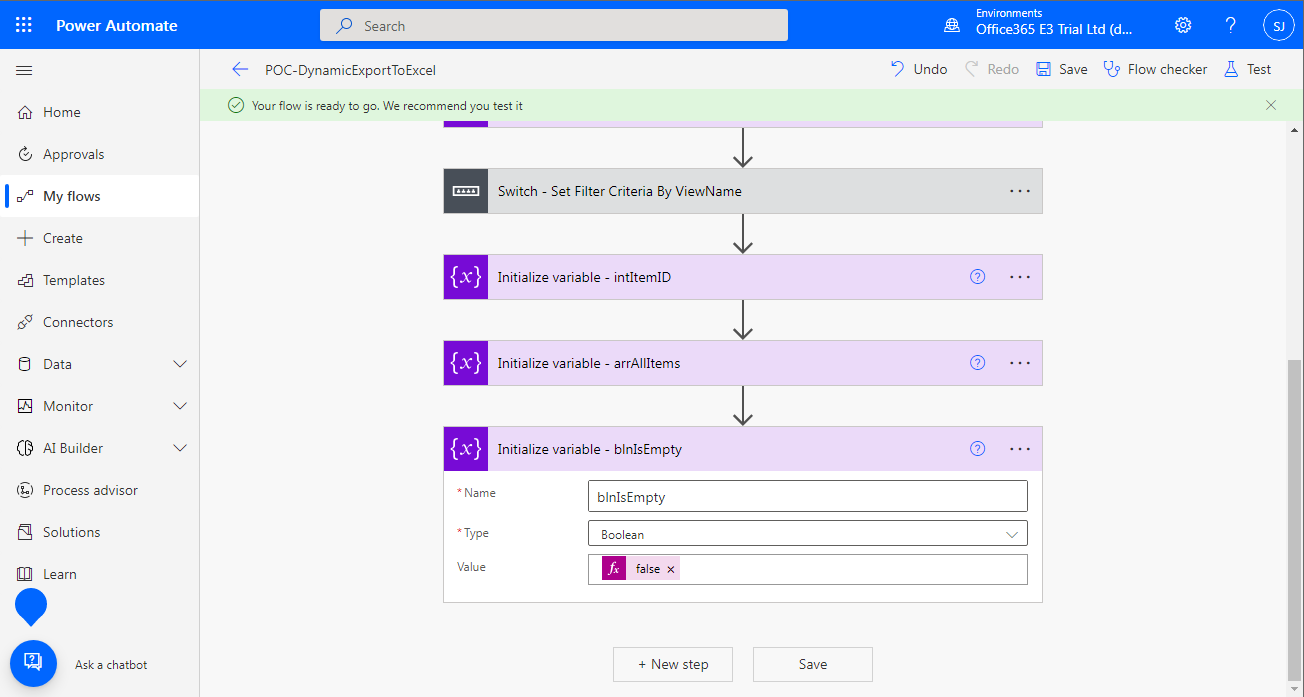
  14. Now, we will fetch all such items from SharePoint list that matches this filter criteria. For that, we have to define three variables then use "Do Until" action to perform the activity.
  15. Now, we will use Do-Until action to fetch the items.
  16. Get Items Using ItemID variable & FilterCriteria
  17. Select the required fields
  18. Join the output with arrAllItems array
  19. Update the variable arrAllItems with the previous action result
  20. Update the intItemID with the last ItemID from the output of GetItems action. If GetItems action output is NULL, then assign it with 0.
  21. Now, check if the output of GetItems is empty or not. If empty, set the blnIsEmpty to true otherwise false.
  22. Now, we will set the "Configure Run After" condition for the action. For this, click on ellipses (3 dots) ahead to the Set blnIsEmpty action and choose "Configure run after".
  23. You will find that "is successful" is by default selected. Select "is failed" as well and click on Done.
  24.  
  25. This completes the second part.
  26. Now, the third part is to filter data by Experience choice. If Experience selected by user is not "All", then we have to apply additional filter of Experience upon the outcome of Do-Until action.
  27. Before that, we will execute this flow and get the schema so that we can parse the output to JSON as we cannot apply filter upon array.
  28. Then use Parse JSON action.
  29. Now add a "Condition" action and check if Experience is not selected as "All". If true, apply "Filter" action on output of ParseJSON action and set the output again to arrAllItems variable.
  30. This completes third part.
  31. Now, the fourth part is to apply filter using free text search.
  32. This is the main section. Here we will apply filter on each field separately and capture the outcome in an individual array.
  33. After then we will combine all these outcomes in single array. Thus, unique results will be obtained.
  34. As we can see that we had applied free text search upon all 7 fields. Thus, we have to create 7 array variables and then apply filter one by one.
  35. First define the arrays.
  36. Now, check if the FreeTextSearch variable is having any value or not. If Yes, then start filtering one by one.
  37. Apply Parse JSON upon arrAllItems so that filter can be applied.
  38. We will check if the FreeTextSearch value is contained (unless specified) in the item respective field.
  39. Filter for Title field.
  40. Remember, when you are applying a filter, you have to use the output (body) of Parse JSON action. When you are updating the respective array with the output of respective filter, then you have to use the output (body) of Filter action.
  41. Filter for First Name field.
  42. Remember, when you are applying a filter, you have to use the output (body) of Parse JSON action. When you are updating the respective array with the output of respective filter, then you have to use the output (body) of Filter action.
  43. Filter for Last Name field.
  44. Remember, when you are applying a filter, you have to use the output (body) of Parse JSON action. When you are updating the respective array with the output of respective filter, then you have to use the output (body) of Filter action.
  45. Filter for Date Of Joining field. Here, we will first format the date to "M/d/yyyy" format and then check if both are equal. Additionally, here we will use the "Configure run after" as well because in case the FreeTextSearch is not a date then the formatDateTime will throw an error and our further processing will get failed. So, we have to handle that case.
  46. Remember, when you are applying a filter, you have to use the output (body) of Parse JSON action. When you are updating the respective array with the output of respective filter, then you have to use the output (body) of Filter action.
  47. Filter for Salary field.
  48. Remember, when you are applying a filter, you have to use the output (body) of Parse JSON action. When you are updating the respective array with the output of respective filter, then you have to use the output (body) of Filter action.
  49. Filter for Designation field.
  50. Remember, when you are applying a filter, you have to use the output (body) of Parse JSON action. When you are updating the respective array with the output of respective filter, then you have to use the output (body) of Filter action.
  51. Filter for Experience field. However, we can avoid filter condition upon Experience as this is already present upon screen in the form of Radio Choice.
  52. Remember, when you are applying a filter, you have to use the output (body) of Parse JSON action. When you are updating the respective array with the output of respective filter, then you have to use the output (body) of Filter action.
  53. Now, we have individual filter results for each FreeText filter criteria. We have to combine these outcomes. Thus, we will now use Compose action to apply union function to combine these outcomes. The benefit of union is that it takes unique items. If any item is found duplicate, it keeps only one of those item instances. 
  54. Now, set the output of this Compose action to arrAllItems.
  55. This completes out fourth part.
  56. Now, the fifth & final part. Here, we will export this output to Excel. For this, you may refer my earlier blogs using OneDrive as well as SharePoint library.
    1. Using One Drive-
      1. Export To Excel Using Power Automate
    2. Using SharePoint Library-
      1. Power Automate: Export To Excel (SharePoint)
  57. This is how, we can Export data to excel.
With this, I am concluding this post.
Happy Coding !!!
Will see you again with some new topics.

Stay Safe !
Stay Healthy !