Wednesday, August 31, 2022

Power Automate: Use Of SELECT Function

Hello Friends,

Welcome back with another post on Power Automate. Today, we will discuss about another amazing function provided by Microsoft. This function is "SELECT". Let's start.

  1. The scenario is, you have to get the items from a SharePoint list based upon the IDs provided. These IDs are sent to the flow as comma separated. Usually, what we do is we convert these comma separate IDs into an array, create a filter query using "Apply to each" loop and then use Get Items action. Now, the same we will do using Select action.
  2. We had created a list named TestListSJ.
  3. This list has 25700 items starting from ID 401 upto 26100. We will use IDs from 401 upto 500 means 100 items.
  4. Let's create a flow in Power Automate.
  5. We are creating a "Manually trigger a flow" with name as "POC-SelectFunction".
  6. Click on Create.
  7. Declare a string variable "strItemIDs" to hold the comma separated Item IDs. Assign the comma separated IDs from 401 to 500.
  8. Now, we will initialize another variable "arrItemIDs" of type array which will hold these IDs in array form.
    1. split(variables('strItemIDs'),',')
      
  9. We will define another variable "intTotalItemIDsCount" of type Integer to capture the total count of Item IDs received.
    1. length(variables('arrItemIDs'))
      
  10. From here, the actual logic starts. Now, we will use "Select action and convert each item ID into individual filter query like from 401 to (ID eq 401).
  11. Click on the arrow marked icon. It will switch the Mapping window to basic mode.
  12. Now add the "Concat" function as below.
    1. concat('(ID eq ',item(),')')
      
  13. This concat function will convert each item id into individual filter query.
  14. Keep saving the flow frequently.
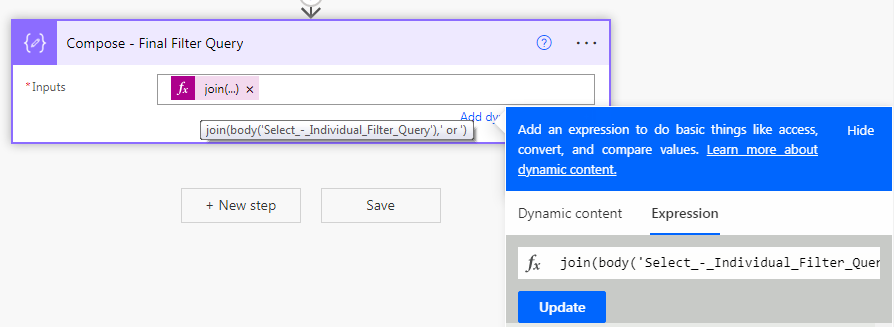
  15. Now we need to combine all these filter queries into one single string, separated with " or ". For this we will use "Compose" action and in compose action, we will use the "join" function. 
    1. join(body('Select_-_Individual_Filter_Query'),' or ')
      
  16. This is what we were looking for.
  17. Now, add "Get Items" action.
  18. Select the Site Address, List Name, click on "Show advanced options". In "Filter Query", select the output of Final Query Compose action.
  19. That's all we done.
  20. Now save the flow and Test it.
  21. If you see the execution time of each action. It all 0. It means they all individually too less than a second to execute.
  22. This is the power of "Select" action. It reduce the execution time. Now, to prove that, we will use tradition method in parallel as well. We will also capture Start/End time for each method and then we will compare the time consumption.
  23. For this, we will add a parallel branch just after the "Initialize variable - intTotalItemIDsCount" action. This variable will be named as "strCombinedFilterQuery".
  24. Add "Apply to each" action on the arrItemIDs. Inside the Apply to each action add another action called "Append to string variable". Here we will append the individual filter query to the variable "strCombinedFilterQuery" 
    1. concat('(ID eq ',item(),') or ')
      
  25. This step will give us a string like "(ID eq 401) or (ID eq 402) or ... (ID eq 500) or ". As we see, there is an extra " or " at the end, we need to scrap it out.
  26. We will add a Compose action and use "substring" function to scrap the last " or " piece.
    1. substring(variables('strCombinedFilterQuery'),0,add(lastIndexOf(variables('strCombinedFilterQuery'),')'),1))
      
  27. Now, use the Get Items action to get the filtered records.
  28. Save the flow and test it again. 
  29. If you see, the traditional approach took 26 seconds to prepare the filter query itself.
  30. Now, if we see the Run history.
  31. Here, we will find that the "Select" approach took only 31 milliseconds to complete the process, while the tradition approach took 27 seconds. It means the Select approach is 81 times faster than the traditional approach.
  32. This select approach is surprisingly useful, when you have to process data. The traditional approach will again add a "Apply to each" loop, while the same work will be done by Select action in fraction of time.
  33. For example, here after getting the data, if I have to add a column where, I need to fill in-
    1. "Apple" if GUID starts with "a"
    2. "Banana" if GUID starts with "b"
    3. "Citrus" if GUID starts with "c"
    4. "Others" for all other GUIDs
  34. Then I need to create HTML of this output. So, what I will do in traditional approach is, I will initialize a string variable to hold the HTML data.
  35. Then, I will use "Apply to each". In "Apply to each" either I will use the Condition (If-Else) or Switch-Case action. In that action, I will check the first character of GUID and based upon that character, I will append HTML code in the declared string.
  36. At the end, I will add another Append to String variable to complete the HTML.
  37. So, the final sequence in Traditional way is
  38. For new approach, I will use the Select action and add column "Flavour". In mapping, I will write the logic.
    1. if(
      	equals(toUpper(first(item()?['GUID0'])),'A'),
      	'Apple',
      	if(
      		equals(toUpper(first(item()?['GUID0'])),'B'),
      		'Banana',
      		if(
      			equals(toUpper(first(item()?['GUID0'])),'C'),
      			'Citrus',
      			'Others'
      		)
      	)
      )
      
  39. Lastly, I will add the Create HTML Table action and provide the output of previously added Select action as the input here.
  40. Now, Save the flow and execute it.
  41. Again, if you see, the new approach completed it process in less than a minute. While the traditional approach took around a minute to get the same completed.
  42. If we verify the same, this comes out to be "0" seconds (means less than a second) for New approach and 55 seconds for Traditional approach.
  43. Thus, you can see, how powerful is the "Select" action. So, friends, wherever possible, please use Select action and try to avoid "Apply to each" or "Switch" actions.
With this, I am concluding this post.
Happy Coding !!!
Will see you again with some new topics.

Stay Safe !
Stay Healthy !

Tuesday, August 30, 2022

Power Automate: Use of TAKE & SKIP Function

Hello Friends,

Welcome back with another post on Power Automate. Today, we will discuss about 2 amazing functions provided by Power Automate. These are "TAKE" and "SKIP".

The purpose of "TAKE" function is to pick the first n values from the provided array / string.

The purpose of "SKIP" function is to skip the first n values from the provided array / string.

These 2 are amazingly useful when working with arrays. Let's see-

  1. I am having a bulk array of Item IDs and I have to process this array in chunks. Here, these 2 functions show their expertise. These works helps when sending bulk IDs from PowerApps to Power Automate for processing
  2. Open the Power Automate Portal. Click on "+ Create", select "Instant cloud flow".
  3. Give you flow a suitable name. and select the appropriate trigger condition. For demo purpose, I am selecting "Manually trigger a flow".
  4. Initialize a variable "strItemIDs" of type String. It will hold the comma separate IDs.
  5. Now, I will initialize 4 more variables-
    1. arrItemIDs - It will hold the ItemIDs in array format using split function over strItemIDs.
    2. intTotalIDsCount - It will hold the total number of IDs present in arrItemIDs using length function.
    3. intBatchSize - It is a number which represents the number of items we will extract from the arrItemIDs
    4. arrItemsBatch - it will hold the IDs extracted from arrItemIDs in one batch. The logic for this will be discussed later in this post.
  6. We will add one more variable named "intSkipCount" and set it to 0.
  7. Now, we will add an action called Do-until. It will continue to execute until the intSkipCount becomes equal to or greater than intTotalIDsCount.
  8. During each iteration, it will fetch the desired records set and assign it to arrItemsBatch. Then increment the intSkipCount with intBatchSize.
  9. Below are the series of screenshots-
  10. Here the expression used is-
    1. take(skip(variables('arrItemIDs'),variables('intSkipCount')),variables('intBatchSize'))
      
  11. This is what the magic of Take & Skip functions is. the Skip function is skipping the first "n" number of records / characters (depends upon, what you are passing to it- array / string) and returning the remaining array/string. Then Take function is using that result and extracting the "m" number of records / characters and giving us as an output.
  12. Initially, intSkipCount was set to 0, so we received first 50 items. Now see the next screenshot.
  13. After getting the first set of items, we are incrementing the intSkipCount with BatchSize (which is 50 in our case).
  14. Now the loop will trigger again. This time, the Skip function will skip first 50 items so the result of skip function will be items starting for 51 to 290. This will be used as input by Take function and it will give first 50 items, means 51 -100.
  15. The loop will continue to trigger until inSkipCount becomes equal to or greater than intTotalIDsCount.
  16. The most important point here is that the last batch will be having only 40 items (251 - 290). However, the Take function was written to extract the 50 items. Ideally it should throw error (like in Substring function). But NO, it is smart enough to handle this situation and returning us the items whatever left there.
  17. This is the Take & Skip function works. Belos are the screenshots of execution.
  18. Below is the outcome of all batches.
  19. This is how, we can leverage the features of Take & Skip functions in Power Automate.
With this, I am concluding this post.
Happy Coding !!!
Will see you again with some new topics.

Stay Safe !
Stay Healthy !

Wednesday, August 24, 2022

Power Automate: Working With OBJECT Variable

Hello Friends,

Welcome back with another post on Power Automate. As we know, while creating a flow, we all use variables of Integer type, String type, Boolean type and sometimes Array type. Apart from that, did we observe one more type of variable "Object" type. I guess, we would haven't observed it. This is an amazing type of variable. If you are using lots of variables in your flow, then surely it will help you in replacing all those variables with a single one. As the type of this variable is object, we can store any object in this type of variable. The simplest way is to store a JSON in this variable. As we know, JSON contains the Key-Value pairs, thus it is the simplest and strongest part of JSON. The combination of JSON with Object type variable is an amazing combination. Let's see.

  1. Open the Power Automate Portal. Click on "+ Create", select "Instant cloud flow".
  2. Give your flow a suitable name. and select the appropriate trigger condition. For demo purpose, I am selecting "Manually trigger a flow".
  3. Click on "Create" to create the flow. Now, we will add 2 variables
    1. arrRandomNumbers (variable type - Array)
    2. objCounts (variable type - Object)
  4. The objective is that we will generate a series of random numbers between 0 & 9 and count how many 0s, 1s --- 9s are generated. For each number, we will add a key-value pair (or a property in object variable).
    1. {
      	"CountFor0" : 0,
      	"CountFor1" : 0,
      	"CountFor2" : 0,
      	"CountFor3" : 0,
      	"CountFor4" : 0,
      	"CountFor5" : 0,
      	"CountFor6" : 0,
      	"CountFor7" : 0,
      	"CountFor8" : 0,
      	"CountFor9" : 0
      }
      
  5. Save the flow and keep saving at regular interval.
  6. Add another variable that will be treated as counter for the how many Random Numbers, we will generate.
  7. Now, add another action called Do-Until and set the validation criteria. Here, we are generating 10 random numbers.
  8. Now inside the Do-until action, add a Compose action and add the expression-
    1. rand(0,9)
  9. Now, add a Switch action and for each number from 0 to 9, add Case. The output of Compose action will be the "On" criteria for the Switch action.

  10. Now for each case, we will add the increment action. However, it will be little bit different. First add another compose action and add the logic mentioned below.
  11. setProperty(variables('objCounts'),'CountFor0',add(int(variables('objCounts')['CountFor0']),1))
    
  12. Then add another action named "Set variable" and assign the output of above Compose action to the variable "ObjCounts". this will update the variable data.
  13.  
  14. The complete code setup for Case 0 will be-
  15. The same steps we need to repeat for rest of the cases. First add a Compose action then add Set Variable action.
  16. Now, we will add action to increment the counter so that the loop gets terminated once the counter reaches to 10.
  17. Now, if you wish to check if the logic we written over here worked, let's assign the ObjCounts variable to a Compose action. This action will be added outside the Do-Until loop.
  18. Save the workflow and run it to verify.
  19. If you wish to know, what all random numbers were generated, then you may add an action called "Append to array variable" as below to add all those numbers in an array-
  20. Lastly, add another compose action to see what all numbers got generated.
  21. Run the flow again and verify the result.
  22. This time the outcome is-
  23. This is how, you can leverage the beauty of Object variables.

With this, I am concluding this post.
Happy Coding !!!
Will see you again with some new topics.

Stay Safe !
Stay Healthy !