Showing posts with label TimeOut. Show all posts

Saturday, September 3, 2022

Power Automate: Flows Timeout Issue Through PowerApps

Hello Friends,

Welcome back with another post on Power Automate. Today, we will discuss about the TimeOut issue when calling a flow from PowerApps. Sometimes, you have observed that the flow you had written for some processing, takes longer time to get it complete. When, such workflows are called from PowerApps, we get a timeout issue on PowerApps after 2 minutes. However, if you had observed, that the flow is still running. The reason is the service which acts as a communication bridge between PowerApps & Power Automate for Request/Response drops the connection after 2 minutes. So, how to handle this situation?

As of now, there is no solution provided by Microsoft to handle this situation. However, we can do a workaround for that. Let's start.

  1. Create a "Instant cloud flow" in Power Automate. Give name as "POC-FlowTimeOutIssue" and the trigger type as "PowerApps".
  2. Click on Create to create the flow. Add to input parameters (Initialize variable) named-
    1. DisplayName
    2. Email
  3. The data type of these parameters will be string and the Value will be "Ask in PowerApps".
  4. Now add a delay action and set the delay for 3 minutes.
  5. Now add an action "Respond to a PowerApps or flow".
  6. Add the output as below-
  7. Save the flow and test it. It will ask you to provide the values for input parameters. Provide the Display Name & Email ID and click on Run flow. Follow the steps to the flow executed.
  8. You will find that the flow execution got failed. It will throw one error "The execution of template action 'Respond_to_a_PowerApp_or_flow' is failed: the client application timed out waiting for a response from service. This means that workflow took longer to respond than the alloted timeout value. The connection maintained between the client application and service will be closed and client application will get an HTTP status code 504 Gateway Timeout.". But no worries because it was a Test, not executed from PowerApps.
  9. Now, create a PowerApps and add a button.
  10. Now from left navigation menu, click on Power Automate Icon >> + Add flow >> Search flow >> POC-FlowTimeOutIssue
  11. Now, write below code on "OnSelect" property of the button.
  12. Save the app and play it. click on the button to execute the flow.
  13. You will see the 5 dots scrolling at the top as well as the button got disabled. After 2 minutes, you will find that the suddenly got enabled and the scrolling of dots stopped. This is because, the flow got timed out. We haven't got any visible error on screen because, we are saving the output in a variable. Let's stop playing it. and check the app. We will find an error in app.
  14. If we see the flow running status, we found it again failed. The Error Details are-
  15. It is saying the connection between client application and service got closed.
  16. Now, what is the solution?
  17. Here, we have 2 solutions-
    1. If there is only data processing and no intimation to user.
    2. If there is processing the data and intimate to user.
  18. For both solutions, you have to follow below process-
  19. In PowerApps, add one condition on "OnSelect" function of button just after the existing code.
    1. If(IsBlankOrError(vrOutPut),Notify("Your request has been timed out, however, it is already processing at the backend.",NotificationType.Error),vrOutPut);
      
  20. In case, if user needs to be intimated, then add below code
    1. If(IsBlankOrError(vrOutPut),Notify("Your request has been timed out, however, it is already processing at the backend. You will receive an email.",NotificationType.Error),vrOutPut);
      
  21. Now come back to flow. In case of intimation to user, add "Send an email (V2)" action at the end of flow.
  22. Now, click on the 3 dots of this action and choose "Configure run after".
  23. Select the options as shown below and click on Done
  24. Save the flow, click on test and enjoy.
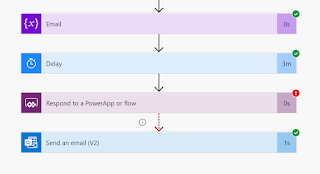
  25. With this, what will happen is that whatever output you want to give to user, it will be sent through mail.
  26. For example, user has clicked on button to export data to excel. Now, if the data is large, it will surely get timeout. then with this method, you can provide the Excel link back to user of the file itself as an attachment to user over email.
  27. The best part is we had configured it to not run if the Response action got executed successfully. It means it will trigger if the Response action got failed / timed out / skipped.
With this, I am concluding this post.
Happy Coding !!!
Will see you again with some new topics.

Stay Safe !
Stay Healthy !

Friday, May 20, 2022

Power Automate: TimeOut in Approval Workflow

Hello Friends,
Welcome back with another post on Power Automate. Sometimes, it happens in real world that we trigger an approval process and sometimes it gets halted due to non-availability of any approver or due to some other reasons. In such scenarios, the workflows instance keeps running. In such cases, what the requirement is that these instances should get terminated after a certain interval. By default, there is a timeout of 30 days for trial licenses. But for paid licenses, it keeps running. Therefore, we need to apply some workaround during the workflow creation to set a timeout of the instance and if the workflow instance reaches to that timeout before getting completed, it should get terminated. So, let's start - 
  1. Suppose we have a SharePoint list named "ZTimeOut".
  2. We have to apply the timeout feature upon the item approval process. For this, we have to create a Power Automate flow upon this list.
  3. So, login to Power Automate portal and click on "+ Create". Choose ""Automated cloud flow".
  4. Give flow a suitable name and choose the trigger option as "When an item is created". click on "Create".
  5. It will create a new workflow. Select the Site Address and the List Name.
  6. Now, in order to apply the timeout, we will use the "Delay until" action. It needs a timestamp till when it has to wait.
  7. So, for that, we will define a variable "strTimeOut" of type string and set it's value as UTCNOW + 5 minutes. You may pick the time out duration (i.e. 5 minutes) dynamically as well from a master list and it could be Seconds / Minutes / Days / Months. You need to define one dimension either Seconds or Minutes or Days or Months. Then convert it accordingly in workflow.
  8. Now, initialize the variable "strTimeOut" and set the Value as below-
  9. Now save the workflow so that the workflow should get saved on cloud environment.
  10. Now, we will define another variable "blnIsProcessCompleted" with default value as false; which will be used to set as true once our approval process gets completed. In case, our approval process doesn't get completed before timeout, then based upon it's value, our code will terminate the workflow instance.
  11. Now, add "Start and wait for approval" action.
  12. At this stage we will add another action "Delay until" in parallel which will act as Timout feature for our flow.
  13. For this, click on + icon and choose "Add a parallel branch".
  14. Now search for "Delay until" action
  15. Give the variable "strTimeOut" as Timestamp input.
  16. Basically, we had created 2 branches. One branch will perform our approval process activity as usual. While other parallel branch "Dealy until" will wait for the stipullated time provided by variable.
  17. This action will wait for the datetime provided by strTimeOut in parallel.
  18. Now add a Condition action to check if the variable blnIsProcessCompleted is true or false.
  19. If false that means the workflow is still running so we will terminate the workflow. Before terminating, if you wish to inform user then you may add "Send an email (V2)" action. If you wish to update the item then you may use "Update an item" or "Send an HTTP request to SharePoint" action. Lastly, we will use Terminate action to terminate the workflow.
  20. This completes our TimeOut portion. Now come back to Approval Process. We had added one level of approval. Based upon outcome, you may write your own logic. I am adding one more level to show how the timeout works.
  21. Add one more "Start and wait for approval" action in the approval branch.
  22. Again, you may write your own logic based upon the outcome of this approval. Once all approval gets completed, you need to set "blnIsProcessCompleted" to true and then add the Terminate action.
  23. Save the workflow and now it's time to test it. For this, add one item in list.
  24. I had added one item and the workflow gets trigger. It sent me the first level approval notification.
  25. I had approved it.
  26. It triggered the level 2 approval notification
  27. I had approved it also.
  28. Now, if we check the workflow, it shows that it has been executed successfully and the approval process get completed with last Termination action execution as well.
  29. However, if we see that the "Delay until" is still showing in running mode. Let's wait for 5 minutes (out TimeOut). It's almost 7 minutes passed. Let's check the status.
  30. As we can see, the Delay until got cancelled and further steps also didn't executed. Means, it is working fine if the approval process goes smoothly. Now, what if any level doesn't take any action. Let see. I will initiate the process again. Approver 1 will approve the request. Approver 2 will not take any action until timeout.
  31. As we can see from below screenshot, Approver 1 has completed its request. Approver 2 haven't taken any action upon the request. So, we are waiting to get the request timeout.
  32. As we can see that the workflow reached to the timeout and it has been terminated by the parallel branch.
  33. The auto cancel mail is also received.
  34. The complete flow is-
  35. Important- You have noticed that in case of timeout, the approval instance for Level 2 still showing as waiting for response. This is because, as of now, there is no feature available by Microsoft to cancel the approval instance. However, it will not make any impact because, if the workflow instance has itself terminated and if the level 2 approver takes any action upon the request, it will not be entertained by the workflow as the instance has already been terminated.
  36. This way, we can implement the TimeOut feature in Power Automate.
With this, I am concluding this post.
Happy Coding !!!
Will see you again with some new topics.
Stay Safe !
Stay Healthy !