- Suppose we have a SharePoint list named "ZTimeOut".
- We have to apply the timeout feature upon the item approval process. For this, we have to create a Power Automate flow upon this list.
- So, login to Power Automate portal and click on "+ Create". Choose ""Automated cloud flow".
- Give flow a suitable name and choose the trigger option as "When an item is created". click on "Create".
- It will create a new workflow. Select the Site Address and the List Name.
- Now, in order to apply the timeout, we will use the "Delay until" action. It needs a timestamp till when it has to wait.
- So, for that, we will define a variable "strTimeOut" of type string and set it's value as UTCNOW + 5 minutes. You may pick the time out duration (i.e. 5 minutes) dynamically as well from a master list and it could be Seconds / Minutes / Days / Months. You need to define one dimension either Seconds or Minutes or Days or Months. Then convert it accordingly in workflow.
- Now, initialize the variable "strTimeOut" and set the Value as below-
- Now save the workflow so that the workflow should get saved on cloud environment.
- Now, we will define another variable "blnIsProcessCompleted" with default value as false; which will be used to set as true once our approval process gets completed. In case, our approval process doesn't get completed before timeout, then based upon it's value, our code will terminate the workflow instance.
- Now, add "Start and wait for approval" action.
- At this stage we will add another action "Delay until" in parallel which will act as Timout feature for our flow.
- For this, click on + icon and choose "Add a parallel branch".
- Now search for "Delay until" action
- Give the variable "strTimeOut" as Timestamp input.
- Basically, we had created 2 branches. One branch will perform our approval process activity as usual. While other parallel branch "Dealy until" will wait for the stipullated time provided by variable.
- This action will wait for the datetime provided by strTimeOut in parallel.
- Now add a Condition action to check if the variable blnIsProcessCompleted is true or false.
- If false that means the workflow is still running so we will terminate the workflow. Before terminating, if you wish to inform user then you may add "Send an email (V2)" action. If you wish to update the item then you may use "Update an item" or "Send an HTTP request to SharePoint" action. Lastly, we will use Terminate action to terminate the workflow.
- This completes our TimeOut portion. Now come back to Approval Process. We had added one level of approval. Based upon outcome, you may write your own logic. I am adding one more level to show how the timeout works.
- Add one more "Start and wait for approval" action in the approval branch.
- Again, you may write your own logic based upon the outcome of this approval. Once all approval gets completed, you need to set "blnIsProcessCompleted" to true and then add the Terminate action.
- Save the workflow and now it's time to test it. For this, add one item in list.
- I had added one item and the workflow gets trigger. It sent me the first level approval notification.
- I had approved it.
- It triggered the level 2 approval notification
- I had approved it also.
- Now, if we check the workflow, it shows that it has been executed successfully and the approval process get completed with last Termination action execution as well.
- However, if we see that the "Delay until" is still showing in running mode. Let's wait for 5 minutes (out TimeOut). It's almost 7 minutes passed. Let's check the status.
- As we can see, the Delay until got cancelled and further steps also didn't executed. Means, it is working fine if the approval process goes smoothly. Now, what if any level doesn't take any action. Let see. I will initiate the process again. Approver 1 will approve the request. Approver 2 will not take any action until timeout.
- As we can see from below screenshot, Approver 1 has completed its request. Approver 2 haven't taken any action upon the request. So, we are waiting to get the request timeout.
- As we can see that the workflow reached to the timeout and it has been terminated by the parallel branch.
- The auto cancel mail is also received.
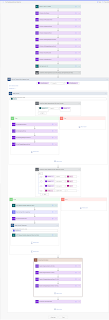
- The complete flow is-
- Important- You have noticed that in case of timeout, the approval instance for Level 2 still showing as waiting for response. This is because, as of now, there is no feature available by Microsoft to cancel the approval instance. However, it will not make any impact because, if the workflow instance has itself terminated and if the level 2 approver takes any action upon the request, it will not be entertained by the workflow as the instance has already been terminated.
- This way, we can implement the TimeOut feature in Power Automate.
Friday, May 20, 2022
Power Automate: TimeOut in Approval Workflow
Thursday, May 12, 2022
Power Automate: Add Admin As Approver In Case Of Out-Of-Office
Hello Friends,
Welcome back with another post of Power Automate. Sometimes, we have a situation where we have multiple level of approvals. In case, if any approver is out of office or on leave, then the approval process gets halted. Is there any way that we can add an Admin in such scenarios?
The answer is YES with a limitation. If the approver is on leave or Out-Of-Office and he/she had activated Auto Replies then we can achieve our goal. Let's see. I will show here how to find whether approver has activated Auto Replies or not. Based upon that, you can use the feature as per your project requirement. Let's start-
- Navigate to Power Automate portal.
- Click on "My flows".
- Click on "+ New flow" and choose "Instant cloud flow".
- Give the flow a name. I am giving "VerifyOutOfOffice".
- Choose the trigger this flow as "Manually trigger a flow".
- Click on Create.
- Now we have an action called "Get mail tips for a mailbox (V2)". It is very useful action. It will give us the information that whether the approver has set any Auto Replies or not. It takes the emails address as input.
- You may give email id as static value as well as using Dynamic Expression window.
- Save it.
- Now, first we will test when our mailbox automatic replies are turned off. I am using my account to show the Test Results. You can give any user email id.
- Now go back to workflow and click on Test.
- Click on Show raw outputs.
- Here, you will find the body >> value. It is having a property "automaticReplies". Presently, it is coming as blank as we have not set any Automatic Replies.
- Now, change the settings of your mailbox and Turn on the Automatic Replies and save the settings.
- Now again test the flow and click on "Show raw outputs".
- As you can see that "automaticReplies" property is now having further sub properties. Out of these, the "message" property is of our use. If there is a message, then it will start from "<div". This is what we can check and use to add an Admin for approval. Even, if the message is not null and have some length then it would also be sufficient to validate.
- Now, go back to Outlook settings. Set the time period for which replies to be send. If the Start or End is having current date, then message will reflect in output otherwise no. Let's take 2 more examples-
- With current date
- Without current date
- As you can see, if the Automatic Replies is ON and is not set for current date then we will not get the message in response. For all other cases, we are getting message. With this feature, we can identify if we need to add another approver or not. Now, how to validate this message. For this, use the "Condition" action-
- Being the output of "Get mail tips for a mailbox (V2)" action is an array which contain only one object so, we will use index as 0 and then we will check for the property "automaticReplies" and then it's nested property "message". Then check it for NULL.
- Next we will check if the length is greater than 0.
- Now save the flow and test it again. Right now, I had set Automatic Replies as ON without any time frame.
- Now, I am setting Automatic Replies as OFF and again Running the flow.
- With all these examples, we have now the clear picture that if the message is there, it means the user is on leave / out-of-office.
- Now, we can put our logic to add another approver.
- This is how, we can trace the availability of any approver.
- Limitation: However, the Automatic Replies are meant only to use during Leave / Out-of-Office; in case, if any user is using to send a default reply, then even, the user is available, the flow will assume that the user is on leave because the automaticReplies/message will return a valid message.
Sunday, January 9, 2022
Power Automate: Multiple Approvers Approval Exceeding Threshold (Generic Less Code)
Hello Friends,
Welcome back with another post on Power Automate. In our previous post, we have discussed above managing multiple level of approvals where this level may go beyond 10, 20 ...
Power Automate: Multiple Approvers Approval Exceeding Threshold
We have achieved this functionality successfully. However, the only issue is that we have to repeatedly write the same login for each level. Can we do something which would be generic in nature and allow us to write logic only once and then it will repeatedly execute until finish. Let's try-
- Taking example of previous post whose link is given above, we will first create a Power Automate (Automate cloud flow >> When an item is created).
- Initialize below variables-
- Save the flow to avoid and mishapenning. It's a good practice to save your work at regular intervals to avoid any loss due to any incident. 😊
- Now, we will get the items from ApproversMaster list (see my previous blog post to read about ApproversMaster list). For this we will use "Get Items" action. We will apply filter upon Country, State and RequestedAmount. We will also apply Orderby on ApprovalLevel as ASCENDING.
- Now, we will check, if this action has any outcome, means if there are any Approvers available. If YES, the get the ApprovalLevel of last item; add 1 to it and assign it to intTotalIterations variable.
- Now, the real battle begins. From here, we will use a looping structure (Do until) which will work upon intLevelNumber.
- For each level-
- It will first check if there is an ApproverLevel available in ApproverList for the LevelNumber iteration. If YES, assign Approver Name, Approver Email, Delegate Approver Name, Delegate Approver Email to respective variables.
- Next, it will check if blnProceedFurther is TRUE, strApproverEmail is available (means should not be NULL or BLANK). Then-
- Update (Send an HTTP request to SharePoint) Approver Name in PurchaseRequest List Item.
- Start Approval Process (Start and wait for approval)
- Set blnProceedFurther (means next iteration approval should be executed or not) by TRUE/FALSE based upon Approve/Reject as Outcome of Approval Process.
- Update (Send an HTTP request to SharePoint) ApprovalStatus & Approval Date Time in PurchaseRequest List Item.
- Reset respective Approver Name, Approver Email, Delegate Approver Name, Delegate Approver Email variables to NULL.
- Increment intLevelNumber by 1.
- Let's begin. Apply looping structure (Do until)-
- For each level-
- Check ApprovalLevel and assign Name & Email variables-
- if blnProceedFurther is TRUE and strApproverEmail is available-
- Update ApproverName in List (Send an HTTP request to SharePoint). Now, here we will make all the executions pure dynamic-
- Start Approval Process (Start and wait for approval)-
- Set blnProceedFurther-
- This equals function will result either true or false based upon the condition. So, if the Outcome is Approve, we need to proceed with next level of approval otherwise termiate.
- Update Approval Status and Date in List (using Send an HTTP request to SharePoint)-
- This is how the all these steps looks like-
- Reset all 4 Name / Email variables-
- Lastly, we will increment the intLevelNumber by 1.
- The complete flow will be-
- That's all. It's time to test now. Before execution, let me inform you the flow-
- Level 1-
- Approver: Ram Vinay
- Delegate: Lokesh Kumar
- Limit: $0
- Level 2-
- Approver: Lokesh Kumar
- Delegate: Amit Sharma
- Limit: $0
- Level 3-
- Approver: Amit Sharma
- Delegate: Sarvesh Singh
- Limit: $500
- Level 4-
- Approver: Sachin Jain
- Delegate: Lokesh Kumar
- Limit: $15000
- Level 5- (Will Be SKIPPED As LIMIT Is Higher Than $20000)
- Approver: Sarvesh Singh
- Delegate: Ram Vinay
- Limit: $25000
- Level 6-
- Approver: Lokesh Kumar
- Delegate: Ram Vinay
- Limit: $12000
- Let's create an item-
- Title: New Project Work
- Country: India
- State: Uttar Pradesh
- RequestedAmount: 20000
- Save the item.
- Workflow gets started and it has updated Approver1 Names in list-
- Both approver & delegate received the mail-
- Let delegate will approve the request. The moment, delegate had approved the request, flow had updated it's status and date in system.
- After then, it had started the next level of approval-
- That means, one round of our workflow has completed. It is running fine. Now, I will just post screenshot of each level-
- Post Assign
- Post Approval
- Level 2-
- Post Assign-
- Post Approval-
- Level 3-
- Post Assign-
- Post Approval-
- Level 4-
- Post Assign-
- Post Approval-
- Level 5-
- Post Assign-
- Surprised? Why it is blank? Because, as per our logic, only approvers having limit less than or equal to the RequestedAmout will be eligible for approving the request. Level 5 person has approval limit higher than that amount. Hence skipped. Instead, Level6 should receive the Approval request. Let's check.
- Level 6-
- Post Assign-
- Post Approval-
- This way, you can implement any number of Approval Stages.
- IMPORTANT Points To REMEMBER-
- Number of levels should be always less than the threshold of Do-Until loop.
- All fields you are going to update in this process (ApproverName, ApprovalStatus, ApprovalDate) must bear similar pattern and similar internal name in list. i.e.-
- Approver1Name
- Approver1ApprovalStatus
- Approver1Comments
- Approver1ActionDate
- .
- .
- .
- Approver5Name
- Approver5ApprovalStatus
- Approver5Comments
- Approver5ActionDate
- .
- .
- .
- Approver15Name
- Approver15ApprovalStatus
- Approver15Comments
- Approver15ActionDate
- .
- .
- .