Friday, November 19, 2021

PowerApps: Using Dropdown In Gallery

Hello Friends,

Welcome back with some new topics. Today, we will learn something about using Dropdown in Gallery. Let's first take an example. We have-

  1. Users Master
  2. Category Master
  3. User-Category Mapping

The Users Master is a collection of users. The Category Master is the collection different categories. The User-Category Mapping is the collection of mapping of user with it's related category. Now, we have a PowerApps screen, where we have a gallery. This gallery is having two controls-

  1. Label (lblUser) - It displays the name of Users from Users Master.
  2. Dropdown (ddCategory) - It is linked with Category Master and displays the current category from User-Category Mapping. If mapping is not available, it will show nothing selected.

Now,w we want that when the screen is loaded, the gallery gets loaded as mentioned above. User should be able to change the category of any user. There should be- 

  1. Button "Save Final Mapping" which will traverse through this gallery and save the updated mapping in a collection (later on in datasource).
  2. Button "Reset Mappings" which will reset the gallery to its original state.

Let's see, how do we do it.

  1. Create a Canvas PowerApps and name it "DropDownCategoryMapping".
  2. Add a button (btnLoadCollections) named "Load Collections". Add below functions on OnSelect property of this button.
    1. UpdateContext({varResetStatus: true});
      ClearCollect(
          collDropDownData,
          {CategoryName: Blank()},
          {CategoryName: "A"},
          {CategoryName: "B"},
          {CategoryName: "C"},
          {CategoryName: "D"},
          {CategoryName: "E"},
          {CategoryName: "F"}
      );
      ClearCollect(
          collDefaultUsers,
          {UserName: "Sachin"},
          {UserName: "Lokesh"},
          {UserName: "Rajeeb"},
          {UserName: "Ram"},
          {UserName: "Sudhir"}
      );
      ClearCollect(
          collDefaultUsersCategoryData,
          {
              Name: "Sachin",
              Category: "A"
          },
          {
              Name: "Lokesh",
              Category: "B"
          },
          {
              Name: "Ram",
              Category: "A"
          }
      );  
  3. Here we have defined-
    1. Variable: varResetStatus. It will be used to Reset the dropdown
    2. Collection: collDropDownData. It contains the list of categories
    3. Collection: collDefaultUsers. It contains the list of users
    4. Collection: collDefaultUsersCategoryData. It contains the mapping list between Users and Categories


  4. Add a Label (lblCategories) and a DataTable (dtCategories) and assign collDropDownData to this datatable.
  5.  

  6. Similar way, add another Label (lblUsers) and DataTable (dtUsers) and assign collDefaultUsers to this datatable.


  7. Similar way, add another Label (lblMapping) and DataTable (dtDefaultMapping) and assign collDefaultUsersCategoryData to this datatable.


  8. Now we will add another Label (lblSetMapping) and a Gallery (gallSetMapping). In this gallery, add one Label (lblUserName) and a Dropdown (ddCategoryList). Assign the collection collDefaultUsers to this gallery (Items property) and assign collDropDownData to the dropdown (Items property).
  9. Now set the Default property of dropdown (ddCategoryList) as-
  10. First(
        Filter(
            collDefaultUsersCategoryData,
            Name = ThisItem.UserName
        )
    ).Category  
  11. The moment, we will add the above function, we will find that each drop is set to the default value of category available in collDefaultUsersCategoryData. For those users, whose mapping is not available, are assigned as blank.
  12. Set the Reset property of ddCategoryList with varResetStatus.
  13. Now we will add a button (btnCaptureFinalMapping) and add below code on its OnSelect property.
  14. ClearCollect(
        collFinalMapping,
        []
    );
    ForAll(
        gallSetMapping.AllItems,
        Collect(
            collFinalMapping,
            {
                FName: lblUserName.Text,
                FMapping: ddCategoryList.SelectedText.CategoryName
            }
        )
    );
    
  15. This will capture the final mapping after we had made changes to them.

  16. Now, we will add another set of  Label (lblFinalMapping) and DataTable (dtFinalMapping) and assign collFinalMapping to this datatable.


  17. Now we will add a button (btnReset) and add below code on its OnSelect property. We are resetting the variable so that Reset action get execute on dropdowns. Secondly, we are cleaning the Final Mapping Collection.
  18. UpdateContext({varResetStatus: false});
    UpdateContext({varResetStatus: true});
    ClearCollect(
        collFinalMapping,
        []
    );


  19. So, What are we waiting for? Let's play the app.
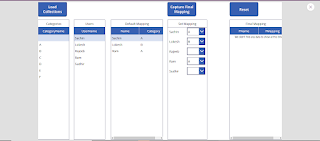
  20. We had launched the app and got below screen.

  21. Now, we will make changes to the Category-

  22. Click on "Capture Final Mapping" button. You will see, the mapping is captured in collection and will reflect in last table.

  23. Now, if we click on "Reset" button, what will happen-


  24. The gallery has been reset to its original state and the final mapping collection has been cleaned.
  25. This way, we can achieve the functionality.
  26. NOTE:-
    1. The functionality of mapping the default value in dropdown should be used cautiously. If you are getting data from datasource while setting the default value, it will badly impact the performance. So, better to bring the default mapping in PowerApps collection and the use that collection in setting the default value.

With this, I am concluding this post.
Happy Coding !!!
Will see you again with some new topics.

Stay Safe !
Stay Healthy !

Thursday, November 18, 2021

PowerApps: Bulk Insert (Using Patch)

Hello Friends,

Welcome back with some new topics. Today, we will discuss about an interview question that is asked in almost all PowerApps interviews.

Ques: How do you insert bulk data in data source using PowerApps?

At first sight, we will say NO WAY. Because Submit Form works on submitting the Form so works for single record. And we use Patch for inserting / updating single record normally.

BUT, do you know that the Patch function is the solution of above question? 🤔

Yes, Patch function inserts data in bulk also. 

So, the answer is YES we can do using Patch function.

The complete syntax is-

Patch(datasource,table)

Here datasource is the source where we have to insert the data and table is the collection of records that needs to be inserted as bulk in datasource. Let's try-

  1. First of all, create a simple list. I had created a basic list with default Title column and added four records.
  2. Now, Open the PowerApps maker Portal. Create a new PowerApps named "BulkInsertApp". Add-
    1. Label with text as "Source List"
    2. Gallery and link with the list (BulkInsertList) (Control Name: galleryBulkInsertList)
    3. Button with text as "Bulk Insert" (Control Name: btnBulkInsert)
    4. Label with text as "New Item"
    5. Input Box with Hint Text as "Enter New Item Here..." and Default Text as blank (Control Name: txtNewItem)
    6. Button with text as "Add To Local Collection" (Control Name: btnAddToColl)

  3. The screen will look like above screenshot.
  4. Now select the button "btnBulkInsert" and choose the OnSelect property. Add below function-
    1. Patch(
          BulkInsertList,
          collLocalCollectionNewItems
      );
      ClearCollect(
          collLocalCollectionNewItems,
          []
      );
      
  5. Patch will perform the bulk insert activity from collLocalCollectionNewItems to BulkInsertList and then we are using ClearCollect to clear the local collection.
  6. Now select the button "btnAddToColl" and choose OnSelect property. Add below function-
    1. Collect(
          collLocalCollectionNewItems,
          {Title: txtNewItem.Text}
      );
      Reset(txtNewItem); 
  7. Here, we are adding the text of text box in local collection "collLocalCollectionNewItems" and then resetting the text box.
  8. That's all. Execute the PowerApps and add couple of data to local collection.
  9. I have added "E" and "F" to local collection. Let check the collection-
  10. Now click on Bulk Insert button.
  11. Before Click-
  12. After Click-

  13. The list status is-

  14. If we check the local collection now. It should be blank-
  15. This way, we can insert bulk data in data source using Patch function.
  16. NOTE:-
    1. If you insert too much data using this technique then remember the screen remains in block/hang mode till all the data does not get inserted in data source. Therefore, we should avoid large data insertion using this technique. 
    2. Rather we should prepare a separate mechanism where we we insert the bulk data as a  single JSON in a temporary list/table.
    3. There should be a Power Automate linked to that temporary table which will read that input, Parse the JSON and insert the data in data source. This way, your app will not stuck and the purpose will also get achieved.
With this, I am concluding this post.
Happy Coding !!!
Will see you again with some new topics.

Stay Safe !
Stay Healthy !

Wednesday, November 17, 2021

PowerApps: Add/Drop/Show/Rename Column

Hello Friends,

Welcome back with some new topics. Today, we will discuss about Column operations in PowerApps. PowerApps provides below options to play on columns-

  1. AddColumns
  2. ShowColumns
  3. DropColumns
  4. RenameColumns

These functions are used to re-shape the collection/table in PowerApps. Apart from that, it also provide functionality to get distinct data using Distinct function.

In this post, we will learn about:

  1. Add/Show/Drop/Rename Column functions
  2. Distinct function
  3. Adding Blank Record (or "Please Select") at Beginning/End of collection (beneficial when binding with Dropdown)
  4. Add ID using Filter function in collection having Distinct data

Let's start one by one. 

  1. First we will create a collection. I had created a collection named "collSampleData". The data is:
  2. ClearCollect(
        collSampleData,
        {
            ID: 1,
            FName: "Sachin",
            LName: "Jain"
        },
        {
            ID: 2,
            FName: "Lokesh",
            LName: "Kumar"
        },
        {
            ID: 3,
            FName: "Rajeev",
            LName: "Khanna"
        },
        {
            ID: 4,
            FName: "Anuj",
            LName: "Sharma"
        },
        {
            ID: 5,
            FName: "Rupesh",
            LName: "Jaiswal"
        },
        {
            ID: 6,
            FName: "Anuj",
            LName: "Sharma"
        },
        {
            ID: 7,
            FName: "Sachin",
            LName: "Jain"
        },
        {
            ID: 8,
            FName: "Sanjiv",
            LName: "Sharma"
        },
        {
            ID: 9,
            FName: "Rajeev",
            LName: "Sharma"
        }
    );  
  3. It will create a collection with 9 records. Here I had added couple of duplicate entries which we will use for Distinct function.
  4. If we check the collection, it has:


  5. Add Column (AddColumns):
    1. AddColumns function is used to add column to the collection/table. You may add a calculated column, add and existing column with different datatype. I am using to add a calculated column by adding FName & LName.
    2. ClearCollect(
          collWithFullName,
          AddColumns(
              collSampleData,
              "FullName",
              FName & " " & LName
          )
      );
      

    3. If we check the collection, it has:

    4. This way, we can add columns to collection.
  6. Show Column (ShowColumns)
    1.  ShowColumns is used to include only those columns in table/collection that needs to be displayed and rest needs to be dropped.
    2. ClearCollect(
          collShowColumnData,
          ShowColumns(
              collWithFullName,
              "ID",
              "FullName"
          )
      );
      
    3. If we check the collection, it has:

    4. Clearly, we can see, only 2 columns are retained and rest are removed. This is useful when we need to show a couple of columns from a large columns list.
  7. Drop Column (DropColumns)
    1.  DropColumns is used to drop the columns from table/collection that needs not to be displayed. It can be say a opposite of ShowColumns.
    2. ClearCollect(
          collWithOnlyFullName,
          DropColumns(
              collWithFullName,
              "ID",
              "FName",
              "LName"
          )
      );
      

    3. If we check the collection, it has:
    4.  

    5. Clearly, we can see, all 3 columns are dropped and rest only 1 column is retained. This is useful when we need to drop couple of columns from a large columns list and rest to be retained.
  8. Distinct (Distinct)
    1. Before moving forward to RenameColumns, we will discuss about Distinct function. After this, you will better understand the RenameColumns function. Distinct function is used to get the distinct values from a table/collection. Distinct works only on single column and return that particular column from the collection.
    2. ClearCollect(
          collDistinctData,
          Distinct(
              collWithOnlyFullName,
              FullName
          )
      );


    3. If we check the collection, it has:

  9.  Rename Column (RenameColumns)
    1. RenameColumns is used to rename the name of existing column.
    2. ClearCollect(
          collRenameColumnData,
          RenameColumns(
              collDistinctData,
              "Result",
              "Full Name"
          )
      );


    3. If we check the collection, it has:


    4. As we can check the column name has been renamed from "Result" to "Full Name" while the data remains unchanged.
  10. Nested Use Of These Functions
  11. Now, once you are expertise in using functions, you may consolidate all these functions into one. I am using below function in one command to achieve the same functionality-
    1. AddColumns
    2. DropColumns
    3. RenameColumns
    4. Distinct
  12. ClearCollect(
        collConsolidated,
        RenameColumns(
            Distinct(
                DropColumns(
                    AddColumns(
                        collSampleData,
                        "FullName",
                        FName & " " & LName
                    ),
                    "FName",
                    "LName"
                ),
                FullName
            ),
            "Result",
            "Full Name"
        )
    );


  13. If we check the collection, it has:


  14. Add Blank Record At Beginning/End of Collection
  15. We have consolidated data collection. We will add a blank record at the end of collection.
  16. ClearCollect(
        collBlankAtEnd,
        collConsolidated,
        {'Full Name': Blank()}
    );
    

  17. For the purpose to display blank record, I had set border of labels used.
  18. Now, we will add a blank record at the beginning of collection.
  19. ClearCollect(
        collBlankAtBegin,
        {'Full Name': Blank()},
        collConsolidated
    );  

  20. Add ID using Filter function in collection having Distinct data
  21. Now suppose a scenario, where you have a collection which is having multiple duplicate records. Your objective is to have Distinct records having ID and Name. The problem is that Distinct function returns only single column, so what the approach is?
    1. We will create a collection.
    2. Apply Distinct (to get distinct records) >> AddColumns (add ItemID column with default value as 0) >> RenameColumns (rename the column "Result" created as as result of Distinct function to ItemName).
    3. Create a replica of this distinct collection to apply ForAll loop.
    4. Apply ForAll loop. In this loop apply Patch. In Patch, use Filter with First function to get the desired ItemID of each item.
  22. Sequentially code is as below-
    1. ClearCollect(
          collStationeryData,
          {
              ID: 1,
              ItemName: "Pencil"
          },
          {
              ID: 2,
              ItemName: "Pen"
          },
          {
              ID: 3,
              ItemName: "Eraser"
          },
          {
              ID: 2,
              ItemName: "Pen"
          },
          {
              ID: 4,
              ItemName: "Sharpner"
          },
          {
              ID: 5,
              ItemName: "Paper A4"
          },
          {
              ID: 1,
              ItemName: "Pencil"
          },
          {
              ID: 3,
              ItemName: "Eraser"
          },
          {
              ID: 6,
              ItemName: "Stapler"
          }
      );
      
    2. ClearCollect(
          collDistinctStationeryData,
          RenameColumns(
              AddColumns(
                  Distinct(
                      collStationeryData,
                      ItemName
                  ),
                  "ItemID",
                  0
              ),
              "Result",
              "ItemName"
          )
      );
      
    3. ClearCollect(
          collDistinctStationeryDataTemp,
          collDistinctStationeryData
      );
      
    4. ForAll(
          collDistinctStationeryDataTemp,
          Patch(
              collDistinctStationeryData,
              LookUp(
                  collDistinctStationeryData,
                  ItemName = collDistinctStationeryDataTemp[@ItemName]
              ),
              {
                  ItemID: First(
                      Filter(
                          collStationeryData,
                          ItemName = collDistinctStationeryDataTemp[@ItemName]
                      )
                  ).ID
              }
          )
      );  

  23. If we check the collection, it has:
    1. collStationeryData

    2. collDistinctStationeryData (initial stage before Patch) / collDistinctStationeryDataTemp

    3. collDistinctStationeryData (After Patch)

  24. This way, you can utilize these power packed functions as per the required. Even you may nest these functions to avoid multiple steps.

With this, I am concluding this post.
Happy Coding !!!
Will see you again with some new topics.

Stay Safe !
Stay Healthy !