Thursday, December 31, 2020

PowerApps: Conditional Display/Hide of Icons

 Hello Friends,

Welcome again with my new post on PowerApps. Today, we will learn some additional features of PowerApps which are quite useful during apps development. In this series, let start with-

  1. Conditional Display & Hide of Icons
For this, what we need is-
  1. A Scenario
  2. A SharePoint List
  3. A PowerApps App
Let's Start-
  1. Scenario:- Sometimes, we have to build an app where-
    1. User can create only one record. IF record has been created by him/her, he/she should not be able to create further any record.
    2. User should be able to edit only it's own record.
    3. In real life, we can have this scenario where an organization/team has to maintain it's all employees/team members info and all employees should be able to access that information on the fly.
  2. SharePoint List:- I have created a list for this-
  3. PowerApps App:- Also created a PowerApps app with following screens-
      1. WelcomeScreen
      2. ListScreen
      3. NewScreen
      4. EditScreen
      5. ViewScreen
  4. Process:

    1. On ListScreen, the "+" icon works to add new record. We will add condition on it.
    2. We will change the "Visible" property as below-
    3. If(CountRows(Filter(galleryTeamList.AllItems, EmailID = User().Email))<1, true,false)
      

    4. We are verifying if there is any record in gallery with EmailID matching with that of current logged-in user where EmailID is the column of our list and storing the current user Email ID.
    5. This way user can only one record for itself.
    6. This completes first part of Scenario. Now coming to second scenario.
    7. For this, we will add an Edit icon in gallery.

    8. Let's add below code for the "Visible" property of this icon.
    9. If(User().Email = ThisItem.EmailID, true, false)

    10. I had added two records using different accounts. it is clearly shown in above screenshot, edit icon is visible for one record, while for other, it is hidden.
    11. Now the question may arise that while inserting first record, user can input wrong email id. We had a solution for this also. We had disabled the DataCard of EmailID and set it's Default property to- User().Email

    12.  This way user cannot be able to change his/her email id.
Happy Coding...
Will see you again with some new topics.

Bye... Bye... 2020
Wishing All Readers & Coders . . .        !!! A Very Happy New Year !!!

Monday, December 28, 2020

PowerApps: Multiple Screens Form

Hello Friends,

Welcome again with my new post on PowerApps. In real life development, sometimes we had a scenario when there is a list which is having huge number of fields (e.g. Application Form) and these cannot be fit on one screen. In such cases, we have to create an app which is having multiple screens. Let's see, how it can be achieved in PowerApps.


  1. First, we create a list (Name:- MultiScreenPowerAppList) with following fields-
    1. First Name
    2. Last Name
    3. Place of Birth
    4. IT Experience
    5. Form Status
  2. All columns are "Single line of text". "Form Status" is an optional column means we are just using this column to maintain the status of record so that we can apply filter to get only completed records.
  3. Now, edit the "Title" field and set "Required" as "No".

  4. The list will be finally appear as below-

  5. Now open the PowerApps Portal by Clicking Here or click on the link "https://create.powerapps.com/".
  6. It will ask to Login (Authenticate). Once you provide the valid credentials, it will take you to PowerApps home page.


  7. Now we will start from creating a "Blank App" using "Phone layout" as marked in above screenshot. it will show you a popup. Just click on "Skip" as we will do from scratch.

  8. A blank screen canvas will be created by PowerApps by default.

  9. Now we have to remove the Screen1. Before this, we have to add another screen.
  10. Click on "Home" >> "New Screen" >> "Scrollable". It will add a new screen "Screen2".

  11. Now delete the first screen "Screen1". For this, click on Ellipses (3 dots) displaying ahead to Screen1 then click on Delete. Now only "Screen2" will remain in system.

  12. Now rename the screen "Screen2". For this, click on Ellipses (3 dots) displaying ahead to Screen2 then click on Rename. Name it "WelcomeScreen". Now remove "Canvas1", "LblAppName1", "RectQuickActionBar1" with same process.
  13. Add image control by clicking on "Insert" >> "Media" >> "Image".

  14. Rename the image name to "imgWelcome". In properties section-
    1. Add any Welcome image
    2. Set Image position as Fill


  15. Image Used here is-

  16. AFTER-

  17. Add button
    1. Rename it "btnLogin"
    2. Text as "Login To Add Details >>"
    3. Change background color of button


  18. Now we have to update its "OnSelect" command . We can this step later on also. 
    1. Set(varFormMode,"new"); ResetForm(frmName); Navigate(NameScreen,ScreenTransition.None)
      
  19. It will show some error because we had used next screen and its form name. Well no problem, let's create them. 
  20. Add more Scrollable screens and rename them as below-
    1. NameScreen
    2. BirthPlaceScreen
    3. ITExperienceScreen
    4. SubmitScreen
  21. Remove the Canvas control from all these screens. Click on each of these screens one by one and then "Insert" >> "Forms" >> "Edit" to add Editable Form. Rename them respectively
    1. frmName
    2. frmBirthPlace
    3. frmITExperience
    4. frmSubmit
  22. Rename all labels starting with "LblAppName" as
    1. lblScreenTitleNameScreen
    2. lblScreenTitleBirthPlaceScreen
    3. lblScreenTitleITExperienceScreen
    4. lblScreenTitleSubmitScreen
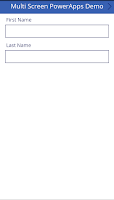
  23. Edit the Text content as "Multi Screen PowerApps Demo".
  24. Now connect the DataSource on each form-

  25. Click on "Data Source" >> "None" >> "Connectors" >> "SharePoint". Select the SharePoint connection / Add a connection as per the scenario. Now select the SharePoint Site from the available sites shown there. Once selected, it will populate the lists. Click on the list we had created in starting "MultiScreenPowerAppList".

  26. It will create input cards for each field. Now delete all input cards except as below on each form-
    1. frmName
      1. First Name
      2. Last Name
    2. frmBirthPlace
      1. Place of Birth
    3. frmITExperience
      1. IT Experience
    4. frmSubmit
      1. Delete all input field cards
  27. Basically, we are spreading out list on all these screens by putting one or two fields on each screen.
  28. Now we will add a navigation icon on below screens-
    1. frmName
    2. frmBirthPlace
    3. frmITExperience
  29. For this we click on "Insert" >> "Icons" >> "Right" icon.

  30. Adjust its Position & Size as shown in above screen and rename as-
    1. IconNameScreen
    2. IconBirthPlaceScreen
    3. IconITExperienceScreen
  31. With this, we had completed the design of below screens-
    1. WelcomeScreen
    2. NameScreen
    3. BirthPLaceScreen
    4. ITExperienceScreen
  32. The last screen "SubmitScreen" will be designed later on. Before that we will add the functionality of icons and buttons.
  33. Click on "WelcomeScreen" >> "btnLogin". Select the "OnSelect" command from left dropdown and set it's formula as 
    1. Set(varFormMode,"new"); ResetForm(frmName); Navigate(NameScreen,ScreenTransition.None)
      
  34. 😉 This time it will not give any error as we had created all screens and forms.

  35. Now click on "NameScreen" >> "frmName". Select the "DefaultMode" command from left dropdown and set it's formula as-
    1. If(varFormMode="edit",FormMode.Edit,varFormMode="view",FormMode.View,FormMode.New)
      
  36. Select "Item" command and set it's formula as-
    1. varRecord
  37. Select "OnSuccess" command and set it's formula as-
    1. Set(varRecord,frmName.LastSubmit); Navigate(BirthPlaceScreen,ScreenTransition.None);
      
  38. Now click on "IconNameScreen" icon and select "OnSelect" command from left dropdown. Set it's formula as-
    1. If(varFormMode="view",Navigate(BirthPlaceScreen,ScreenTransition.None),SubmitForm(frmName))


  39. Similar activity will be performed for BirthPlaceScreen and ITExperienceScreen. Find below the code-
  40. BirthPlaceScreen-
    1. frmBirthPlace
      1. DefaultMode >> If(varFormMode="view",FormMode.View,FormMode.Edit)
      2. Item >> LookUp(MultiScreenPowerAppList,ID=varRecord.ID)
      3. OnSuccess >> Navigate(ITExperienceScreen,ScreenTransition.None)
    2. IconNextBirthPlaceScreen
      1. OnSelect >> If(varFormMode="view",Navigate(ITExperienceScreen,ScreenTransition.None),SubmitForm(frmBirthPlace))
  41. ITExperienceScreen-
    1. frmITExperience
      1. DefaultMode >> If(varFormMode="view",FormMode.View,FormMode.Edit)
      2. Item >> LookUp(MultiScreenPowerAppList,ID=varRecord.ID)
      3. OnSuccess >> Navigate(SubmitScreen,ScreenTransition.None)
    2. IconITExperienceScreen
      1. OnSelect >> If(varFormMode="view",Navigate(SubmitScreen,ScreenTransition.None),SubmitForm(frmITExperience))
  42. Now the last screen "SubmitScreen". Add a button on it rename it "btnSubmit" and Text as "Submit".

  43. Update the formula for it's "OnSelect" command as
    1. Set(varSubmitMode,"submit");SubmitForm(frmSubmit)
      
  44. Now update the below command of frmSubmit-
    1. DefaultMode >> If(varFormMode="view",FormMode.View,FormMode.Edit)
    2. Item >> LookUp(MultiScreenPowerAppList,ID=varRecord.ID)
    3. OnSuccess >> 
    4. If(
           varSubmitMode = "submit",
      
      Patch(
               MultiScreenPowerAppList,
               frmSubmit.LastSubmit,
               {'Form Status': "Submitted",Title:Concatenate(varRecord.'Last Name', ", ", varRecord.'First Name')}
           ));
      Notify("Record Updated Successfully");
      Navigate(WelcomeScreen,ScreenTransition.None)
      
  45. Save the App and Publish it.
  46. Now open the app in PowerApps / Run from Preview option (arrow mark at top right side). I am providing here screen shot of mobile PowerApps app.


Lastly, we will check our SharePoint list, whether the record is inserted or not.
Actually, how this app function is, When you fill the First & Last name and navigate to next form, it creates a record in SharePoint List with "Form Status" field value as "Draft". Now when you fill in Birth Place and navigate, it update the same record. Now filling the IT Experience and navigating, it again update the record. When you click on Submit button, it finally update the record with "Form Status" as "Submitted" and update the Title filed as "<Last Name>, <First Name>".


This way, we can create Multi Screen PowerApps for a single list which is having huge number of fields.

Happy Coding...
Will see you again with some new topics.

References:-
  1. PowerApps : Form Across Multiple Screens
😊 Enjoy The Auto Play Mode 😊


Thursday, December 24, 2020

PowerApps: Cascading Dropdown

Hello Friends,

Welcome again with my new post on PowerApps. In real life development, most of the times we had a scenario when we have to get data from different SharePoint lists depending upon each other. In other words, we need to implement Cascading. Let's see how can we achieve Cascading in PowerApps.

First discuss the scenario- Suppose we have to create an Employee Form. It can have several information. We will focus on only 3 fields-

  1. Employee Name
  2. Country
  3. State 
Employee Name is a Single line of Text column while Country and State are Choice column. So the requirement is that upon change of Country, the State dropdown should get refreshed by binding the states belonging to the country selected. So, we need to cascade here. Let's see, how can we achieve this. 

  1. First create a SharePoint list name "Country". It will be having "Title" column by default. We will use it to store country names-

  2. Now add some records to it-

  3. Now create another list named "State". The default column "Title" will be used to store state names. Add another column named "Country" which will be a lookup column to link data from list "Country" with column "Title"-


  4. Add some records-

  5. Now create a list "Employees". The default Title column will be used to capture employee names. Add two other columns-
    1. Country >> LookUp >> Country (list) >> Title (country list column)
    2. State >>>> LookUp >> State (list) >> Title (state list column)


  6.  
  7. Now open the PowerApp Portal by Clicking Here or click on the link "https://create.powerapps.com/".
  8. It will ask to Login (Authenticate). Once you provide the valid credentials, it will take you to Power Apps home page.


  9. Now we will start from creating a "Blank App" using "Phone layout" as marked in above screenshot. it will show you a popup. Just click on "Skip" as we will do from scratch.

     
  10. A blank screen canvas will be created by PowerApps by default.

  11. Click on "Home" >> "New Screen" >> "Form". It will a new screen "Screen2".

     
  12. Now delete the first screen "Screen1". For this, click on Ellipses (3 dots) displaying ahead to Screen1 then click on Delete. Now only "Screen2" will remain in system. 

  13. Click on "connect to data" displayed on form screen-

  14. Clicking on "connect to data" shows a list of Entities & Connectors. Click on Connectors and select "SharePoint"-

  15. Clicking on SharePoint shows a list of already established connections (if any) and a link to add a new connection "Add a connection".

  16. If there is no established connection then click on "Add a connection". It will ask you to choose How to connect-

  17. Click on connect.
  18. With this, it will be connected to the SharePoint account and will ask you to choose the SharePoint Portal where you had created your SharePoint lists. In case, if there was already a connection in Step 13, then you will land on this screen (means Step 14 & 15 are to establish a connection and finally land to same screen)-

  19. You will find all SharePoint portal you have access with the account you logged in. Choose the portal where you had created lists (Country, State, Employees). By clicking on the portal link, it will populate the lists available. Click on Employees list and click on Connect button provided at bottom.

  20. It will look like-

  21. Well, now we will place some controls on screen-
    1. Text label
      1. Rename Label1 >> lblEmployeeName
      2. Properties >> Text >> Employee Name
    2. Text input
      1. Rename TextInput1 >> txtEmployeeName
      2. Properties >> Default >> Employee Name
    3. Text label
      1. Rename Label2 >> lblCountry
      2. Properties >> Text >> Country
    4. Drop down
      1. Rename Dropdown1 >> ddCountry
      2. Items >> Connectors >> SharePoint >> Select Connection >> Select SharePoint Site >> Select Country list
      3. Value >> Title


    5. Text label
      1. Rename Label3 >> lblState
      2. Properties >> Text >> State
    6. Drop down
      1. Rename Dropdown2 >> ddState
      2. Items >> Connectors >> SharePoint >> Select Connection >> Select SharePoint Site >> Select State list
      3. Value >> Title

  22. Apply cascading for State dropdown. For this click on "ddState" dropdown then change the function for "Items" from "State_1" to "Filter(State_1, Country.Value = ddCountry.SelectedText.Value)"


  23. Finally add a Button to the data to list-
    1. Button
      1. Rename Button1 >> btnSubmit
      2. Properties >> Text >> Add Employee 
  24. Now update the OnSelect command to post data to the list. Change the function from "false" to below code- 
  25. Patch(
        Employees,
        Defaults(Employees),
        {
    Title: txtEmployeeName.Text,  
            Country:
        {
            '@odata.type': "#Microsoft.Azure.Connectors.SharePoint.SPListExpandedUser",  
                Id: ddCountry.Selected.ID,  
                Value: ddCountry.Selected.Title
            },  
            State:
        {
            '@odata.type': "#Microsoft.Azure.Connectors.SharePoint.SPListExpandedUser",  
                Id: ddState.Selected.ID,  
                Value: ddState.Selected.Title
            }
    }  
    );
    Notify("Employee Added Successfully!!!");
    
  26. BEFORE-

  27. AFTER-

  28. All Done!
  29. Now it's time to test the functionality. Click on Preview button located at top right side (triangle with right side arrow). If everything goes fine. It will populate Country and State data from SharePoint list.

  30. Yess!, It's working. Country and State data has been loaded. Now play with Country & State dropdown. By changing the Country dropdown, related States getting populated. Let me freeze data as:-
    1. Employee Name - Sachin Jain
    2. Country - India
    3. State - Delhi
  31. Click on "Add Employee" button.


  32. Wow! Record saved successfully. You may close the preview screen by clicking on "X" sign placed at top right corner.
  33. It will take you back to design screen.
  34. Hey! but did you check the SharePoint List "Employees" ? Let's check if the record is actually inserted in list or not?

  35. Wow, it's there. The record, we had inserted, is reflecting here.
This way, we can implement Cascading in dropdowns.

Further references:-

See you again with some new topics.