SPServices is a jQuery library which abstracts SharePoint’s Web Services and makes them easier to use. It also includes functions which use the various Web Service operations to provide more useful capabilities. It works entirely client side and requires no server install.
SPServices can be used with SharePoint 2007, 2010, and 2013, whether on premises or hosted with Office365 or others. SPServices is primarily hosted on Codeplex, with this repository mirroring most of the downloads there. With Codeplex shutting down, any new activity will happen on the NEW Github-backed site. Check out the newer location (http://sympmarc.github.io/SPServices/) for SPServices information on Github pages.
We can perform Create, Read, Update, Delete operations easily using SPServices. Let us go through one by one.
In my earlier post, we have discussed about Update Operation. Now, we will discuss about Delete operation.
Basic Preparations
List Creation
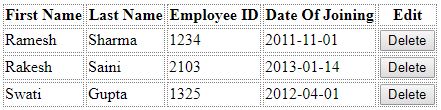
We have created a custom list name "EmployeeMaster" in Sharepoint having Columns "Title", "First Name", "Last Name", "Employee ID", "Date of Joining".

Now on page we have added references of jquery and spservices files.
<script type="text/javascript" src="../Scripts/jquery.min.js"></script>
<script type="text/javascript" src="../Scripts/jquery.SPServices-2014.02.min.js"></script>
Next, we have added some CSS.
<style type="text/css">
 table thead th,
 table tbody tr td
 {
  border:thin gray dotted;
 }
</style>
For this, first we create a page having a table showing existing records and a button to delete the record.

For this we have added html as below-
<div id="dvResult">
 <table id="tblResult">
 </table>
</div>
Now we have added 2 functions-
1. GetRecords - To get and display all the records of list
3. DeleteRecord - To delete the record
3. DeleteRecord - To delete the record
<script type="text/javascript">
 $(document).ready(function()
 {
  GetRecords();
 });

 function GetRecords()
 {
  $().SPServices(
  {
   operation: "GetListItems",
   webURL: $(this).attr('location').origin,
   async: false,
   listName: "EmployeeMaster",
   completefunc: function (xData, Status)
   {
    if(Status == 'success')
    {
     var vrTableHTML = '';

     vrTableHTML += '<thead>' +
          '<th>' + 'First Name' + '</th>' +
          '<th>' + 'Last Name' + '</th>' +
          '<th>' + 'Employee ID' + '</th>' +
          '<th>' + 'Date Of Joining' + '</th>' +
          '<th>' + 'Edit' + '</th>' +
         '</thead>';

     vrTableHTML += '<tbody>';
     $(xData.responseXML).SPFilterNode("z:row").each(function()
     {debugger;
      vrTableHTML += '<tr>' +
           '<td>' + $(this).attr("ows_First_x0020_Name") + '</td>' +
           '<td>' + $(this).attr("ows_Last_x0020_Name") + '</td>' +
           '<td>' + $(this).attr("ows_Employee_x0020_ID") + '</td>' +
           '<td>' + ($(this).attr("ows_Date_x0020_Of_x0020_Joining")).split(' ')[0] + '</td>' +
           '<td>' + '<input type="button" id="btnEdit" title="Delete" value="Delete" onclick="DeleteRecord(' + $(this).attr("ows_ID") + ');">' + '</td>' +
          '</tr>';
     });
     vrTableHTML += '</tbody>';
     $('#tblResult').html(vrTableHTML);
    }
    else
    {
    }
   }
  });
 }


 function DeleteRecord(vrID)
 {

  $().SPServices(
  {
   operation: "UpdateListItems",
   webURL: $(this).attr('location').origin,
   async: false,
   batchCmd: "Delete",
   listName: "EmployeeMaster",
   ID: vrID,
   valuepairs: [],

   completefunc: function (xData, Status)
   {
    if(Status == "success")
    {
     alert("Record Deleted Successfully");
     GetRecords();
    }
    else
    {
     alert("Error");
    }
   }
  });
 }
</script>
Let's start the process. Load the page.
Now click on Delete button ahead of the record you wish to delete. It will delete the record.Now click on OK. It will reload the list.Here we can see that the record has been deleted.